Using Webinars/Live Trainings in a Course
If you offer live webinars as part of your Self Paced course content, our Webinar Modules are a streamlined way to allow students to launch the webinar from inside your course! To make these webinars available, you'll need to create a webinar module, then add it to a course.
To facilitate the webinars, we integrate with several third-party services: Zoom, Vimeo Live Streaming, GoTo Webinar, GoToTraining, and Microsoft Teams. These webinar modules allow you to connect with your students at a scheduled meeting time, and are a powerful way of not only teaching students about a subject, but making them feel connected to the instructor and their peers.
Now, let's go through how to choose a webinar service provider, and then how create a webinar module depending on the provider. Depending on what provider you choose, you'll need to set up an integration as well. We'll also go over how to launch the webinar, and student experience of a webinar is for each service provider!
Note that if your content is entirely webinar based, you can consider setting up an Instructor Led course, which is built out of classes. Each class has a date, time and location (which can be virtual) for the students to meet with the instructor for teaching. If this sounds like a good fit, please see this guide for more details.
In this article
- Webinar Service Provider Options
- Creating & Managing a Webinar Module Using Zoom
- Creating & Managing a Webinar Module Using Vimeo Live Streaming
- Creating & Managing a Webinar Module Using Microsoft Teams
- Creating & Managing a Webinar Module Using GoToWebinar
- Creating & Managing a Webinar Module Using GoToTraining
- Adding a Webinar Module to a Course
Webinar Service Provider Options
Before creating a Webinar Module, you must first create an account with one of our service providers and download any necessary software to their computer. If you will be using Zoom, Microsoft Teams, GoToWebinar or GoToTraining, you'll also need ensure that you're set up with the necessary integration.
We offer the ability to use several different service providers inside your Webinar Module. Let's learn about each of the webinar service providers:
- Zoom: Zoom offers free or paid services, and allows you to create live and on-demand virtual events. Find out more about Zoom here.
- Vimeo Live Streaming: Vimeo is a paid live streaming platform that will allow Students to view an Instructor's presentation, but not interact with the Instructor in any way. Find out more about Vimeo Live Streaming here.
- Microsoft Teams: Microsoft Teams webinars provide the tools to schedule your webinar and run an interactive presentation. Learn more here.
- GoToWebinar: This is a is a paid service, with many options for interacting with Students. Find out more about GoToWebinar here.
- GoToTraining: This is is a paid service used to engage learners. Learn more about GoToTraining here.
Note:
As mentioned above, if you choose to use Zoom, Microsoft Teams, GoToWebinar or GoToTraining for your Webinar Modules, you must first have it set up correctly in your account's Integrations. This article will walk you through how to set up the integrations, and then you may proceed with creating your Webinar Module as laid out below.
Creating & Managing a Webinar Module Using Zoom
Once your Zoom account is integrated, you can use it to schedule webinars in your courses by creating webinar modules. You can create a Webinar from the Curriculum within a Course or from the Webinar Modules page from you Dashboard Menu.
Step 1: Creating a Webinar Module
- On your Dashboard Sidebar menu, to the Courses -> Webinars and select Create Webinar Module.
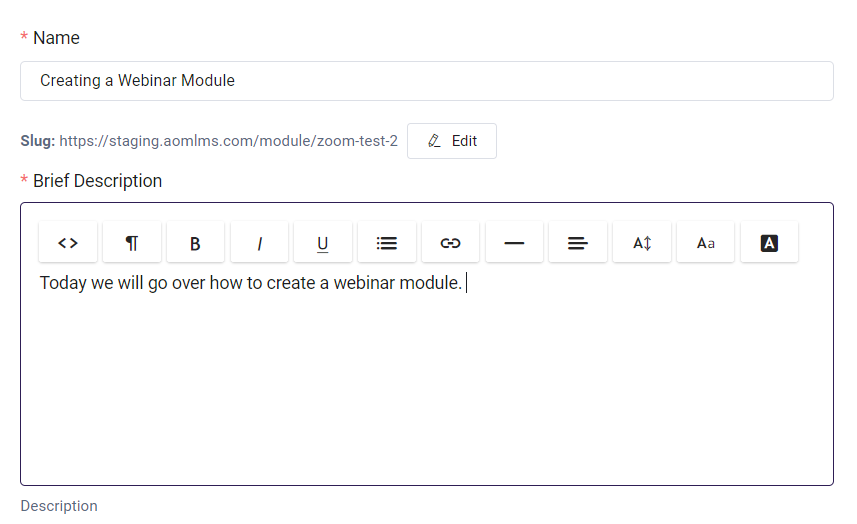
- Enter a Name and a Brief Description.
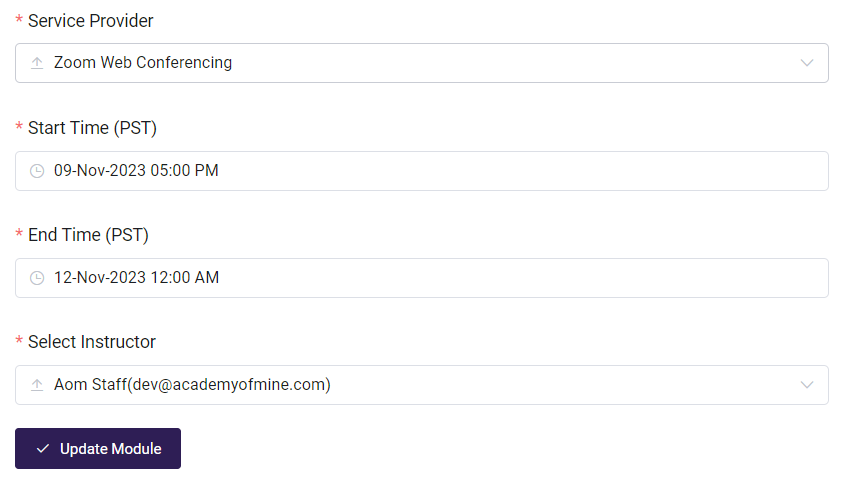
- Select Zoom Web Conferencing, and enter a Start Time, End Time, and select an Instructor
- Click on the Save Module button.
- If you created the Webinar from the Webinar Modules page, you can now add it to a Course. If you are within the Curriculum of a Course, make sure to click Update Course to save your progress. Check out the Creating and Updating a Course article for more details on how to add modules to a course.
Launching a Zoom Webinar as an Instructor
Instructors must set up their own Webinar integrations to Launch Webinars from within the platform. Read about setting up a Zoom Integration here.
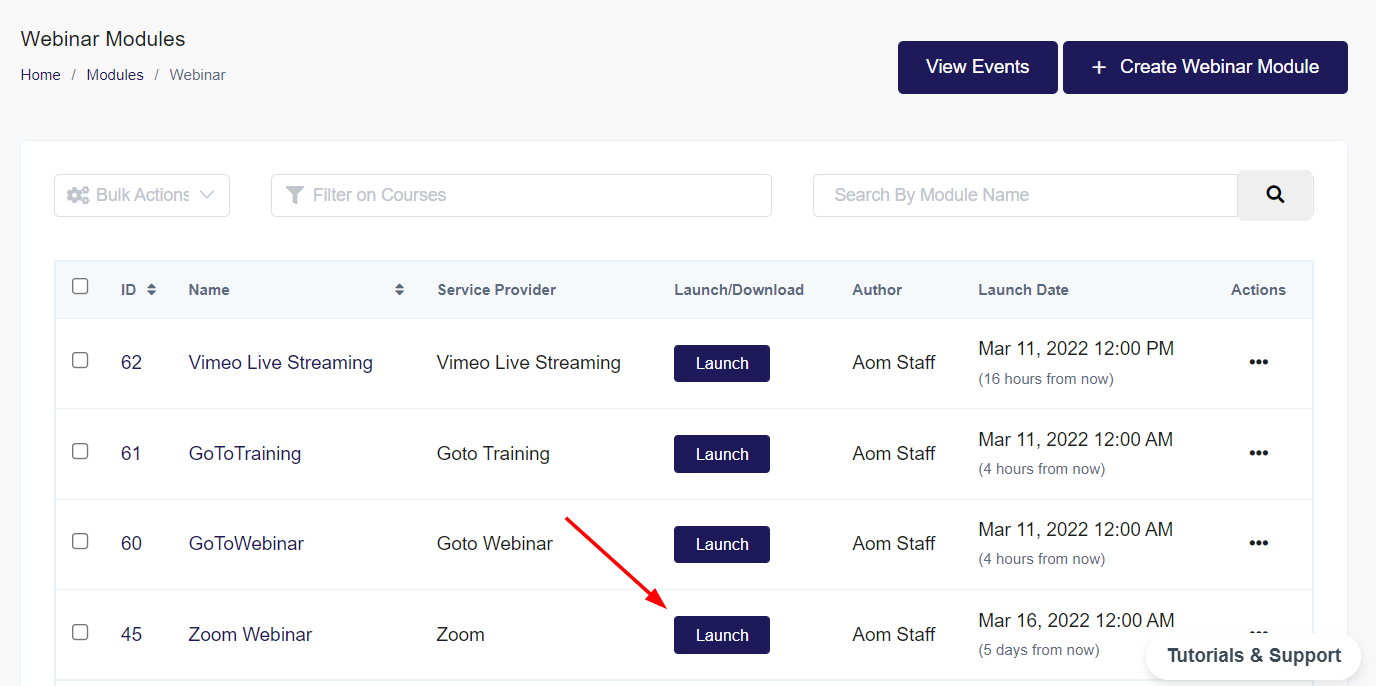
- Go to the Webinar Module listing page in the Admin Dashboard (in the sidebar Course -> Webinars) and click on the Launch button for the Webinar you wish to launch. You will automatically be brought to the session within your browser.
- Inside the Zoom Meeting, the Instructor acting as the Zoom Host will be able to view the active student participants, control audio and video sharing, and chat. Instructors will also be able to share their screens with students.
- When finished, the Instructor can end the Meeting for all participants.
Student Experience of a Zoom Meeting in a Webinar Module
Now let's learn about the student experience!
- Inside the webinar module, the details of the webinar will be displayed, with a Launch Webinar button that will open the Zoom meeting directly in the student's browser.

- Near the Launch Webinar button, the student will be notified of the status of the meeting. They'll be shown if the webinar is In Progress, Upcoming, or Past. When the student clicks to launch the webinar they will be prompted to join the webinar:
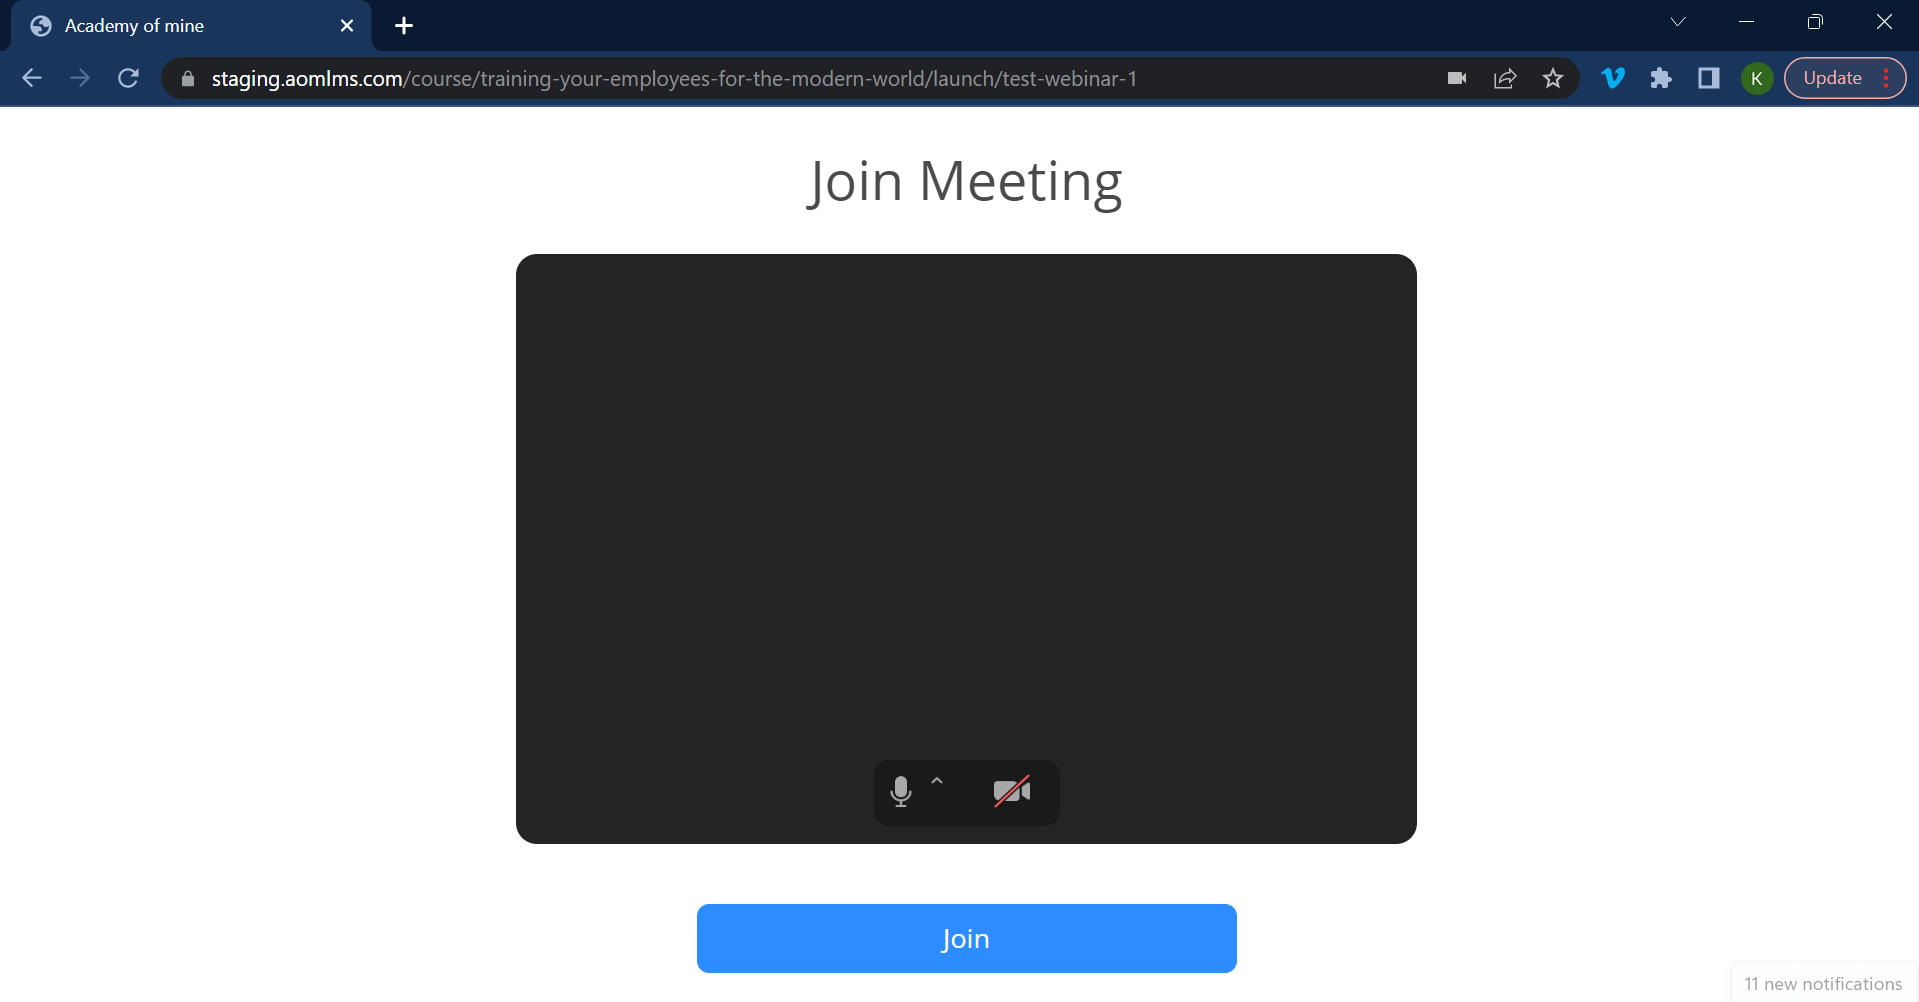
- The student will click to join, and the Zoom Meeting will launch inside the same browser tab as the Webinar Module. If requested by the Instructor's Meeting settings, the Student will wait to be admitted by the Instructor. Students will have the option to control audio and video sharing, as well as chat. Screen Sharing will be turned off by default. The student's name in the meeting will be the name they have given for their course.
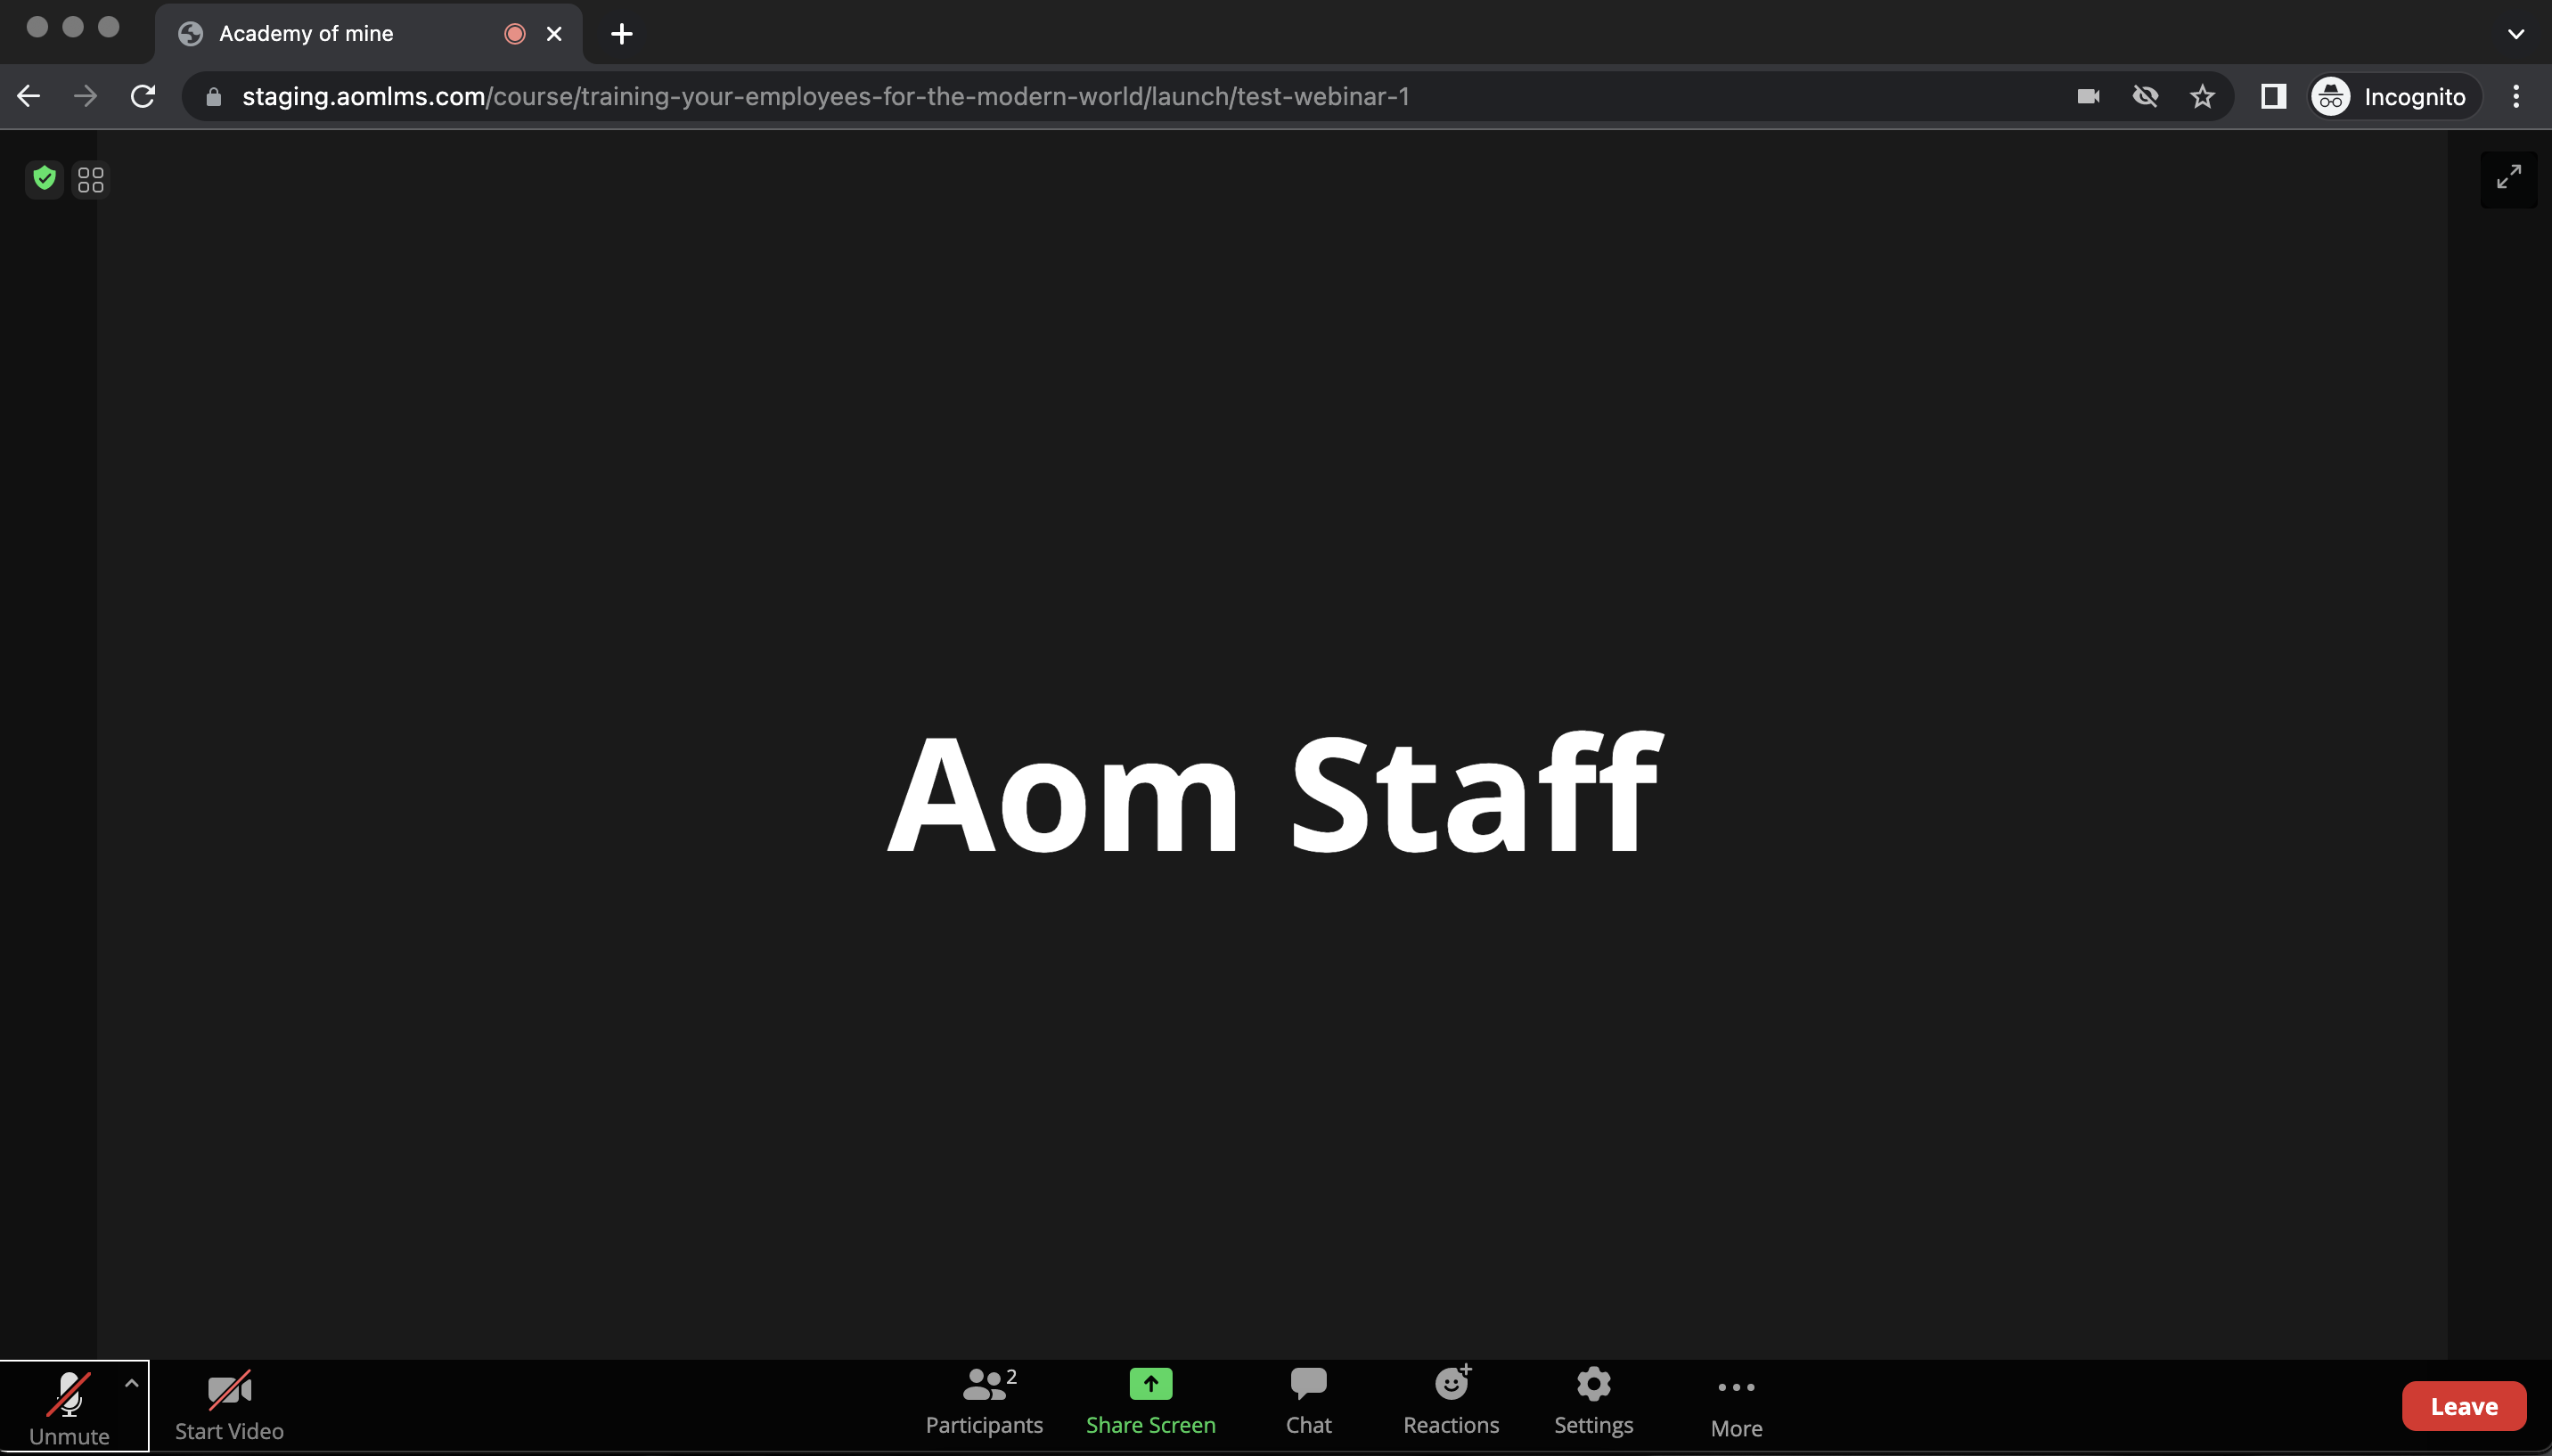
- When a student leaves the meeting, they will be returned to the main course page. When the student leaves the webinar, their webinar module is changed to 100% completed if you don't have a minimum time spent set up for that module.
Instructor Experience of a Zoom Meeting in a Webinar Module
Let's go through how the instructor can manage the Webinar and what it looks like for them.
- The Instructor will launch the scheduled Meeting directly from their calendar from their Dashboard, by clicking on the event directly:
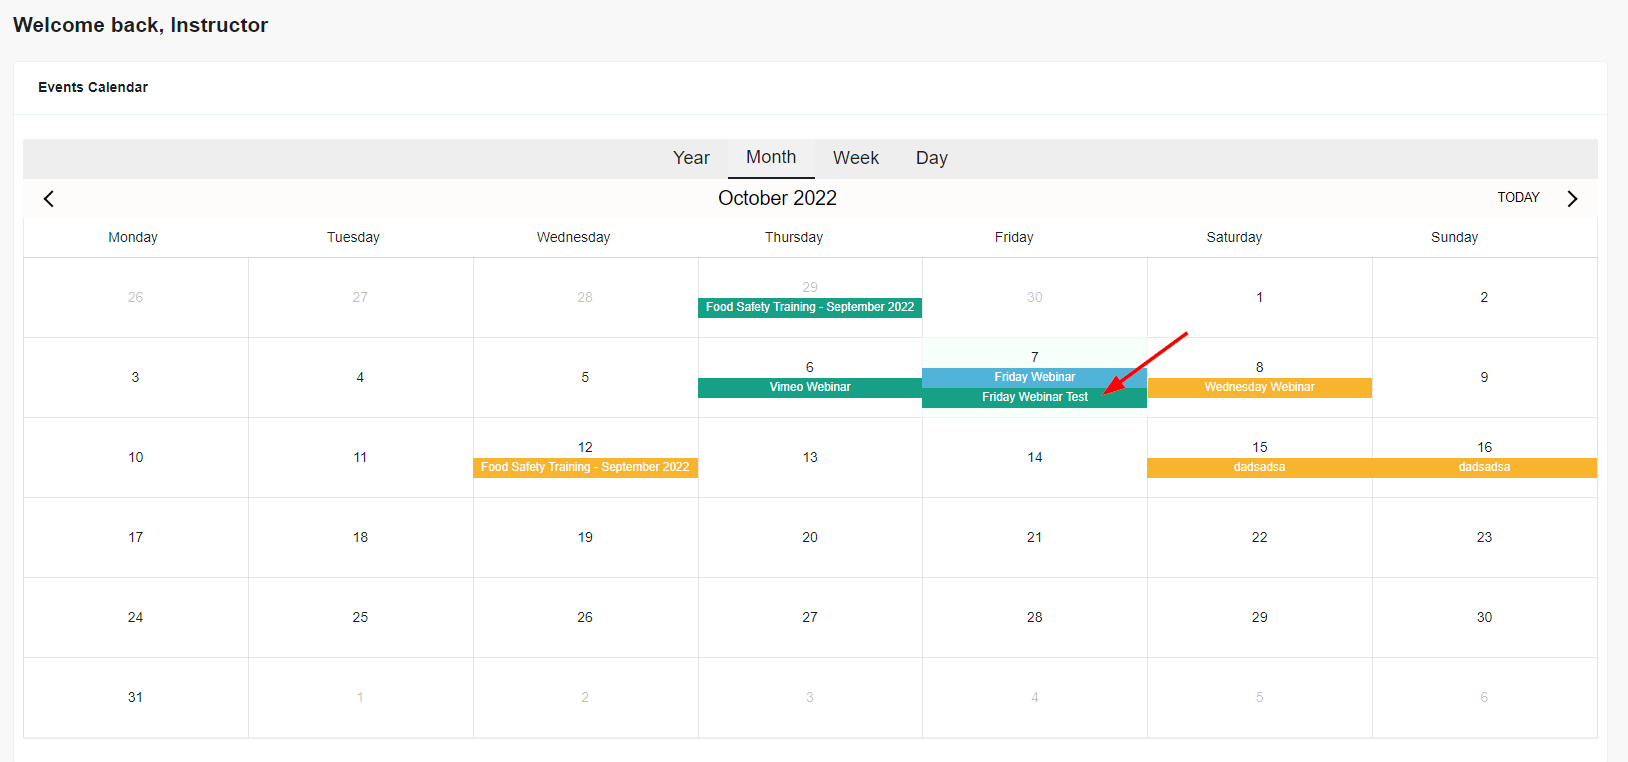
Which will open this option where you can launch the event:

Then they will be able join the meeting directly within their browser.
- Inside the Zoom Meeting, the Instructor acting as the Zoom Host will be able to view the active Student participants, control audio and video sharing, and chat.
- Instructors will also be able to share their screens with Students.
- When finished, the Instructor can end the Meeting for all participants.
Video Walkthrough of Integrating with Zoom
If you're more of a visual person, check out this video about integrating with Zoom for webinars.
Creating & Managing a Webinar Module Using Vimeo Live Streaming
There's no integration required to add a Vimeo Meeting URL to your webinar module, though you will need to get the Meeting URL from the Vimeo Meeting to be included in the Module.
Creating the Vimeo Webinar Module
- Once you have the Vimeo Meeting URL, head back into Academy of Mine
- To create your module, head to the Courses > Webinars section of your Dashboard, and select Create Webinar Module.
- Give your webinar module a Name and a Brief Description that will be seen by your Students. Feel free to customize the text of your Brief Description, and even add HTML elements like images or videos.
- Select the Service Provider as Vimeo Live Streaming
- Enter the Vimeo Meeting URL, as well as the Start and End time of the webinar, and select an Instructor
- Click Save Module
- Then, we want to make sure the Webinar is made available in a course. Jump to this section below for the steps. You can also check out the Creating and Updating a Course article for more details on how to add modules to a course. Once added to your course, you can set the availability of the module and the minimum time spent inside. A Fixed Date availability will restrict your students from accessing the module until a set day. You can also set the minimum time spent in the module to have it marked as completed.
Launching a Vimeo Live Streaming Webinar as an Admin
- The Vimeo Live Steaming webinar session should be launched directly from your Vimeo account. For more details check this link.
- To end a stream, click End on the top right corner of the Live Preview or Broadcaster page on Vimeo.
Student Experience of a Vimeo Live Stream in a Webinar Module
Now let's learn about the student experience!
- Inside the webinar module, the details of the webinar will be displayed, with a Launch Webinar button that will open the meeting directly in the Student's browser.
- Near the Launch Webinar button, the student will be notified of the status of the meeting. They'll be shown if the webinar is In Progress, Upcoming, or Past.

- The meeting will launch inside the same browser as the webinar module.
- When a student leaves the meeting, they will be returned to the main course page. When the student leaves the webinar, their webinar module is changed to 100% completed if you don't have a minimum time set up for the module.
Creating & Managing a Webinar Module Using Microsoft Teams
Once your Microsoft Teams account is integrated, you can use it to schedule webinars in your courses by creating webinar modules. You will create the meeting time right within the module.
If you're a visual learner, check out this video:
Creating a MS Team Webinar Module
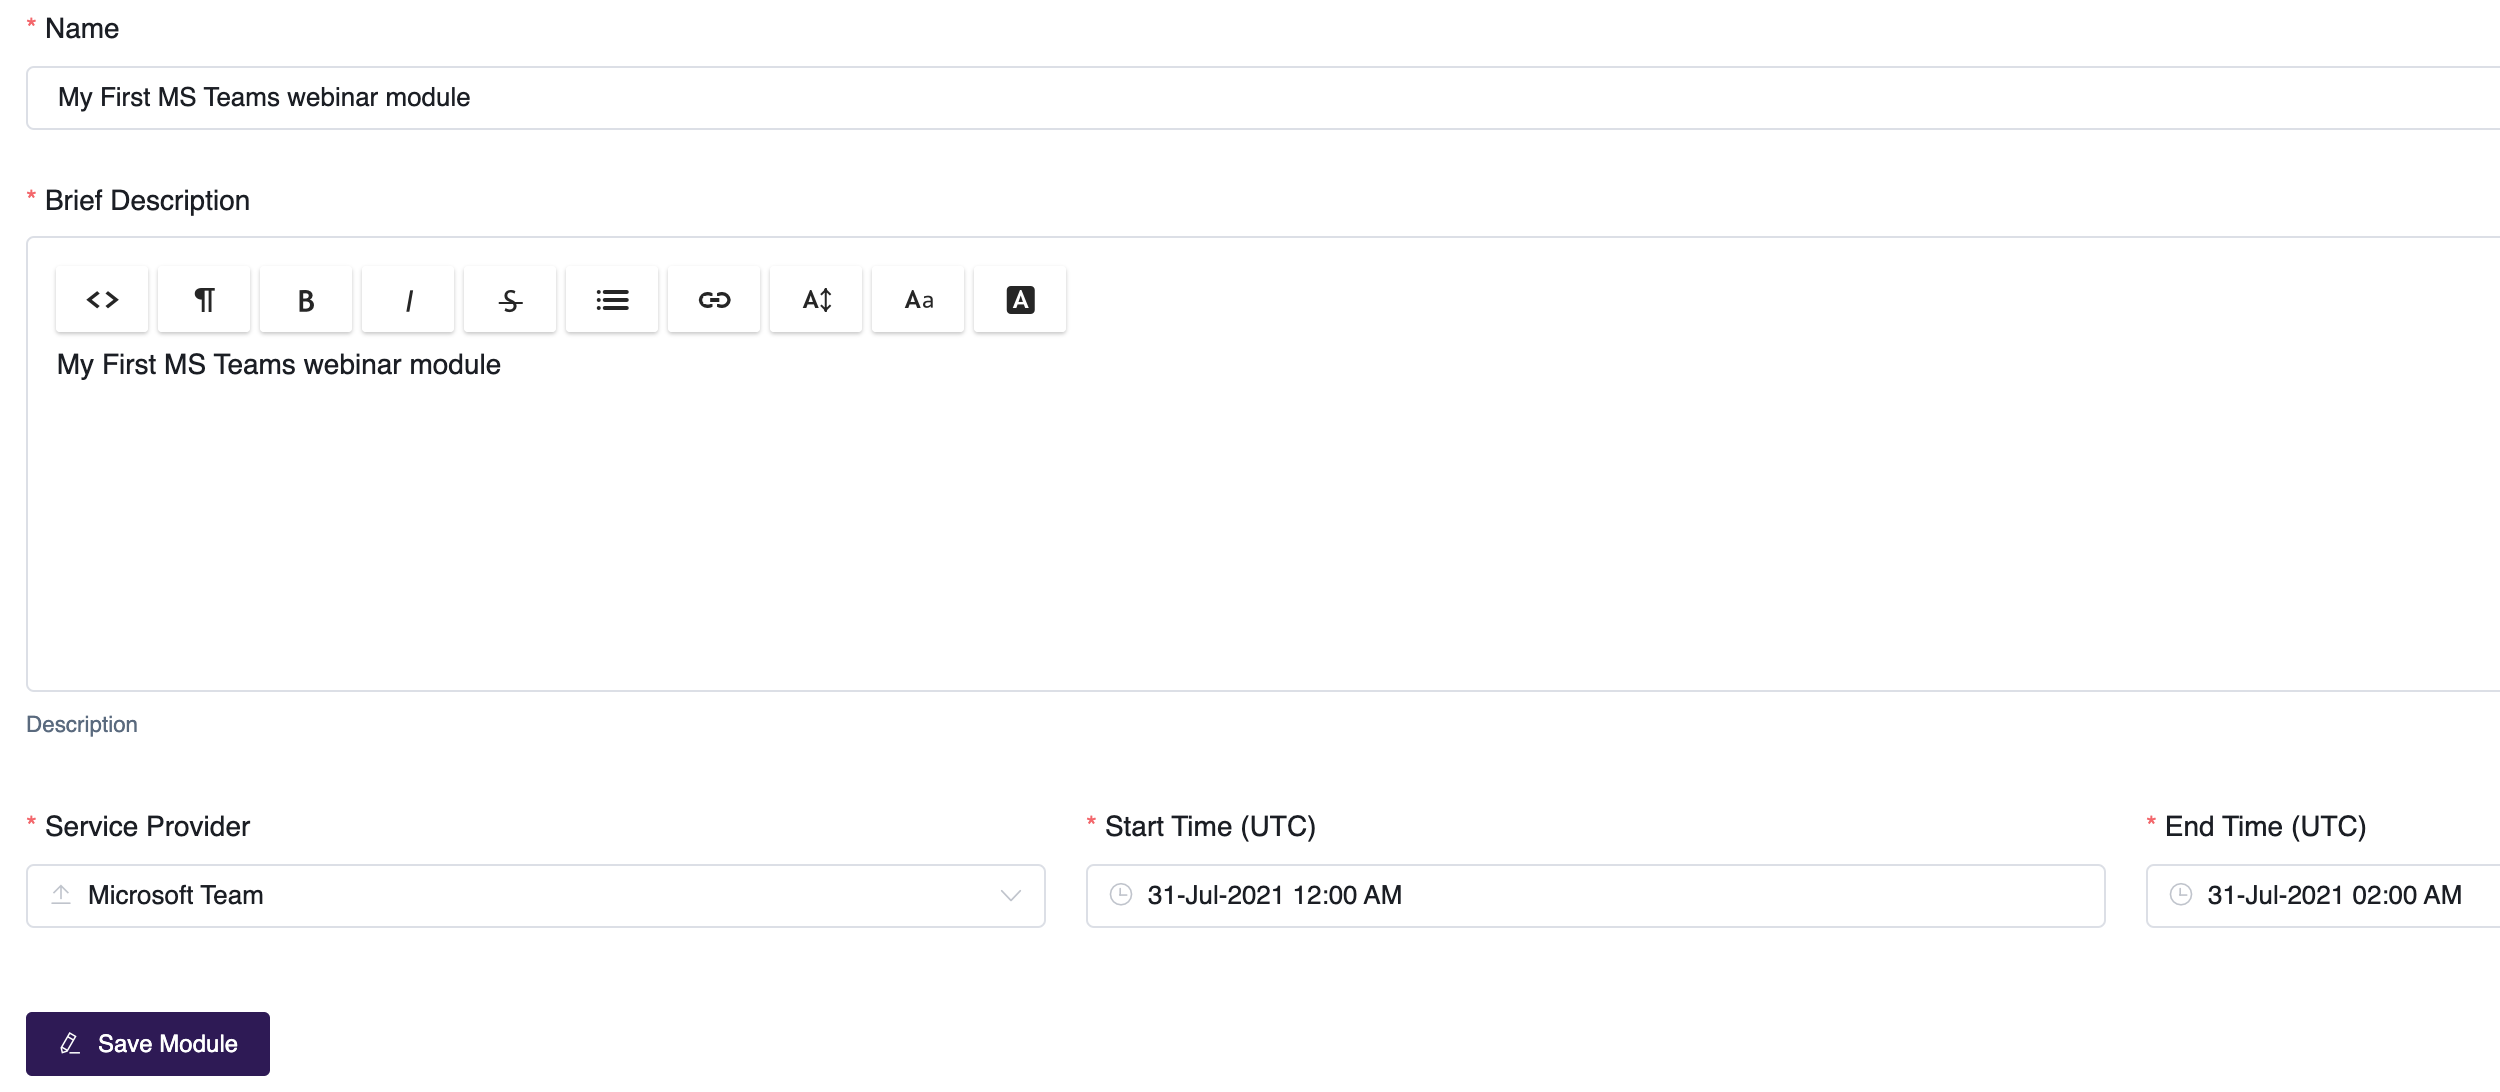
- To create your module, head to the Courses > Webinars section of your Dashboard, and select Create Webinar Module
- Give your webinar module a name and a brief description that will be seen by your students when looking at the module in the course player. The brief description field is customizable and can include HTML elements like images or videos.
- Now, you need to connect and schedule your webinar. Select the Service Provider as Microsoft Teams and set a start and end date-time for your webinar. Note that start and end time are indicators for the students as to when they should join but themselves do not determine when you can choose to launch the webinar as an Admin. Click on Save Module to create the webinar module and make it available to add to a course.
- Then, we want to make sure the Webinar is made available in a course. Jump to this section below for the steps. You can also check out the Creating and Updating a Course article for more details on how to add modules to a course. Once added to your course, you can set the availability of the module and the minimum time spent inside. A Fixed Date availability will restrict your students from accessing the module until a set day. You can also set the minimum time spent in the module to have it marked as completed.
Launching a MS Teams Webinar as an Admin
- Go to the webinar module listing page in the Admin Dashboard (in the sidebar Course -> Webinars) and click on the Launch button for the Webinar you wish to launch. You will automatically be brought to the session.

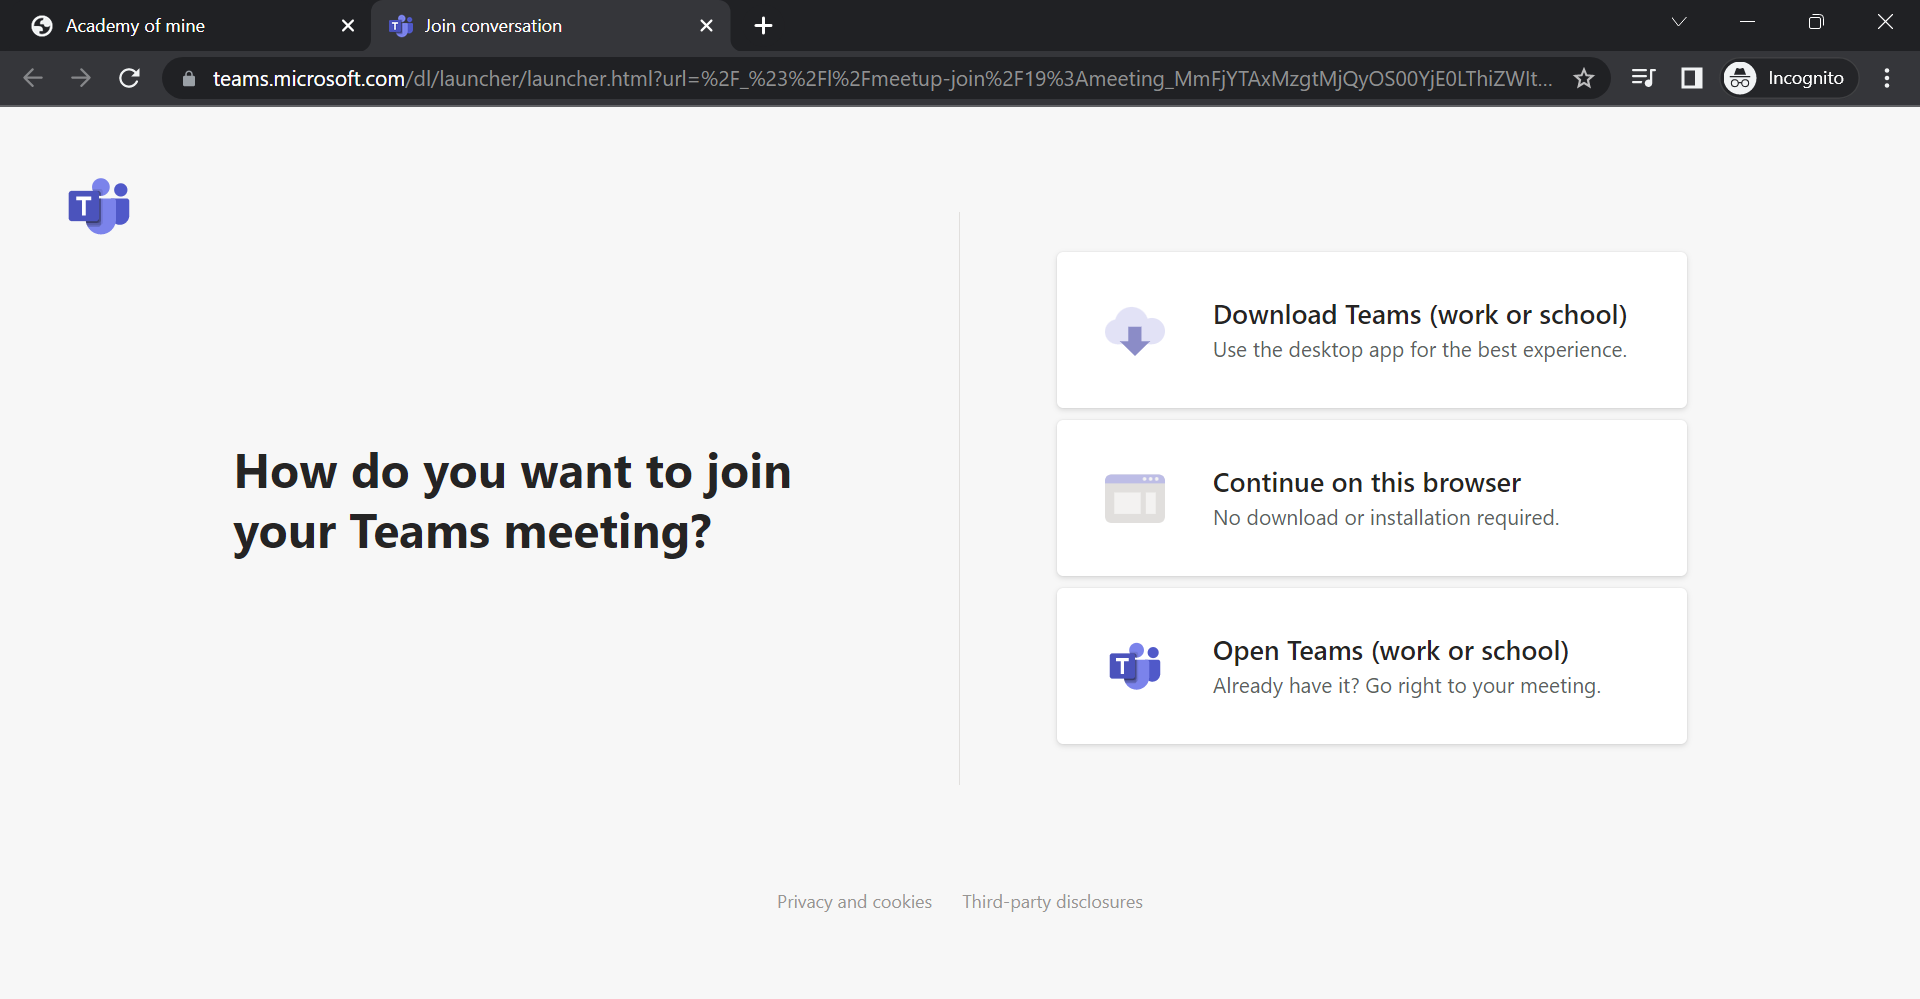
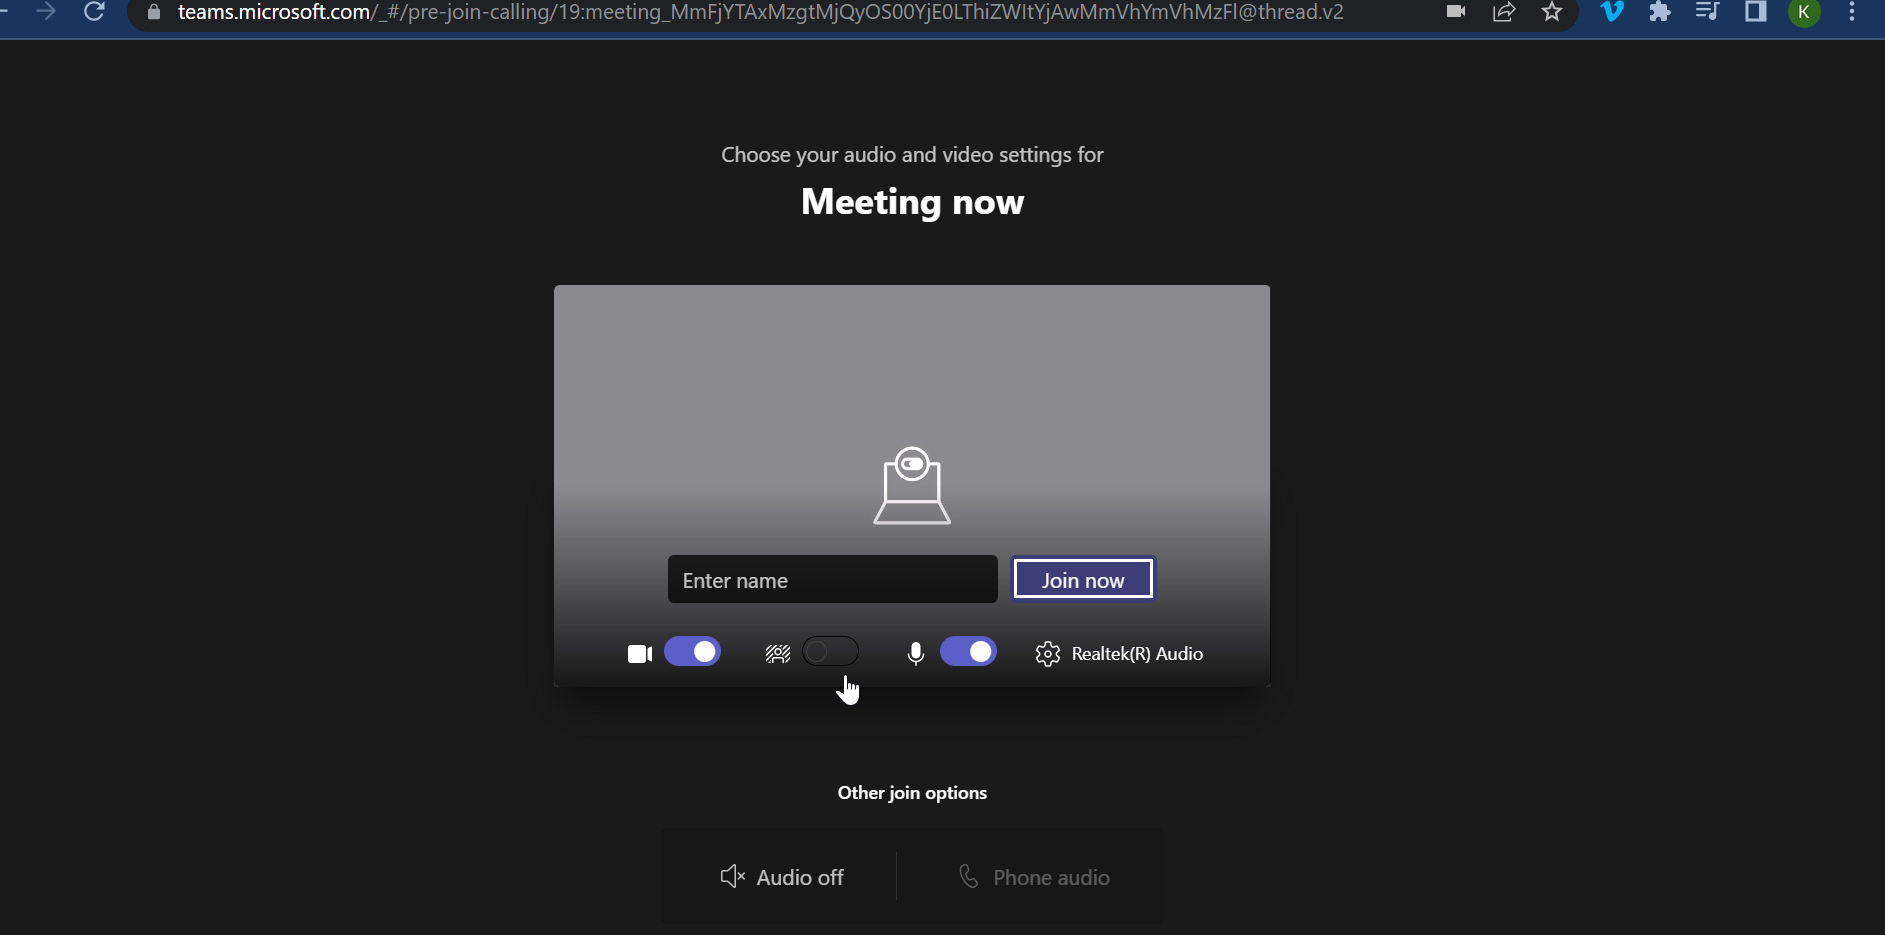
The admin will be able to choose how they want to run the meeting--if they want to continue from the browser, or open in MS Teams:
Student Experience of a MS Teams Meeting in a Webinar Module
Now let's learn about the student experience!
- Inside the webinar module, the details of the webinar will be displayed, with a Launch Webinar button that will open the meeting directly in the student's browser.
- Near the Launch Webinar button, the student will be notified of the status of the meeting. They will be alerted that they can launch the webinar, or that the start time is past.
- When the student clicks Launch, they will have the option of how they want to view the meeting--if they click to continue on the browser and the meeting will launch inside the same browser tab as the webinar module.
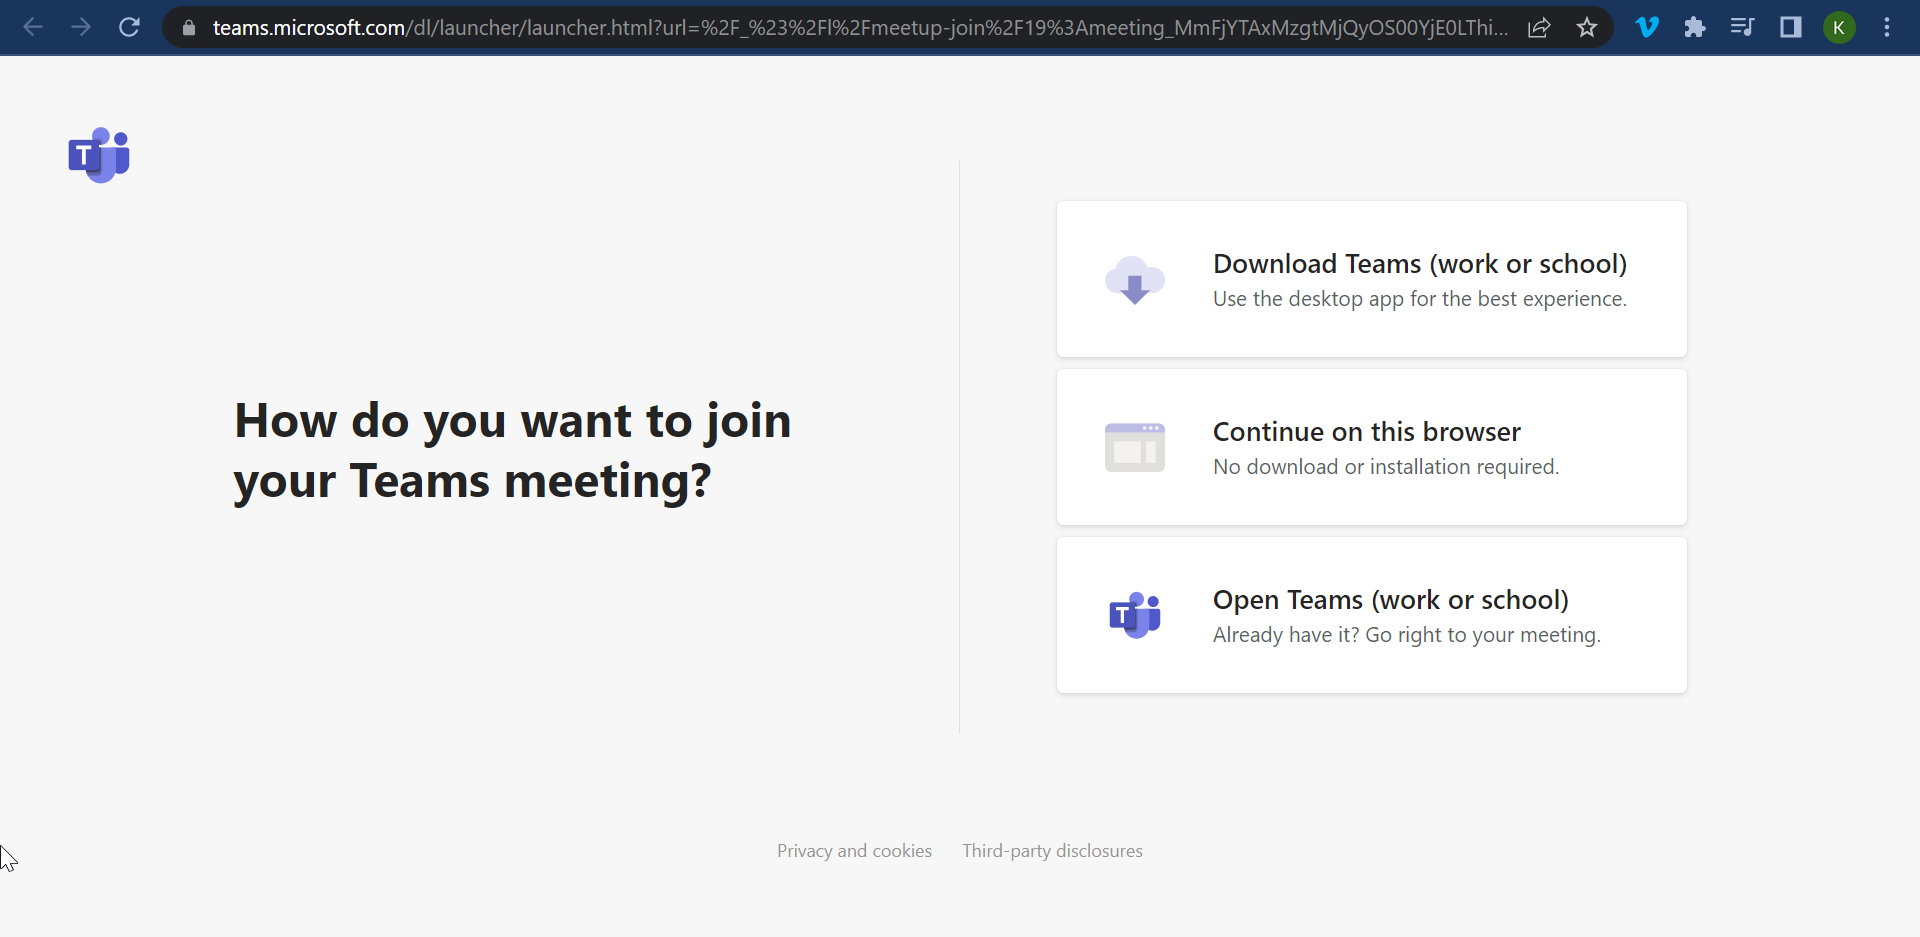
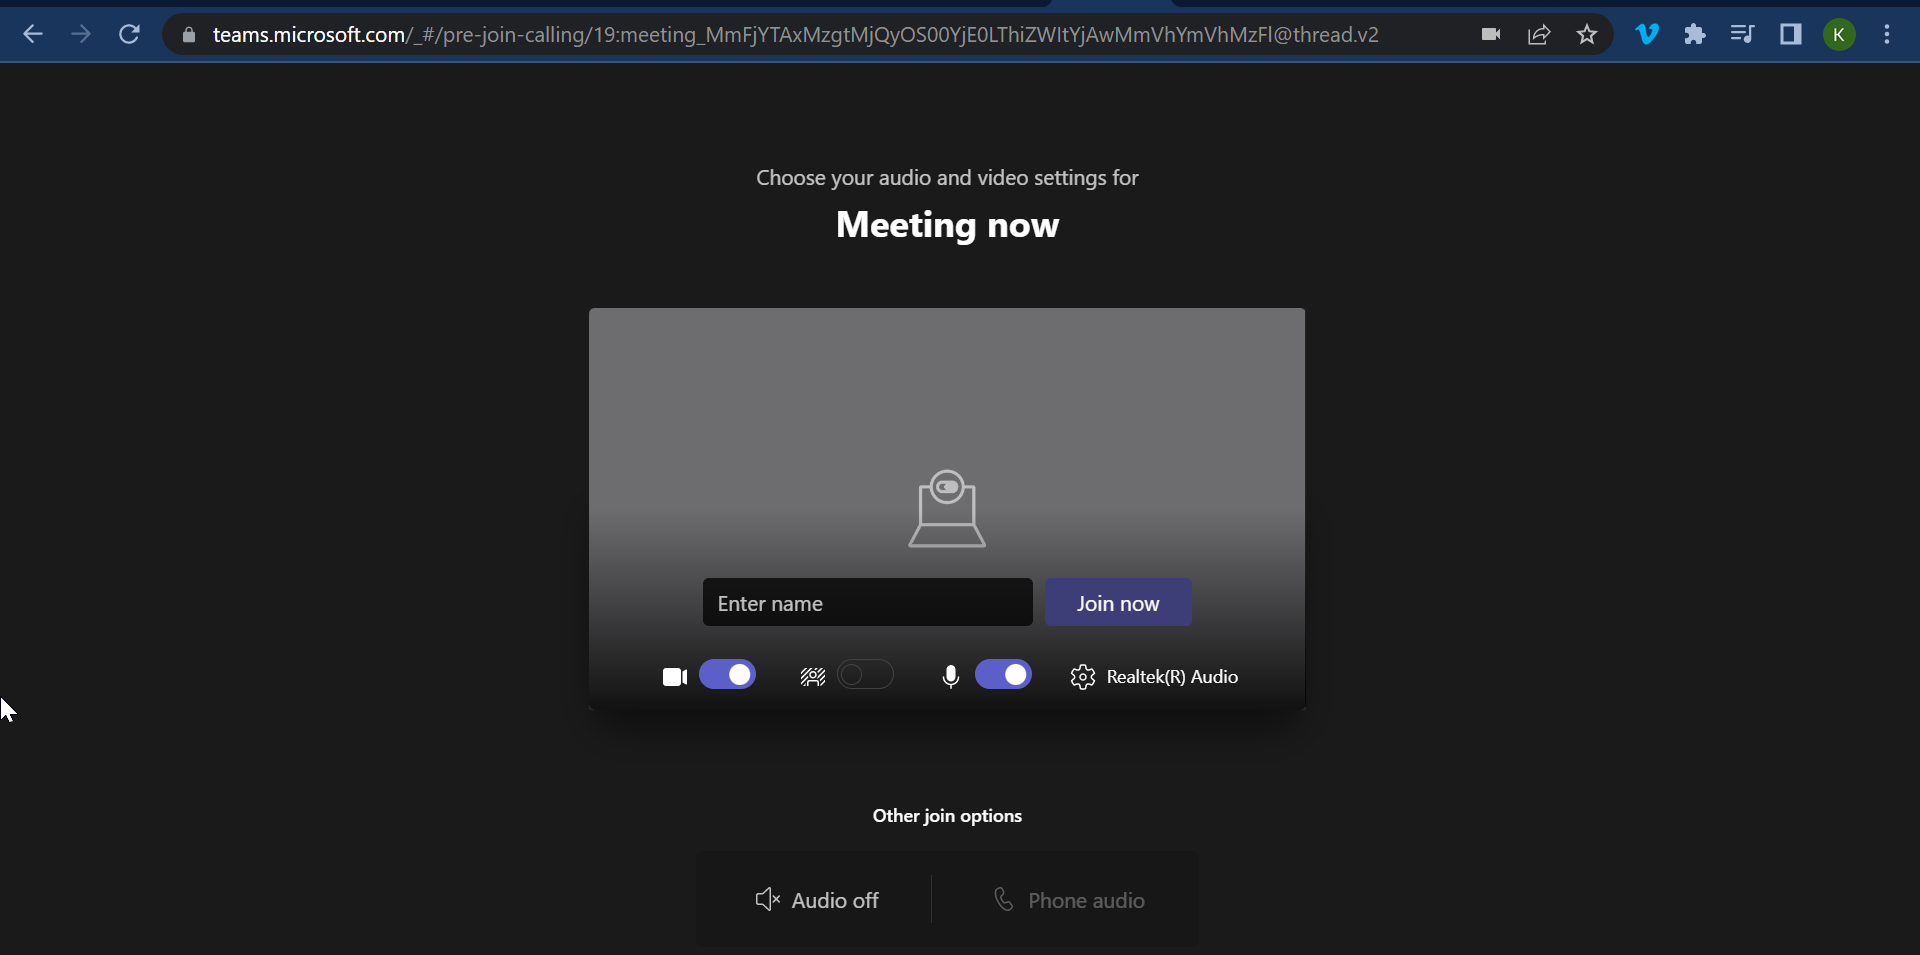
Once the meeting is continued on the browser, they will be able to enter their name and join the meeting:
- When a student leaves the meeting, they will be returned to the main course page. When the student leaves the webinar, their webinar module is changed to 100% completed.
Creating & Managing a Webinar Module Using GoToWebinar
Once your GoToWebinar integration is enabled, scheduling only requires you to set a start time and end time for your webinar. You will set up the webinar with AOM, and the webinar will show on your GoToWebinar as well.
Creating a GoToWebinar Webinar Module
- To create your module, head to the Courses > Webinars section of your Dashboard, and select Create Webinar Module
- Give your webinar module a name and a brief description that will be seen by your students when looking at the module in the course player. The brief description field is customizable and can include HTML elements like images or videos.
- Select GoToWebinar as the service provider. Enter the set the Start Time and End Time of the meeting. On selecting GoToWebinar you will get an option to "allow download?" . If enabled to allow download , the students will be able to download the recording of the webinar, if recording is available in their computer or else the student will not be able to download.
- Select the instructor to be assigned to this particular webinar.
- Click on Save Module to create the webinar module.
- Then, we want to make sure the webinar is made available in a course. Jump to this section below for the steps. You can also check out the Creating and Updating a Course article for more details on how to add modules to a course. Once added to your course, you can set the availability of the module and the minimum time spent inside. A Fixed Date availability will restrict your students from accessing the module until a set day. You can also set the minimum time spent in the module to have it marked as completed.
Launching a GoToWebinar Webinar as an Admin
- Go to the webinar module listing page in the Admin Dashboard (in the sidebar Course -> Webinars) and click on the Launch button for the webinar you wish to launch. You will automatically be brought to the session.
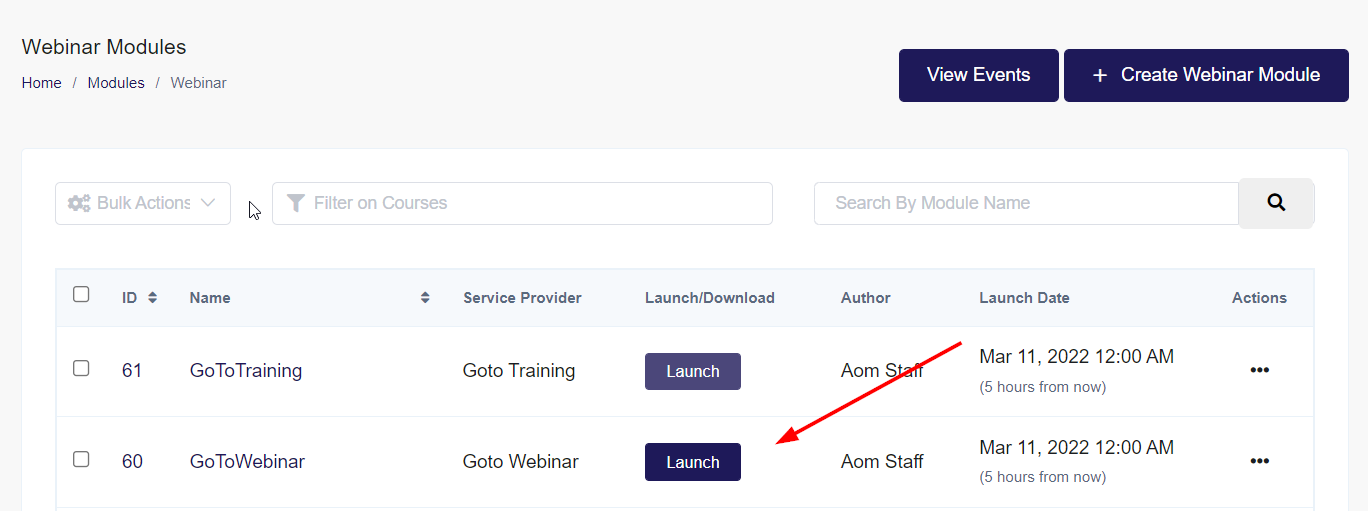
- This will prompt you to open the GoToWebinar application where you can start the broadcast. The control panel will allow you to share your computer's audio, camera, or screen with students. You can also record your webinar, keep track of student attendance, and launch polls and questions.
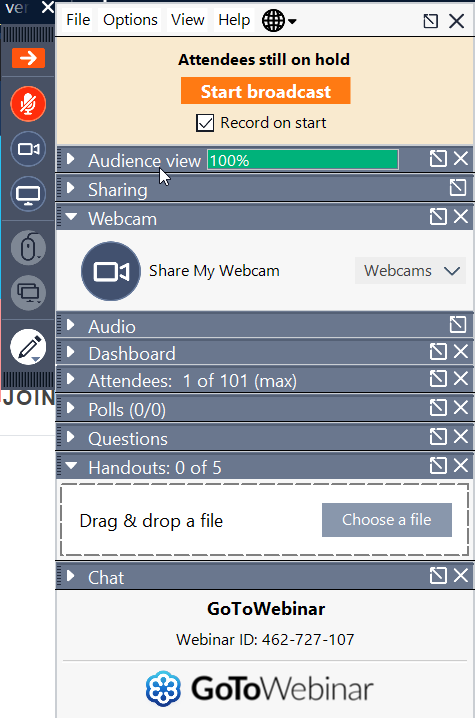
- When finished, closing the control panel will allow you to end the webinar for all participants. After closing the webinar, the GoToWebinar Video Library will open in a new browser tab as your webinar recording finishes processing.
Student Experience of a GoToWebinar Meeting in a Webinar Module
Now let's learn about the student experience!
- Students registered for your GoToWebinar directly within GoToWebinar (for example, if you upload a list of users to the webinar to GoToWebinar) will be sent an email confirmation and calendar invite. They are welcome to add the webinar to their calendar but advise them to not use the Join Webinar button inside this email, and instead to launch the webinar from inside the course.
- Inside the webinar module, the details of the webinar will be displayed, with a Launch Webinar button. Near the Launch Webinar button, the student will be notified of the status of the meeting. They will be alerted that the webinar is In Progress, Upcoming or Past.

- When they click the Launch Webinar button, the webinar will be launched in a new tab in the browser, next to the webinar module tab.
- The student control panel is located on the right side of the browser. This includes audio controls and a Raise Hand function.

- When the webinar is ended by the Instructor, a message will display, and the student is free to close the browser tab and return to their webinar module. When the student leaves the webinar, their webinar module is changed to 100% completed.
Creating & Managing a Webinar Module Using GoToTraining
Once your GoToTraining integration is enabled, scheduling only requires you to set a Start time and End time for your webinar.
Creating a GoToTraining Webinar Module
- To create your module, head to the Courses > Webinars section of your Dashboard, and select Create Webinar Module
- Give your webinar module a name and a brief description that will be seen by your students when looking at the module in the course player. The brief description field is customizable and can include HTML elements like images or videos.
- Select GoToTraining as the service provider. Enter the set the Start Time and End Time of the meeting. On selecting GoToTraining you will get an option to "allow download?" . If enabled to allow download , the students will be able to download the recording of the webinar, if recording is available in their computer or else the student will not be able to download.
- Select the instructor to be assigned to this particular webinar.
- Click on Save Module to create the webinar module
- Then, we want to make sure the webinar is made available in a course. Jump to this section below for the steps. You can also check out the Creating and Updating a Course article for more details on how to add modules to a course. Once added to your course, you can set the availability of the module and the minimum time spent inside. A Fixed Date availability will restrict your students from accessing the module until a set day. You can also set the minimum time spent in the module to have it marked as completed.
Launching a GoToTraining Webinar as an Admin
- Go to the webinar module listing page in the Admin Dashboard (in the sidebar Course -> Webinars) and click on the Launch button for the Webinar you wish to launch. You will automatically be brought to the session.

- This will bring you to your GoToTraining account, where you can choose to use the browser or the GoToTraining application. Then you may start the session.
- When finished, leaving the session will allow you to end the webinar for all participants.
Student Experience of a GoToTraining Meeting in a Webinar Module
Now let's learn about the Student Experience!
- Students registered for your GoToTraining will be sent an email confirmation and calendar invite--this is if you add the list of students to the webinar directly in GoToTraining. They are welcome to add the webinar to their calendar but advise them to not use the Join Webinar button inside this email, and instead to launch the webinar from inside the course.
- Inside the webinar module, the details of the webinar will be displayed, with a Launch Webinar button. Near the Launch Webinar button, the student will be notified of the status of the meeting. They will be alerted that they can launch the webinar, or that the start time is Past.
- When they click the Launch Webinar button, the webinar will be launched in a new tab in the browser, next to the webinar module tab.
- When the webinar is ended by the Instructor, a message will display, and the student is free to close the browser tab and return to their webinar module. When the student leaves the webinar, their webinar module is changed to 100% completed.
Adding a Webinar Module to a Course
Now that your module has been created, you can add it to the course(s) so that it is accessible to students:
-
From the Admin Dashboard, choose Courses, then All Courses
-
Find the Course you want to add the Module to, and click the three-dot action menu. Select Edit
-
Click the Step 2: Curriculum tab
-
Click "Add Module" and then opt to "Select an existing module from the list"
- Search the drop-down menu for your module name, and select it.
- Once the module is added to the bottom of your course list, you have the option of entering the Edit Module page to make changes to its content or removing the module from the course.
-
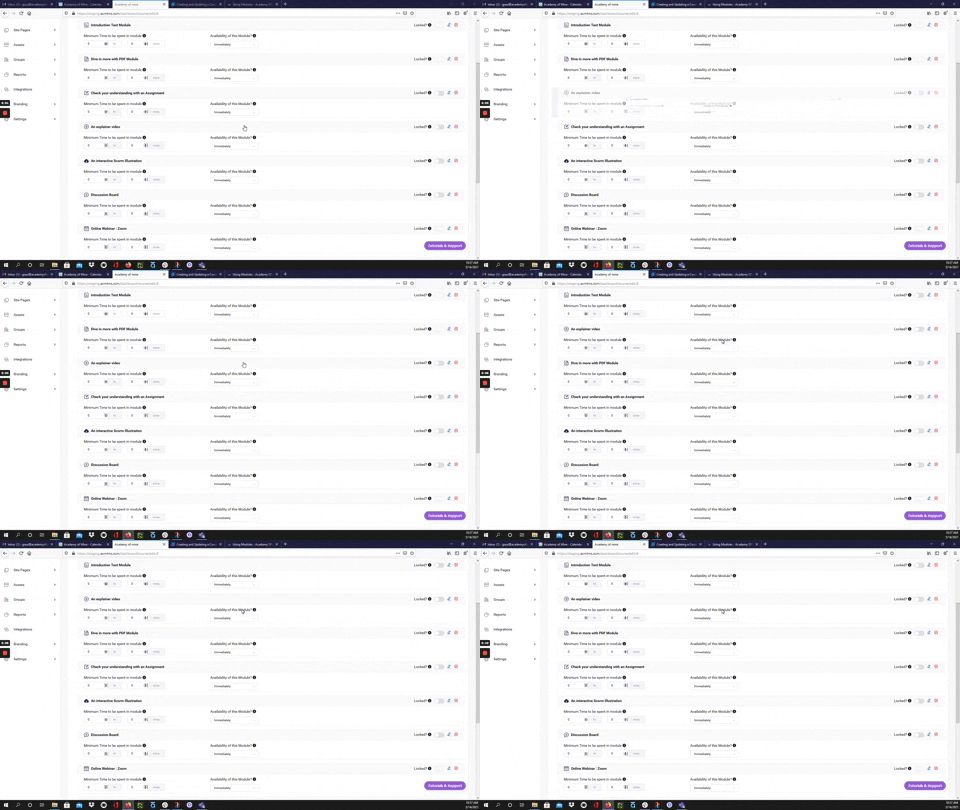
Click and drag the modules to rearrange them in the order they should be presented in the course. This involves placing the modules in a suitable order along with the sections if used.
-
You have the option to:
- Lock the Module, which forces a student to complete it before being able to move on to the next module in the course
- Set the availability of the module, which allows you set a date when the module will be available to a student. This gives an Admin or Instructor the control to make modules available to students over time or to restrict a student from completing the course too quickly.
- You can also set a minimum amount time spent in the module that the student must abide by in the Module before being allowed to move on to the next module.
-
Save your course changes by clicking Update Course in the upper right corner. If you get distracted or navigate to another section of the platform, changes may not be saved if you do not update before leaving a page you have made changes to.
An automated email will also be sent for the scheduled Webinar. Upcoming webinar emails are sent to a student X Hours prior to the launch of a webinar. Please see Automated LMS-Related Emails for a detailed list of all our automated email offerings and how to enable and edit them.
Please see this guide for the full details of Creating and Updating a Course.