Create/Update a Course (Hybrid Course)
Creating a course is a fundamental aspect of using an LMS, and AOM provides flexibility in structuring courses with different sections, allowing learners to engage with learning materials effectively. Courses can include sections, modules, and webinars to enhance the learning experience. Modules provide structured content that learners can access at their own pace, while webinars offer scheduled sessions for interactive learning. This guide covers how to create a course, organize it with sections, add modules and webinars to structure the curriculum, and set grading criteria while defining access rules for learners. Before getting started, review Introduction to Courses to understand course structure and organization. If you are a Staff member or Instructor, access to certain features may be restricted based on permission levels managed by the account owner. If options are unavailable, contact the administrator for access.
Create a new course
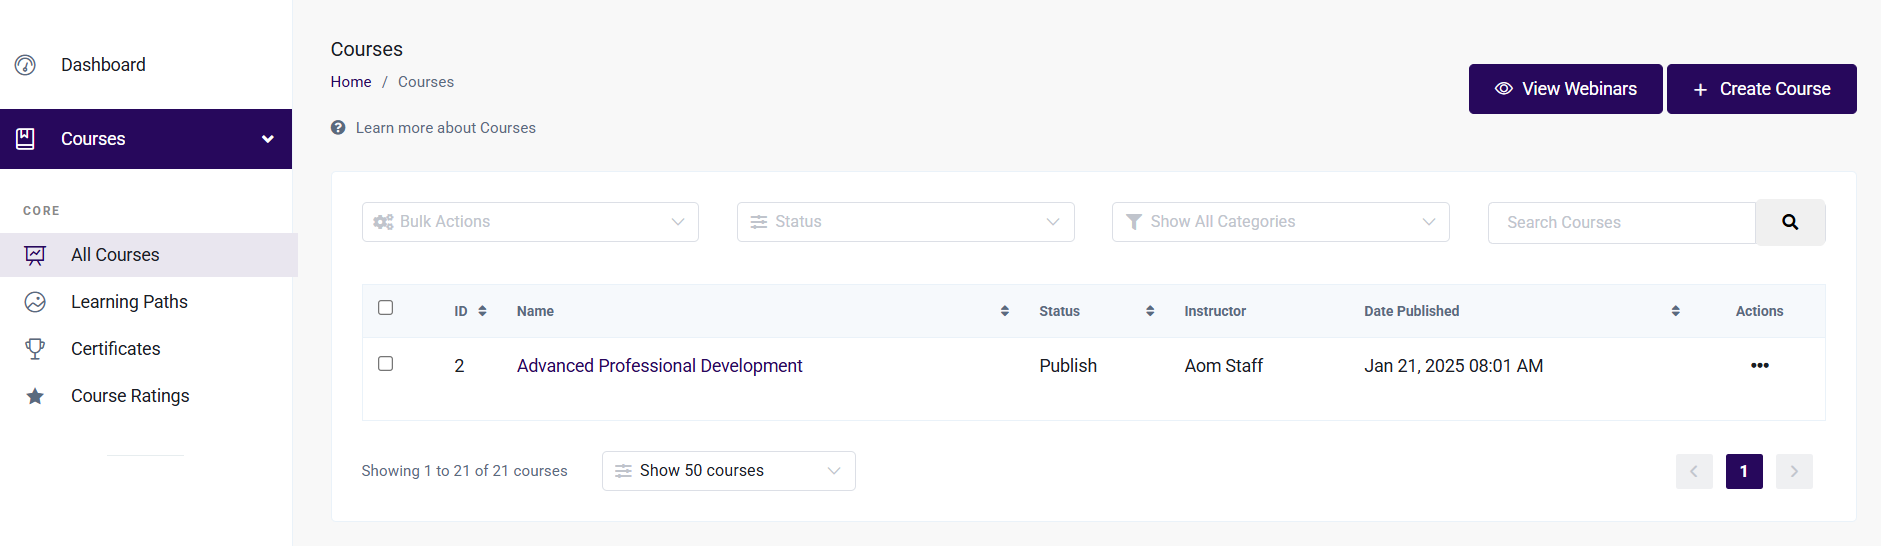
Navigate to Dashboard > Courses > All Courses using the left-hand sidebar menu, then select Create Course. The main content area displays the course listing section, along with filtering and search functionalities.
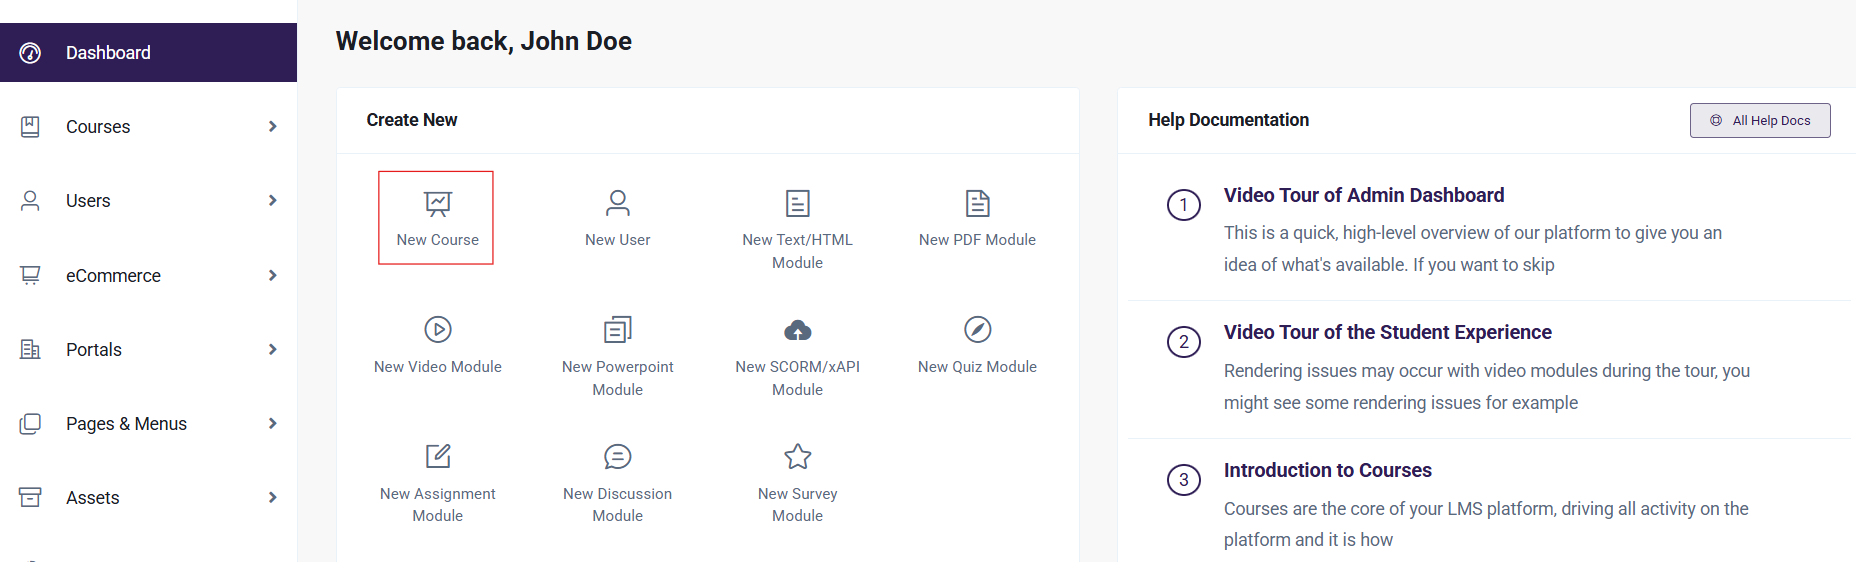
You can also create a new course is through the Admin or Staff Dashboard under the "Create New" section. Select "New Course" to get started.
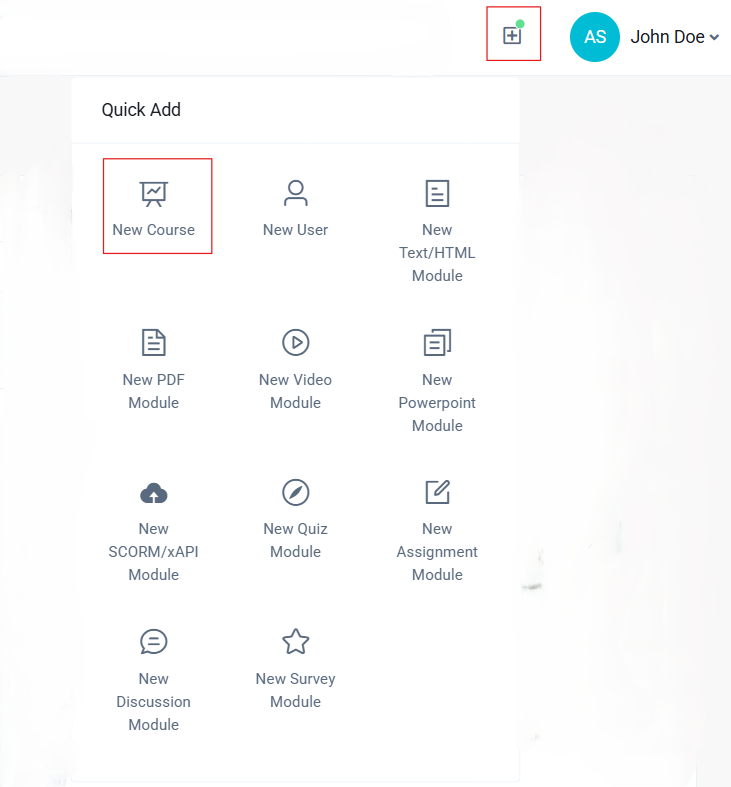
Alternatively, create a new course using the "Quick Add" menu. Select the "+" icon in the upper-right part of the screen and choose "New Course."
Configure the course
Course curriculums can be composed of Self-Paced sections, where learners can access and complete the curriculum online at their own pace, and Instructor-Led (Webinar) sections, where learners attend scheduled live sessions with an instructor.
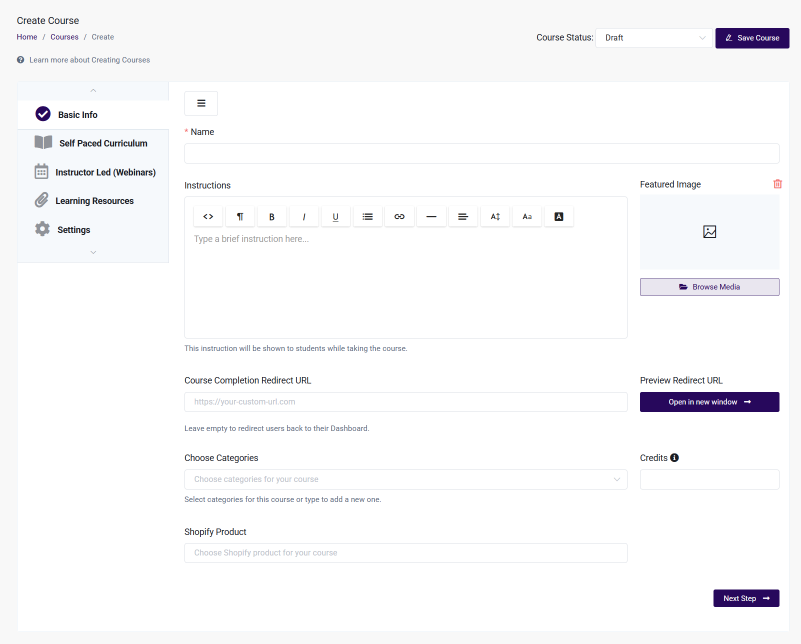
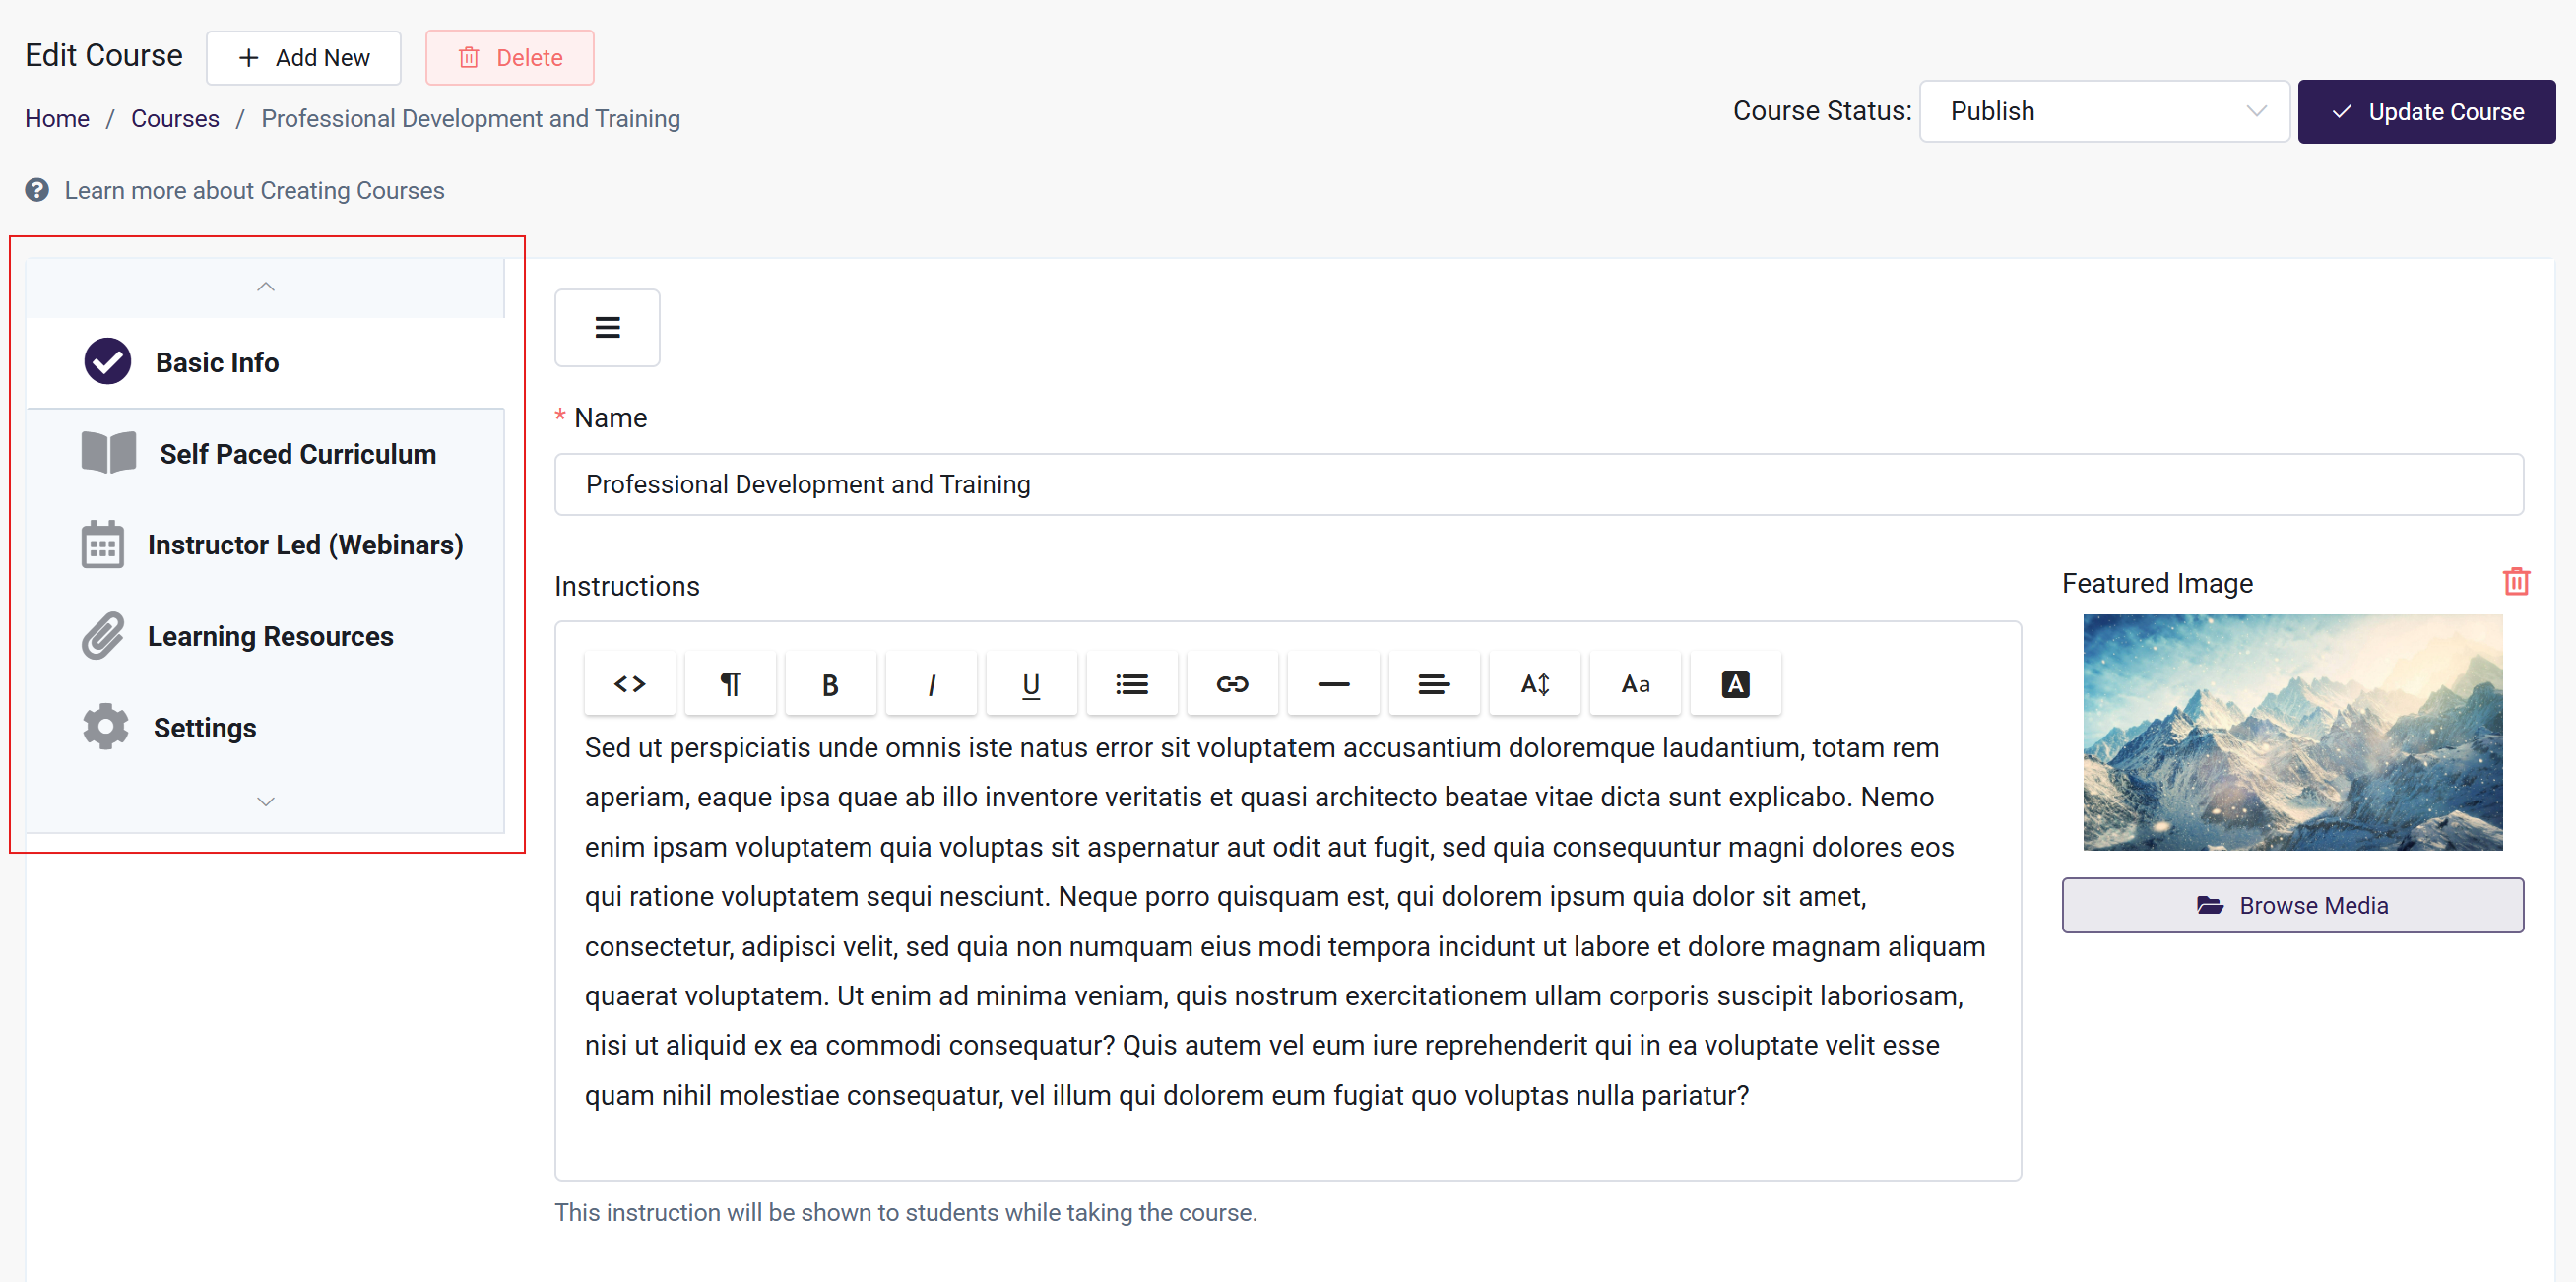
Step 1. Basic Info
- Name: The course's name. Learners will see the course name when logged in. It will also be printed on certificates awarded upon course completion.
- Instructions: Add any course instructions to help learners understand what to expect. These instructions will appear when they launch the course. Consider including a brief course description and any other relevant details.
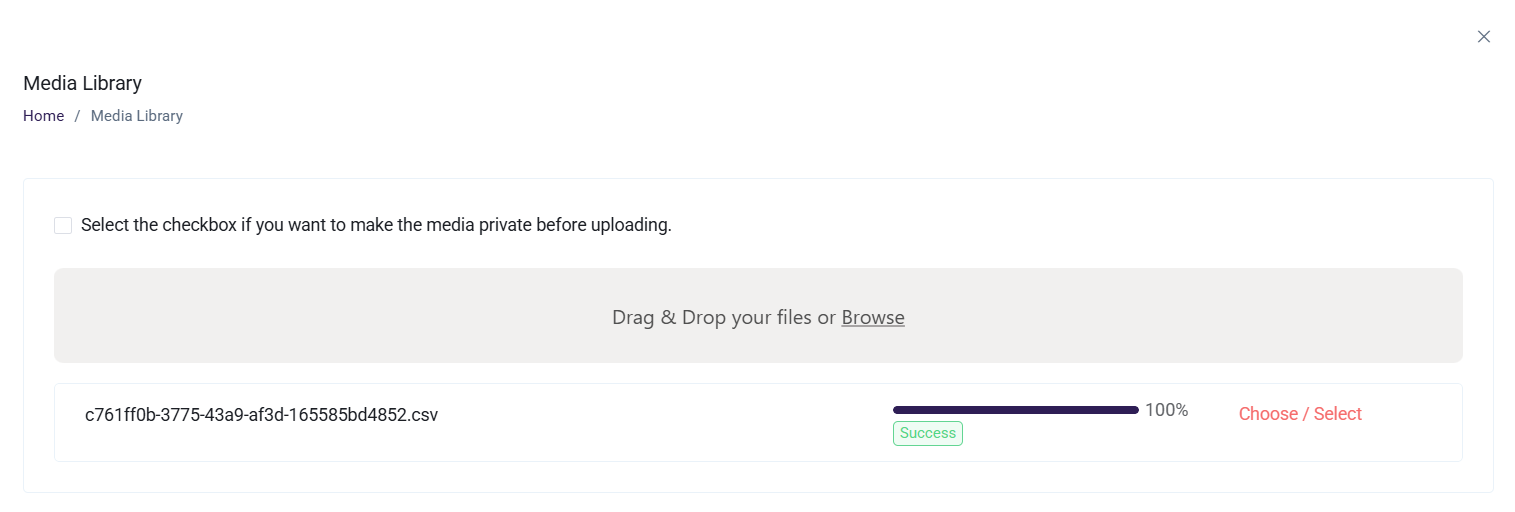
- Featured Image: Add a featured image to provide learners with a visual reference for the course. Click "Browse Media" to open the Media Library and upload an image. Once uploaded, the file will appear in the library. Select it by clicking "Choose / Select" to set it as the Featured Image. A previously uploaded image from the Media Library can also be selected.
- Featured Images are optional. If no image is uploaded, a default sample image will be used for all courses without a custom featured image.
- To remove a featured image after uploading it, click the trashcan icon in the top right corner above the image. Once deleted, the default sample image will be displayed instead.
- The Featured Image follows a 3:2 aspect ratio, where the width is 1.5 times the height. The recommended dimensions are 300 px by 200 px for optimal performance and visibility. Larger images may slow down page loading, while smaller images can cause formatting issues. To maintain a consistent and professional appearance in the learner view and course catalog, all featured images should be the same size.
- When not in the process of creating a course, you can upload and view files in the Media Library by selecting "Assets" and then "Media Library" on the Sidebar.
If you're a Staff member, clicking "Browse Media" may redirect you to a permission error page. If this happens, contact your administrator to request media access. Once permission is granted, you can return to the Upload Media page by clicking "Browse Media"
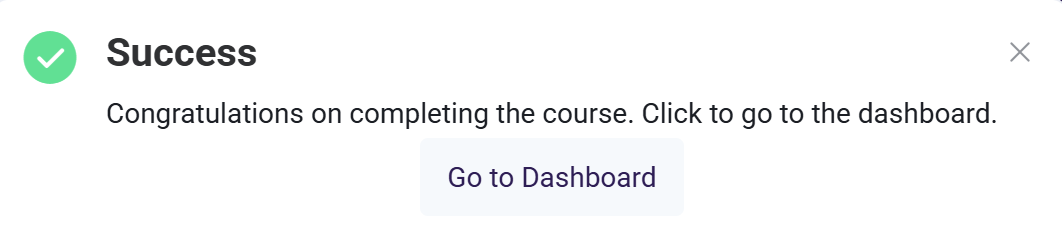
- Course Completion Redirect URL: The URL to direct learners to a specific page upon course completion. At course completion, a pop-up will appear, allowing learners to either navigate to the dashboard or follow the specified redirection URL. If left blank, learners will only have the option to navigate back to the dashboard.
-
Choose Categories: Categories to help organize courses, especially when using Membership Plans. If categories are already available, apply them to the course. If not, create one at this step by entering the desired name in the "Choose Categories" field, which will automatically generate the category. For more information on using Categories, visit our Course Categories guide.
-
Shopify Product: Link Shopify product(s) to the course (if applicable).
-
Credits: To award credits to learners, add them in this section. Course credits help track continuing education progress or indicate inclusion in a larger curriculum. If enabled, the number of credits can also appear on the course certificate.
Step 2. Self-Paced Curriculum
The Self-Paced Curriculum tab is used to build and organize a course by adding sections and modules. A course can include multiple sections with modules or a single module. Sections help structure content effectively. For example, modules could be grouped into sections such as "Introduction," "Jumping In", and "Wrapping Up." Organizing content into sections ensures a structured and logical learning flow, making navigation easier for the learner.
If a course contains both stand-alone Modules and Modules within Sections, the stand-alone Modules must be placed before the Sections. Otherwise, they will be automatically included in the nearest Section.
- To add a section, which groups modules, click Add Section. A blank Section will appear with the default name "Blank Section" — click on it to rename it. Add as many sections as needed for your course.
- Once the sections are added, you can add modules in two ways: by creating a new module directly in the course curriculum or by selecting an existing module. The Using and Managing Modules article provides more details on different Module types and their applications.
- To create a new module, click Add Module, select the module type, enter a name, and press Enter on your keyboard.
- Your module will then be added to the course curriculum. If applicable, set the Minimum Time and Availability settings.
- To add content to the new module, click the Edit (✏️) button. This will open the module in a new tab.
Pressing Enter is required for the new module to be created after entering its name.
To add a previously created module, click Add Module, then select "Select an existing module from the list."
- Use the drop-down menu to search for the module by typing its name, then select it. Once added to the bottom of the course list, you can either open the Edit Module page to modify its content or remove it from the course.
- To arrange the modules in the desired order, click and drag them into place. If Sections are used, position the Modules appropriately within them.
- Click and drag the modules to arrange them in the desired order for the course. If sections are used, ensure the modules are placed appropriately within them.
- Modules are created and arranged within their respective sections.
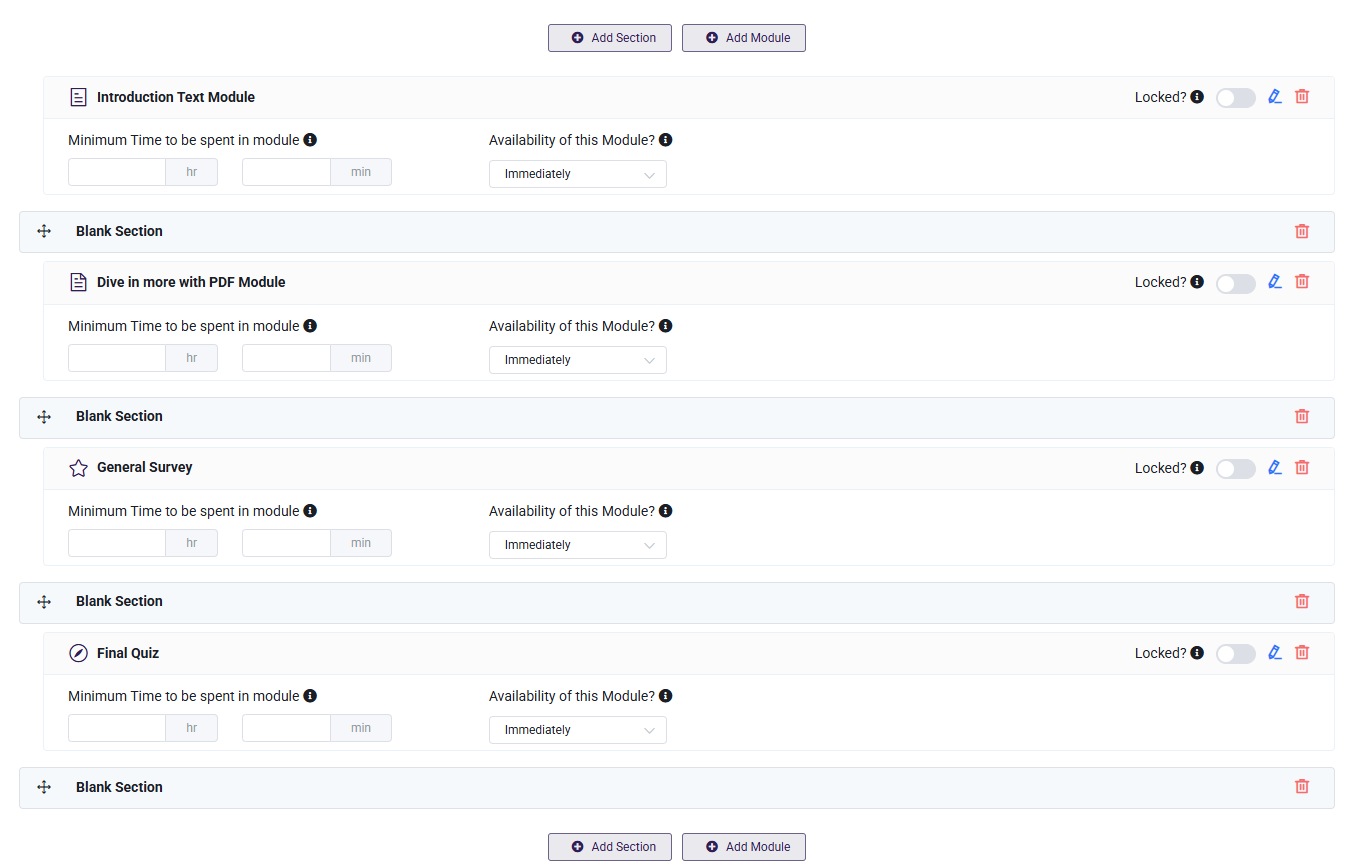
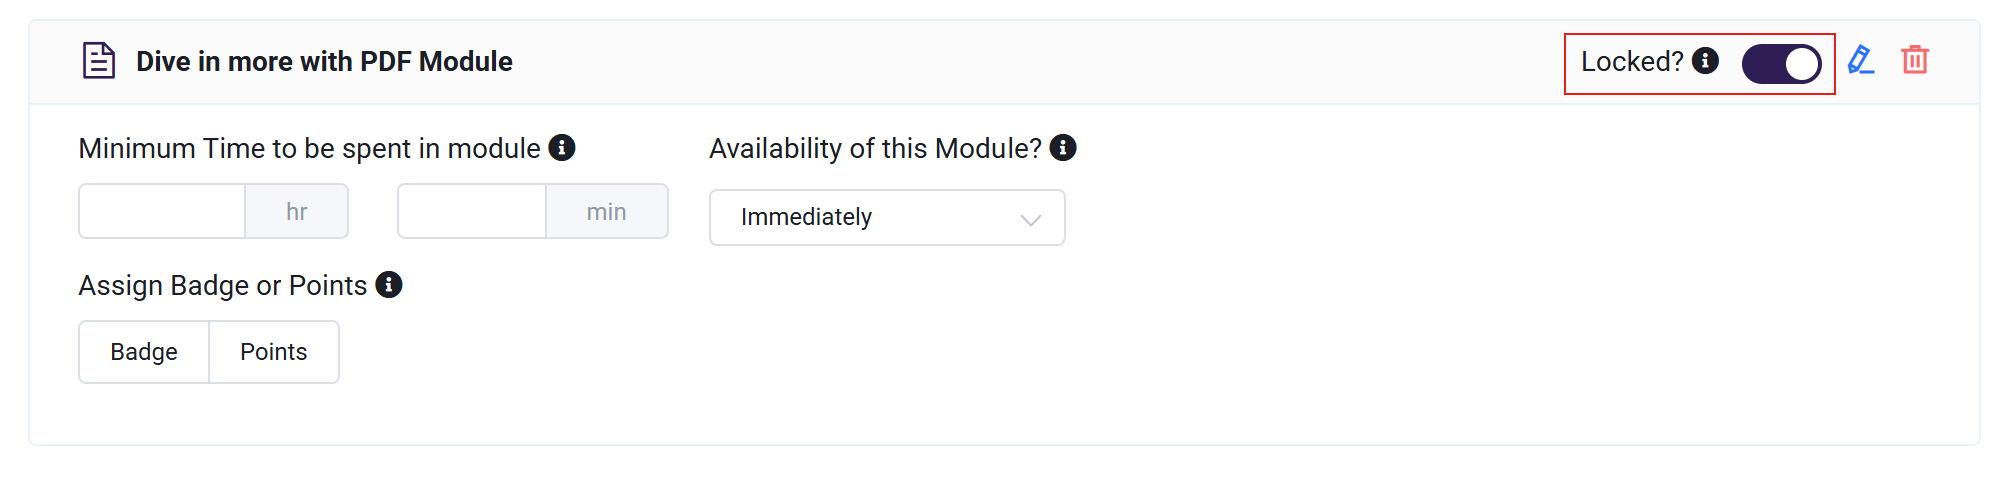
- Locked?: Locking a Module ensures that the module must be completed before progressing to the next one. One or more modules can be locked to create a structured learning path, preventing access to new content until the required modules are completed. This approach is beneficial when course material builds on previous content or when quiz modules are used to assess knowledge at different stages.
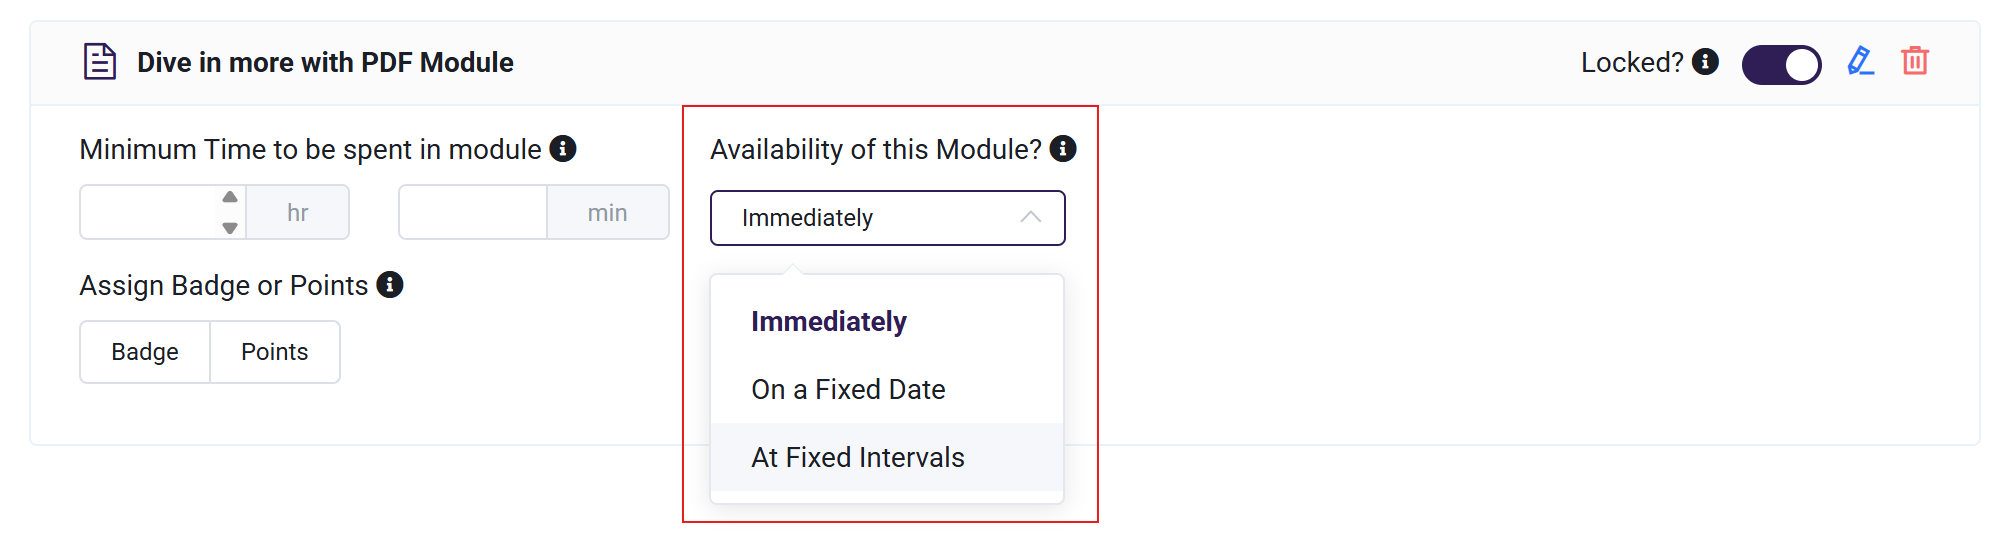
- Availability of this Module?: Control when a module becomes accessible to learners. Manage the pacing of the course, ensuring content is released gradually or preventing learners from completing the course too quickly. The options are:
- Immediately – The module is available as soon as a learner is enrolled.
- On a Fixed Date – The module will be accessible only after a specified calendar date.
- At Fixed Intervals – The module is released based on a set schedule, such as a certain number of days after enrollment, or after starting the course.
- Minimum Time to be spent in module: If set, a learner MUST spend at least the minimum amount of time in this module before the module is considered completed. This prevents learners from advancing too quickly through the course.
If a learner exits the course page before meeting the minimum time requirement, the module will show a status of In Progress even if it is marked 100% complete. The learner must return to the module and fulfill the required time to complete it.

To save your course changes, click Update Course in the upper right corner. If you navigate away, any unsaved changes may be lost. Be sure to update before leaving the page.

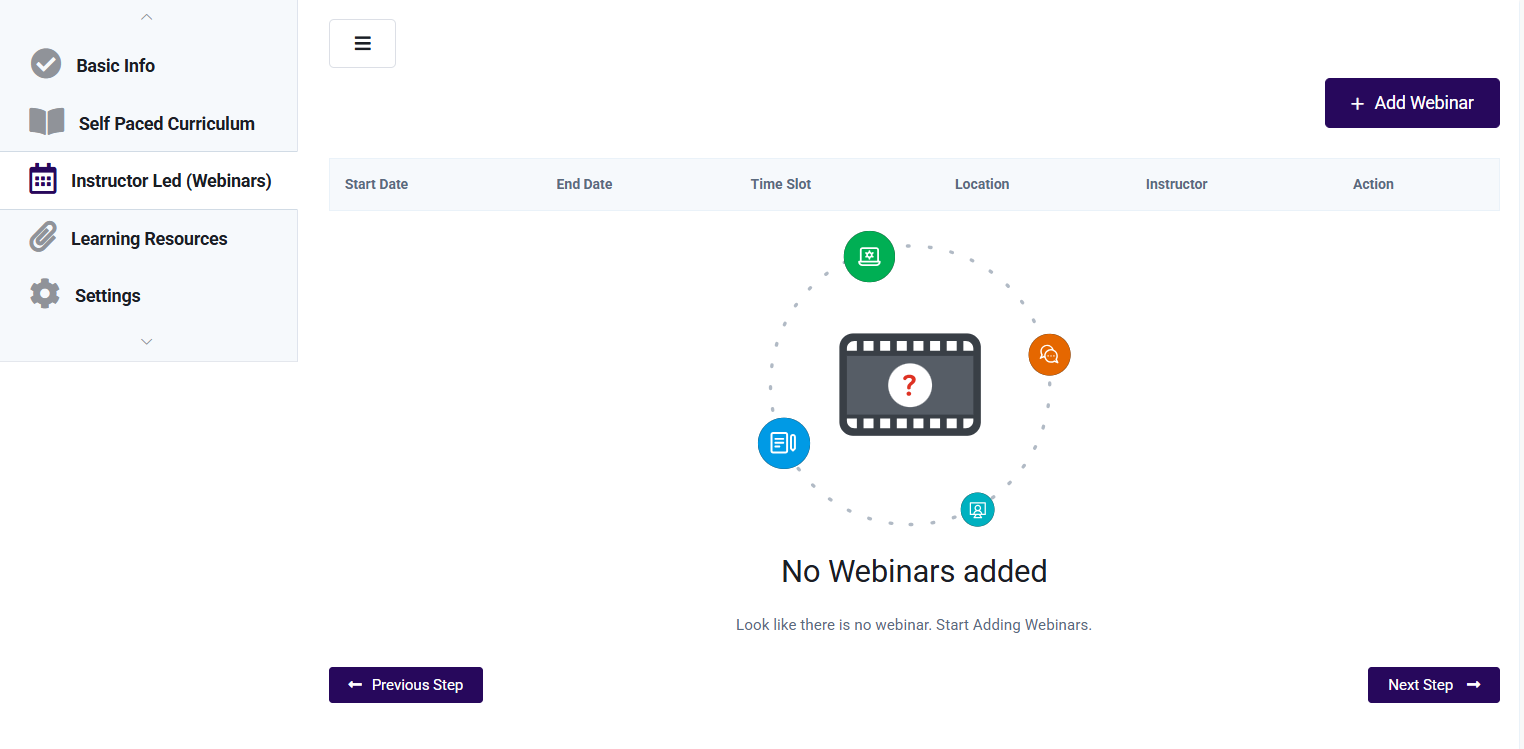
Step 3. Instructor Led (Webinars)
Schedule and manage live webinar sessions. Webinars can be set up with details such as location, assigned instructor, and preferred webinar provider, including Zoom, GoToWebinar, and others.
Additional options include enabling cloud recording and allowing participants to download session recordings. Each webinar requires a specified start and end time. If recurrence is enabled, sessions can be repeated at a set interval, such as monthly, for an extended period.
Webinar Service Provider Options
Before creating a Webinar Module, an account must first be created with a service provider, and any necessary software must be downloaded. If using any of our supported webinar integrations, please ensure the necessary integration is set up in your AOM platform beforehand.
Supported webinar providers:
Zoom: Zoom offers both free and paid services, and allows you to create live and on-demand virtual events. Zoom integration guide.
GoToWebinar: This is a is a paid service. GoToWebinar integration guide.
GoToTraining: This is a paid service. GoToTraining integration guide.
Microsoft Team: This is a paid service. Microsoft Teams integration guide.
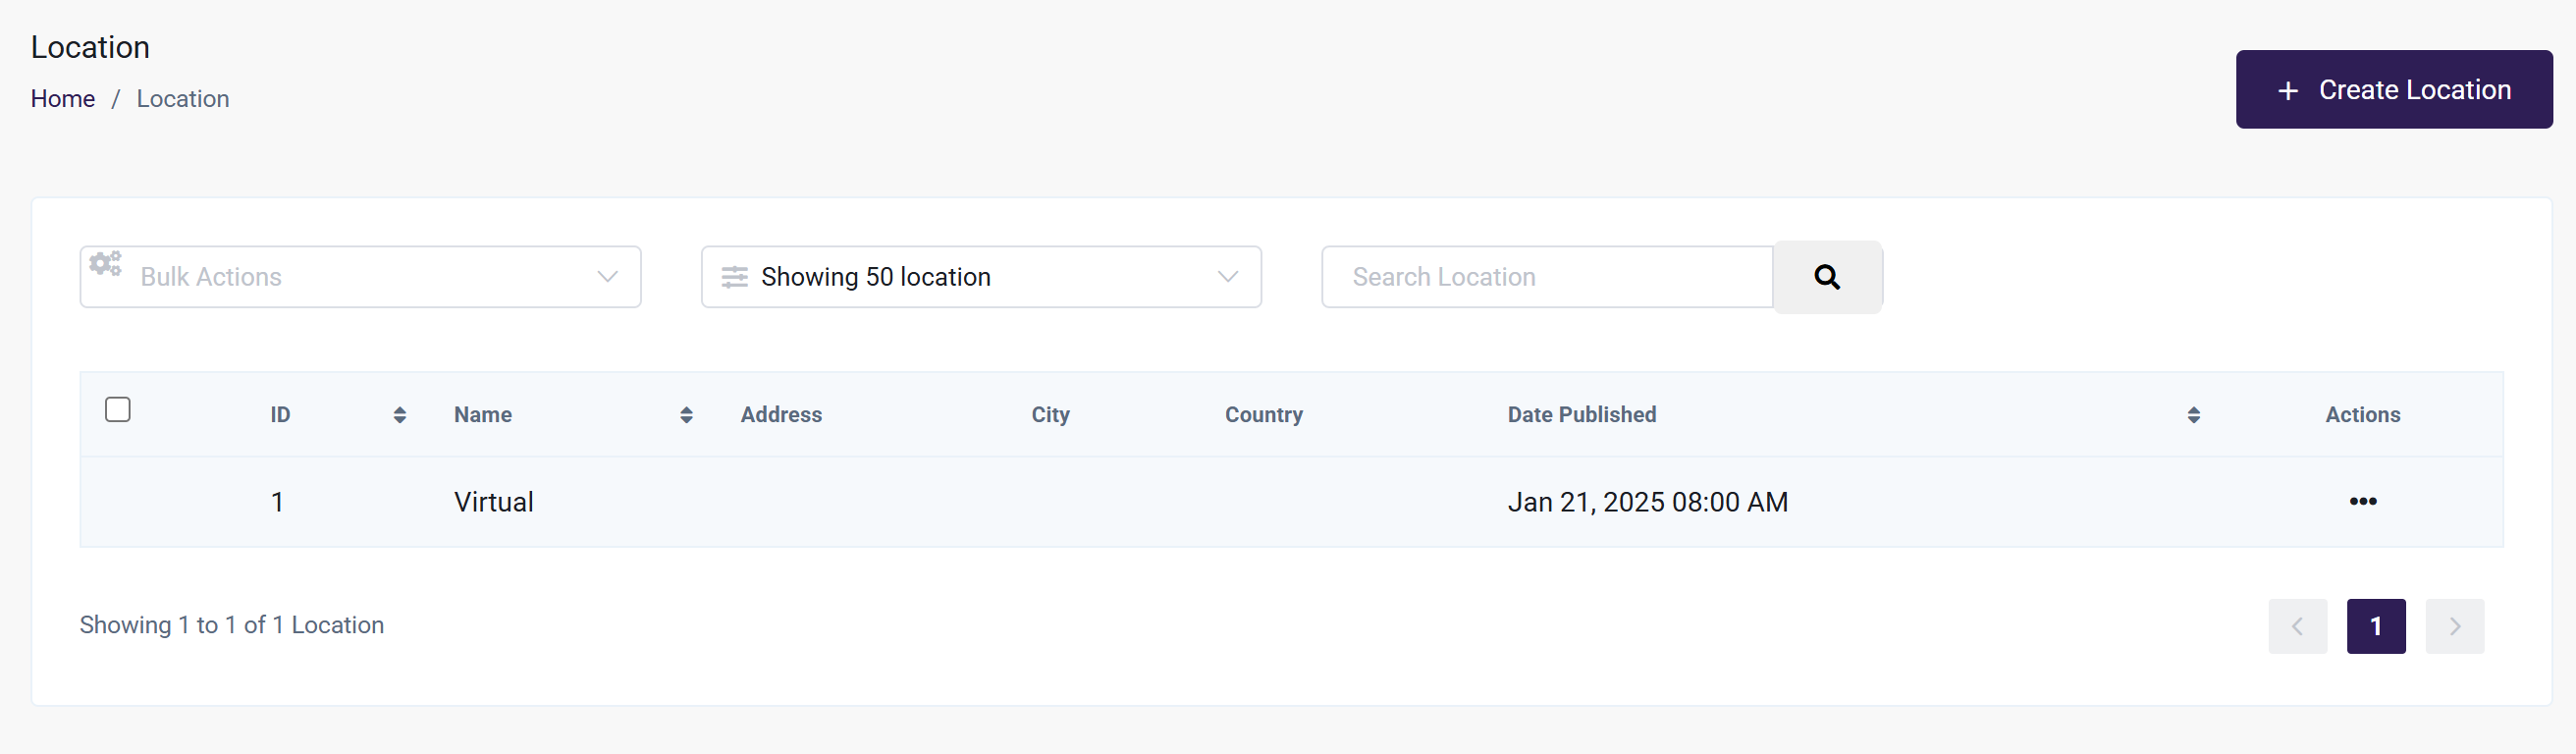
Add a new Location
To ensure webinars have accurate locations, the system allows locations to be added and managed dynamically inside course settings.
Before creating the course, the location must be added if offering in-person sessions. To create a new location:
- From the left sidebar menu, navigate to Courses > Location.
- Click Create Location
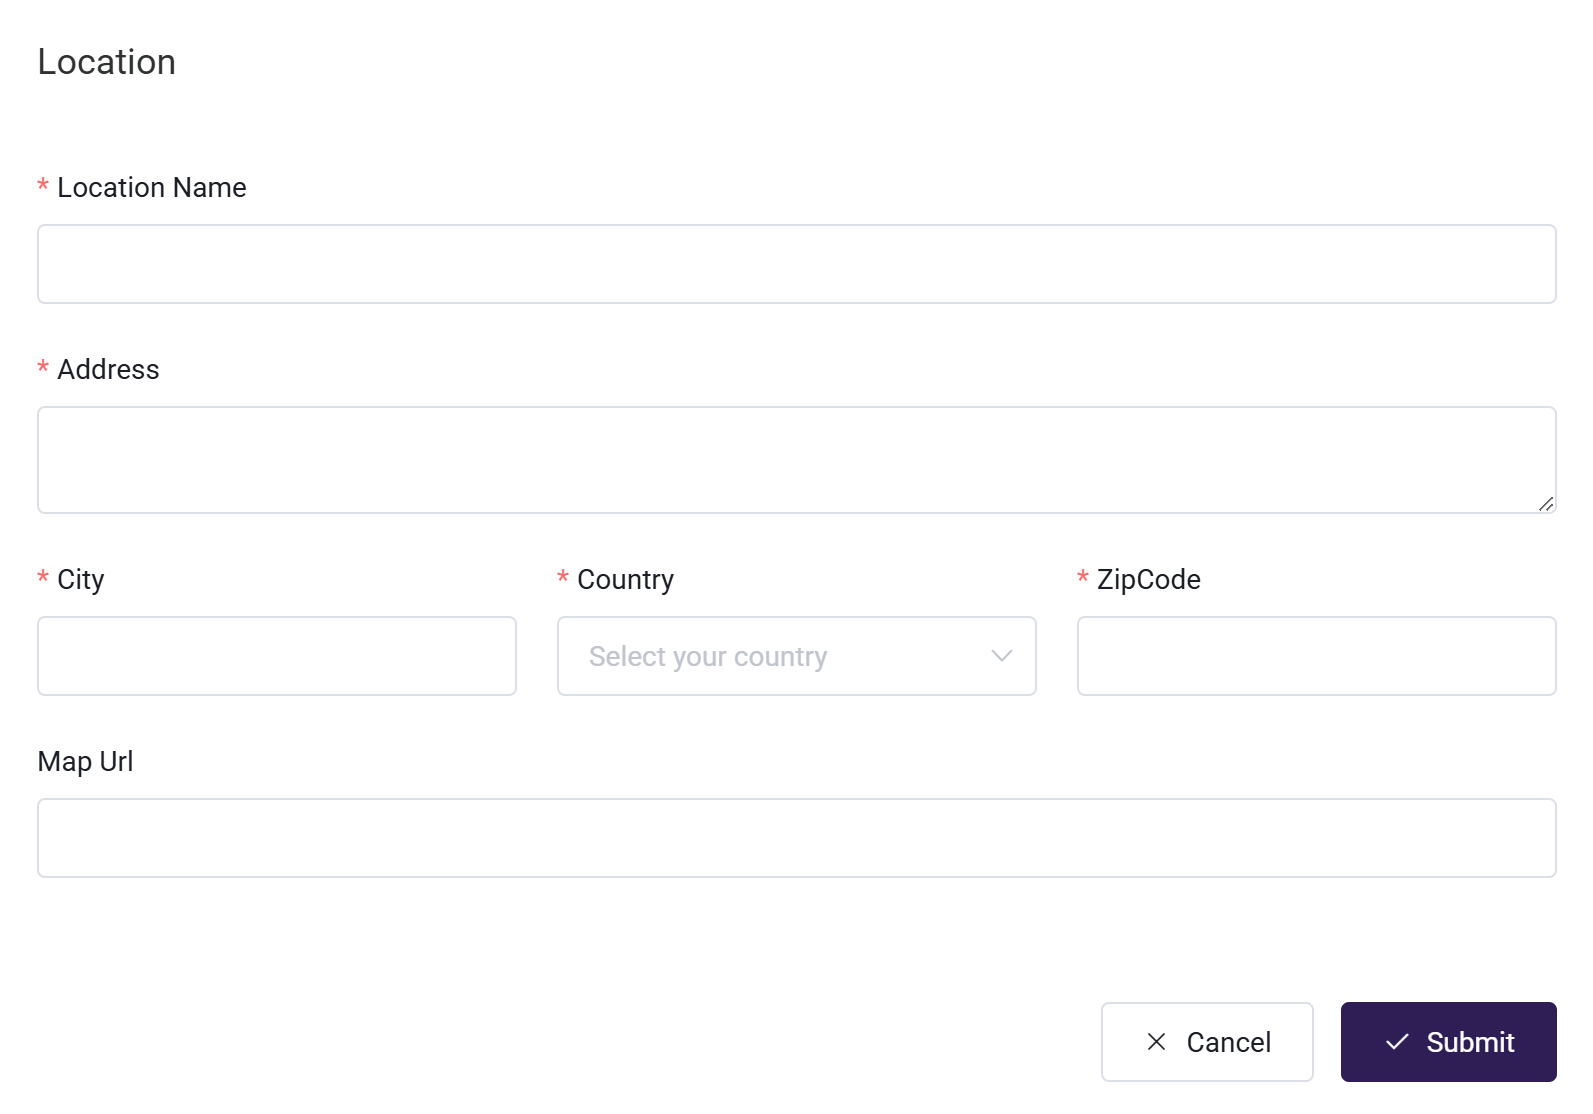
- Add the location details
- Location Name (Required) – Enter the name of the location
- Address (Required) – Provide the full address
- City (Required) – Specify the city where the location is
- Country (Required) – Select the country from the dropdown
- Zip Code (Required) – Enter the postal code
- Map URL (Optional) – Add a link to the location on Google Maps
- Click Submit to Save
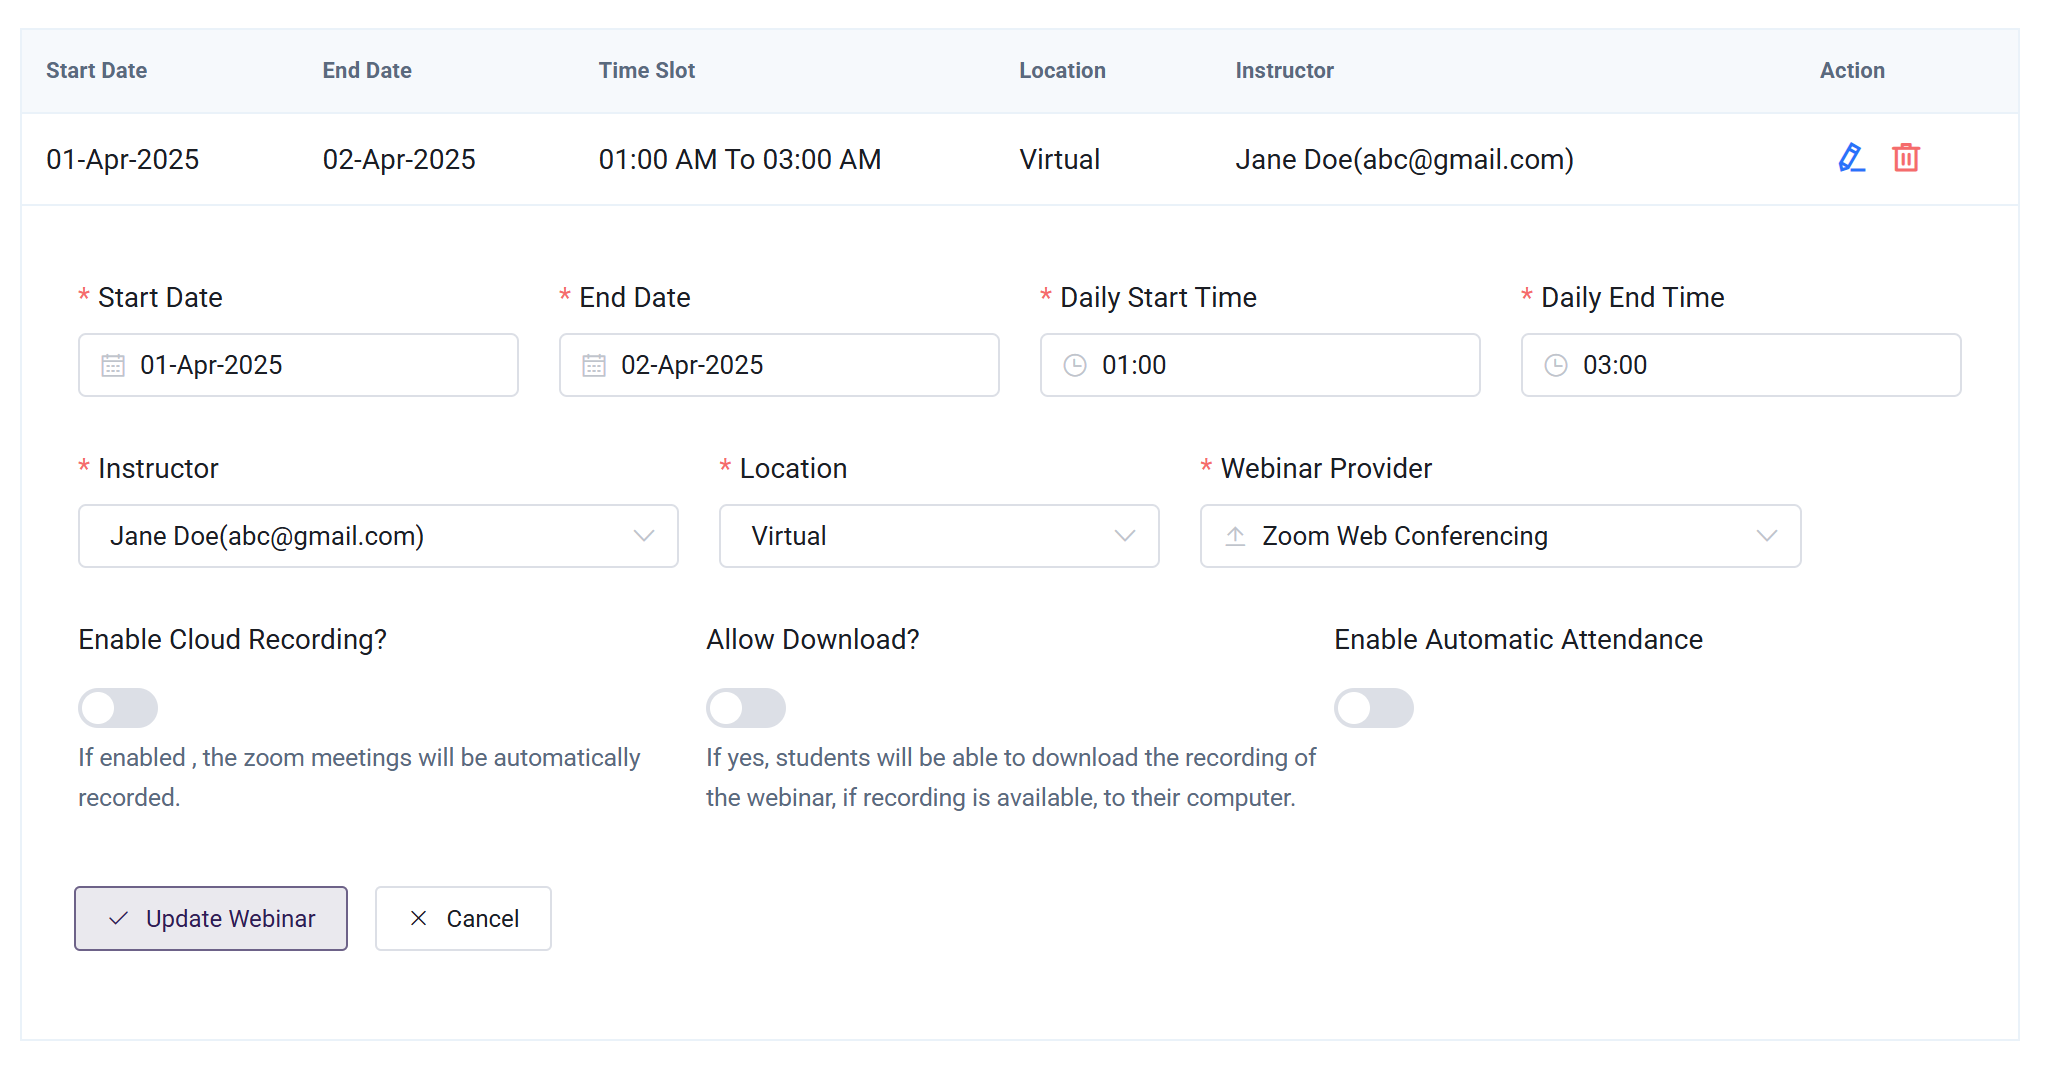
Add a Webinar to a Course
After setting up locations, follow these steps to add a webinar to a course:
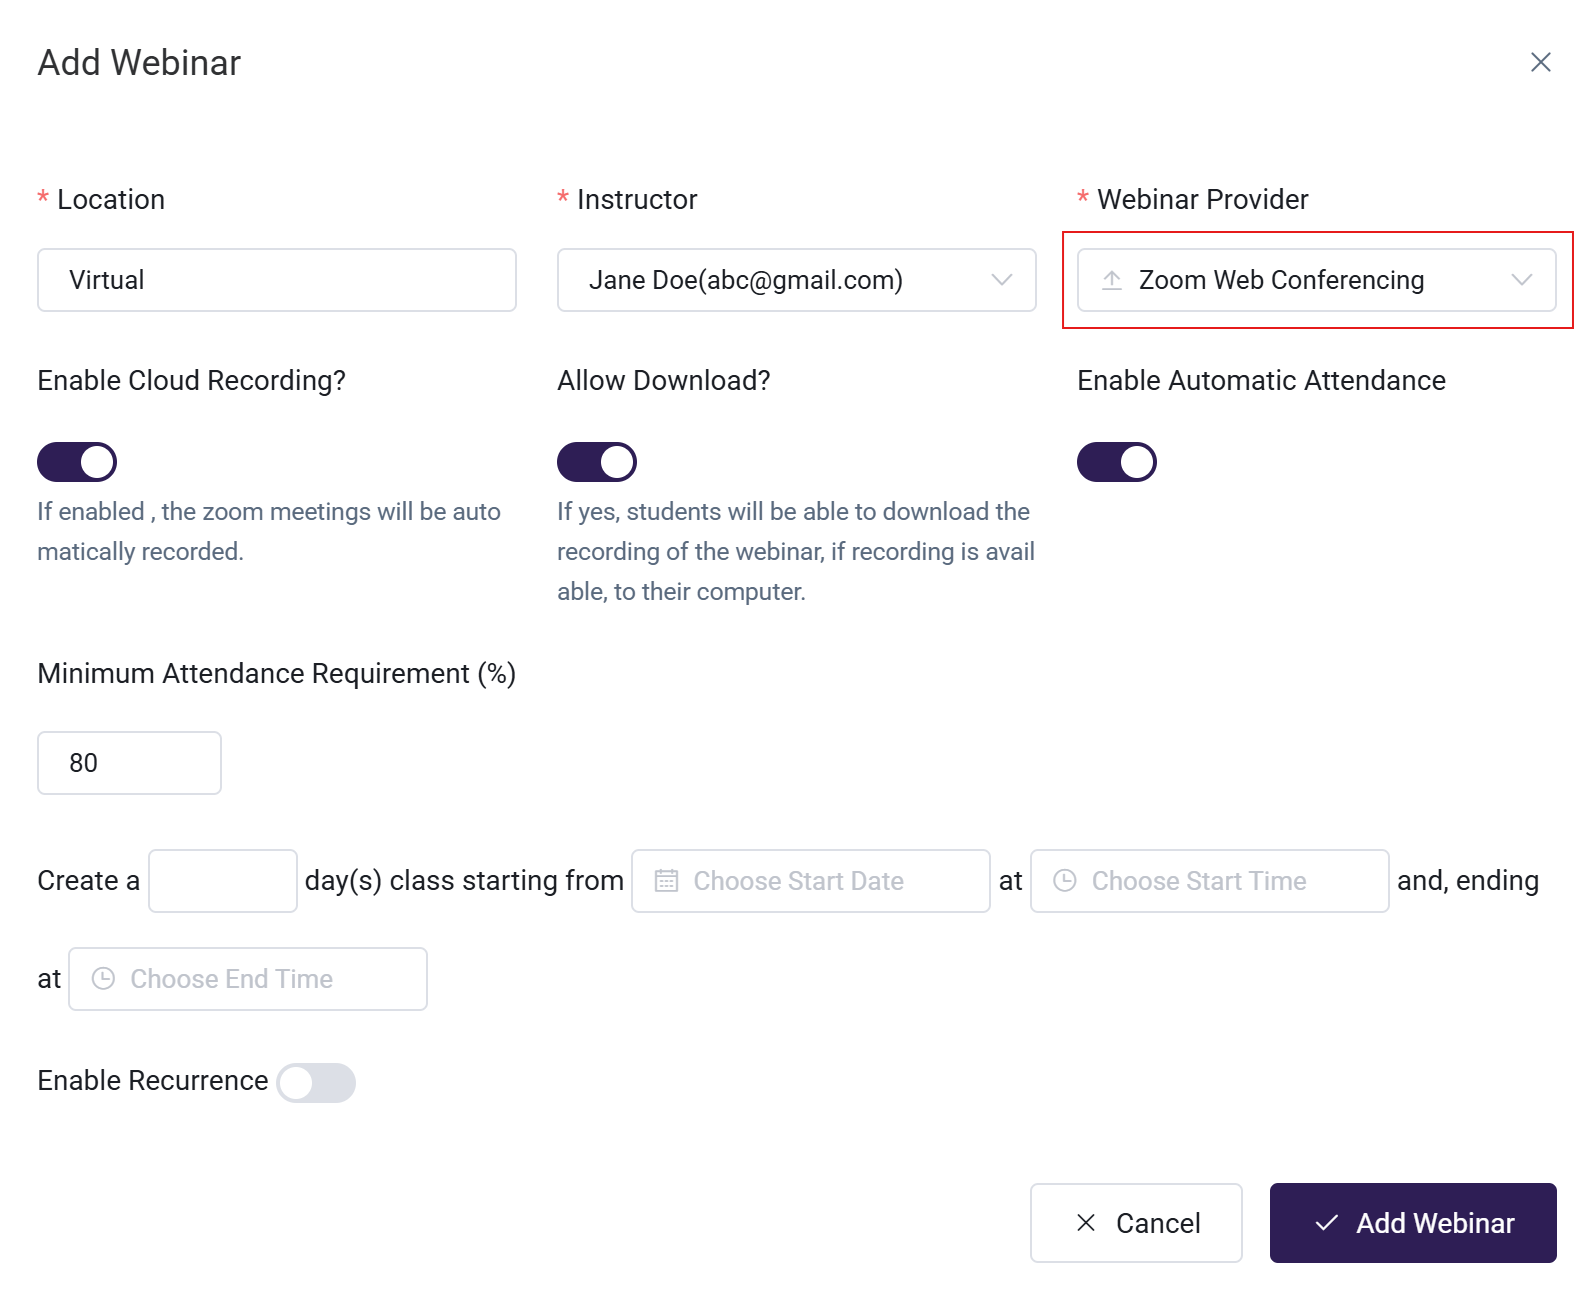
Webinar Details
- Location – Choose Virtual or add a physical location
- Instructor – Select the webinar host
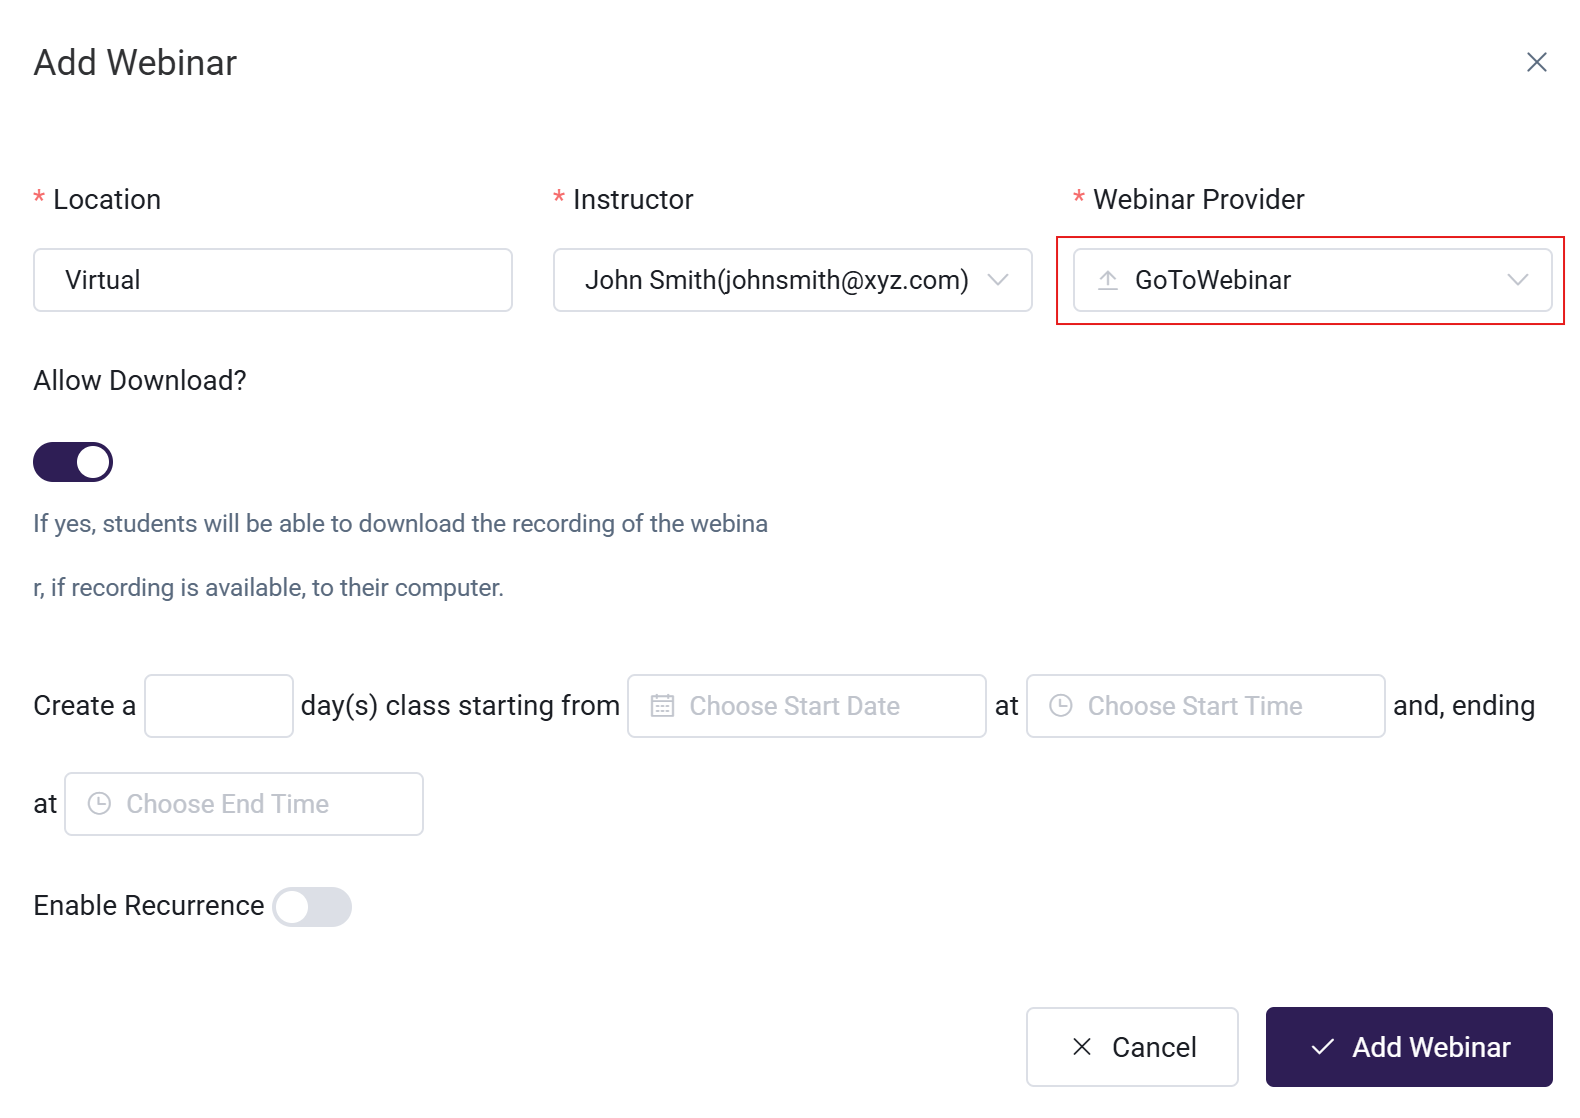
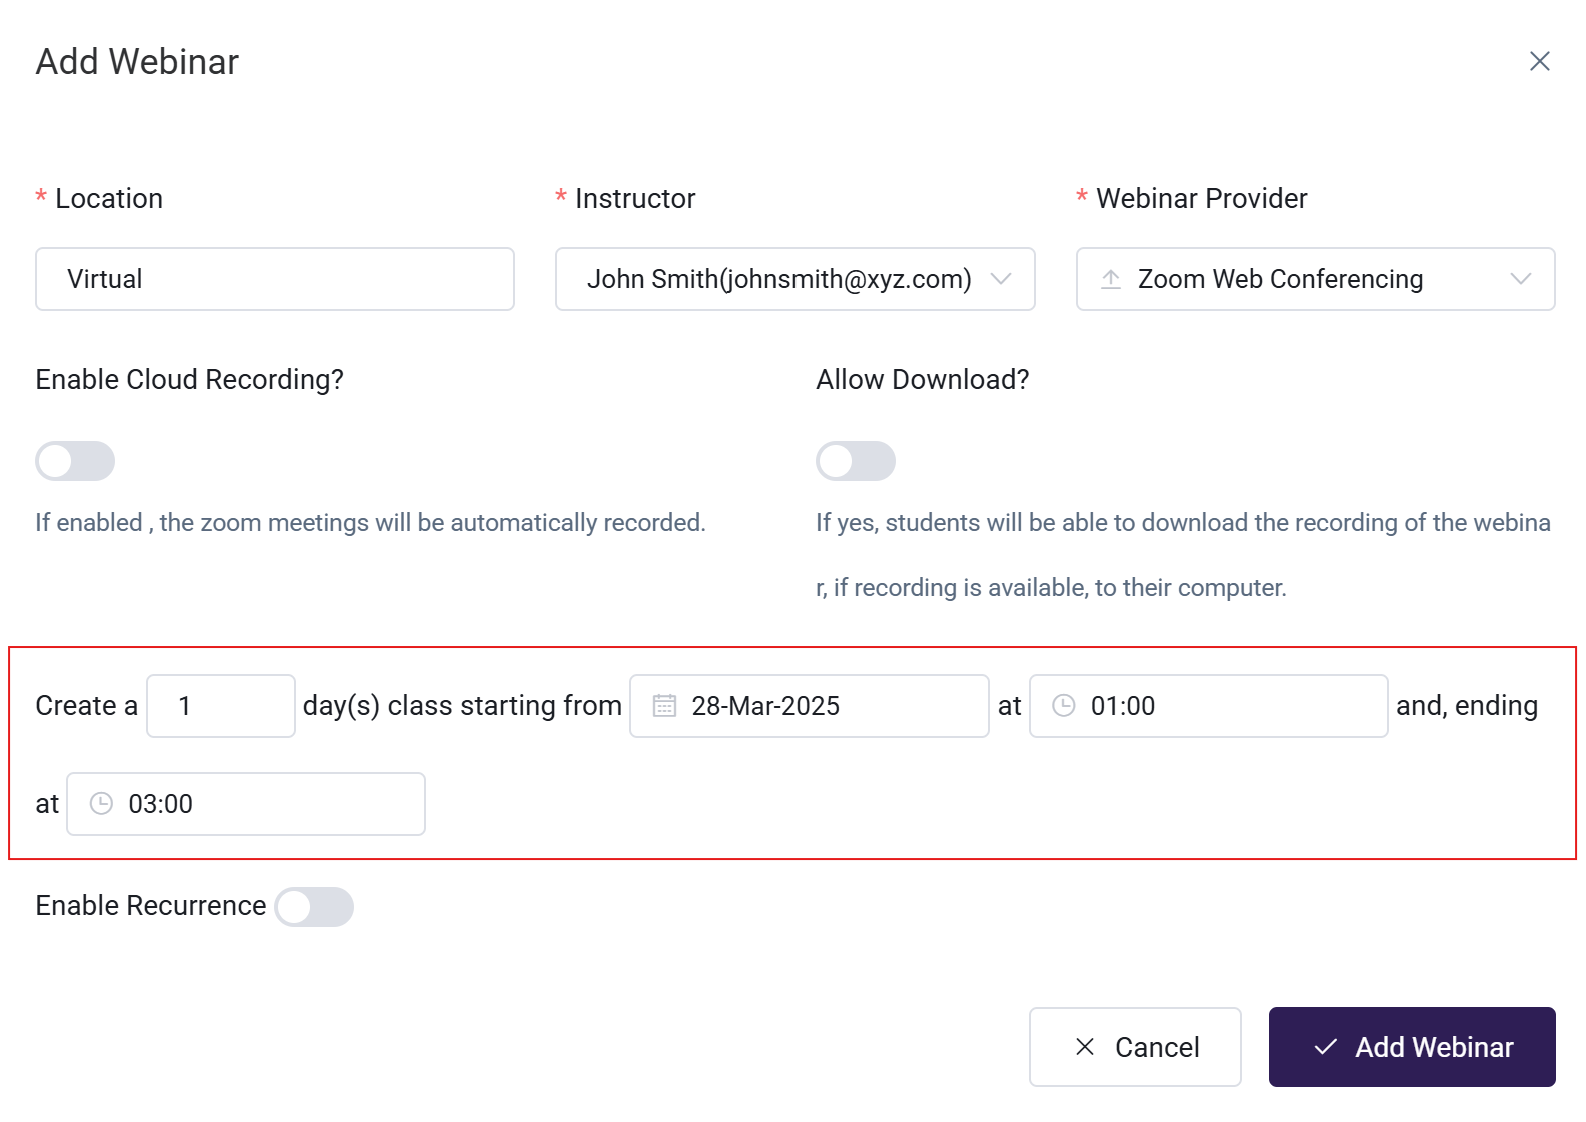
- Webinar Provider – Choose from:
1. Zoom Web Conferencing
Instructors must set up their own Webinar integrations to Launch Webinars from within the platform. Read about setting up a Zoom Integration here.
Additional options available:
Some of these features might not be available on your current Zoom plan. Check your plan details or reach out to Zoom support if you need help accessing them.
-
Cloud Recording
- Toggle ON: The Zoom meeting will be automatically recorded and stored in the cloud.
- Toggle OFF: No automatic recording will be done.
-
Allow Download
- Toggle ON: Learners will be able to download the webinar recording if it is available.
- Toggle OFF: No download option will be provided.
-
Enable Automatic Attendance
- Toggle ON: If enabled, attendance will be recorded automatically, and all Zoom attendance records will be logged for webinars.
- Toggle OFF: No attendance will be recorded.
-
Minimum Attendance Requirement(%)
- If automatic attendance is enabled, you'll need to set a minimum attendance threshold. Once a participant meets this threshold, they'll be marked as "attended".
The attendance percentage is calculated by comparing the time a user spent in the webinar against the scheduled duration of the webinar. For example, if someone attended a 60-minute webinar for 30 minutes, their attendance would be 50%.
2. GoToWebinar
Once your GoToWebinar integration is enabled, scheduling only requires you to set a start time and end time for your webinar.
Additional options available:
- Allow Download?
- Toggle ON: Learners will be able to download the webinar recording if it is available.
- Toggle OFF: No download option will be provided.
3. Other (custom options)
The "Other" option allows you to enter any custom meeting URL. This option is typically used if: we don't have an integration with your preferred webinar provider, or if you do not have admin access to set up your webinar provider.

Duration
One-Time Webinar (Single-Day Webinar)
- Select this option if the webinar will be held for one day only
- Specify the start date and time as well as the end time on the same day
- Ideal for standalone sessions, workshops, or one-time training events
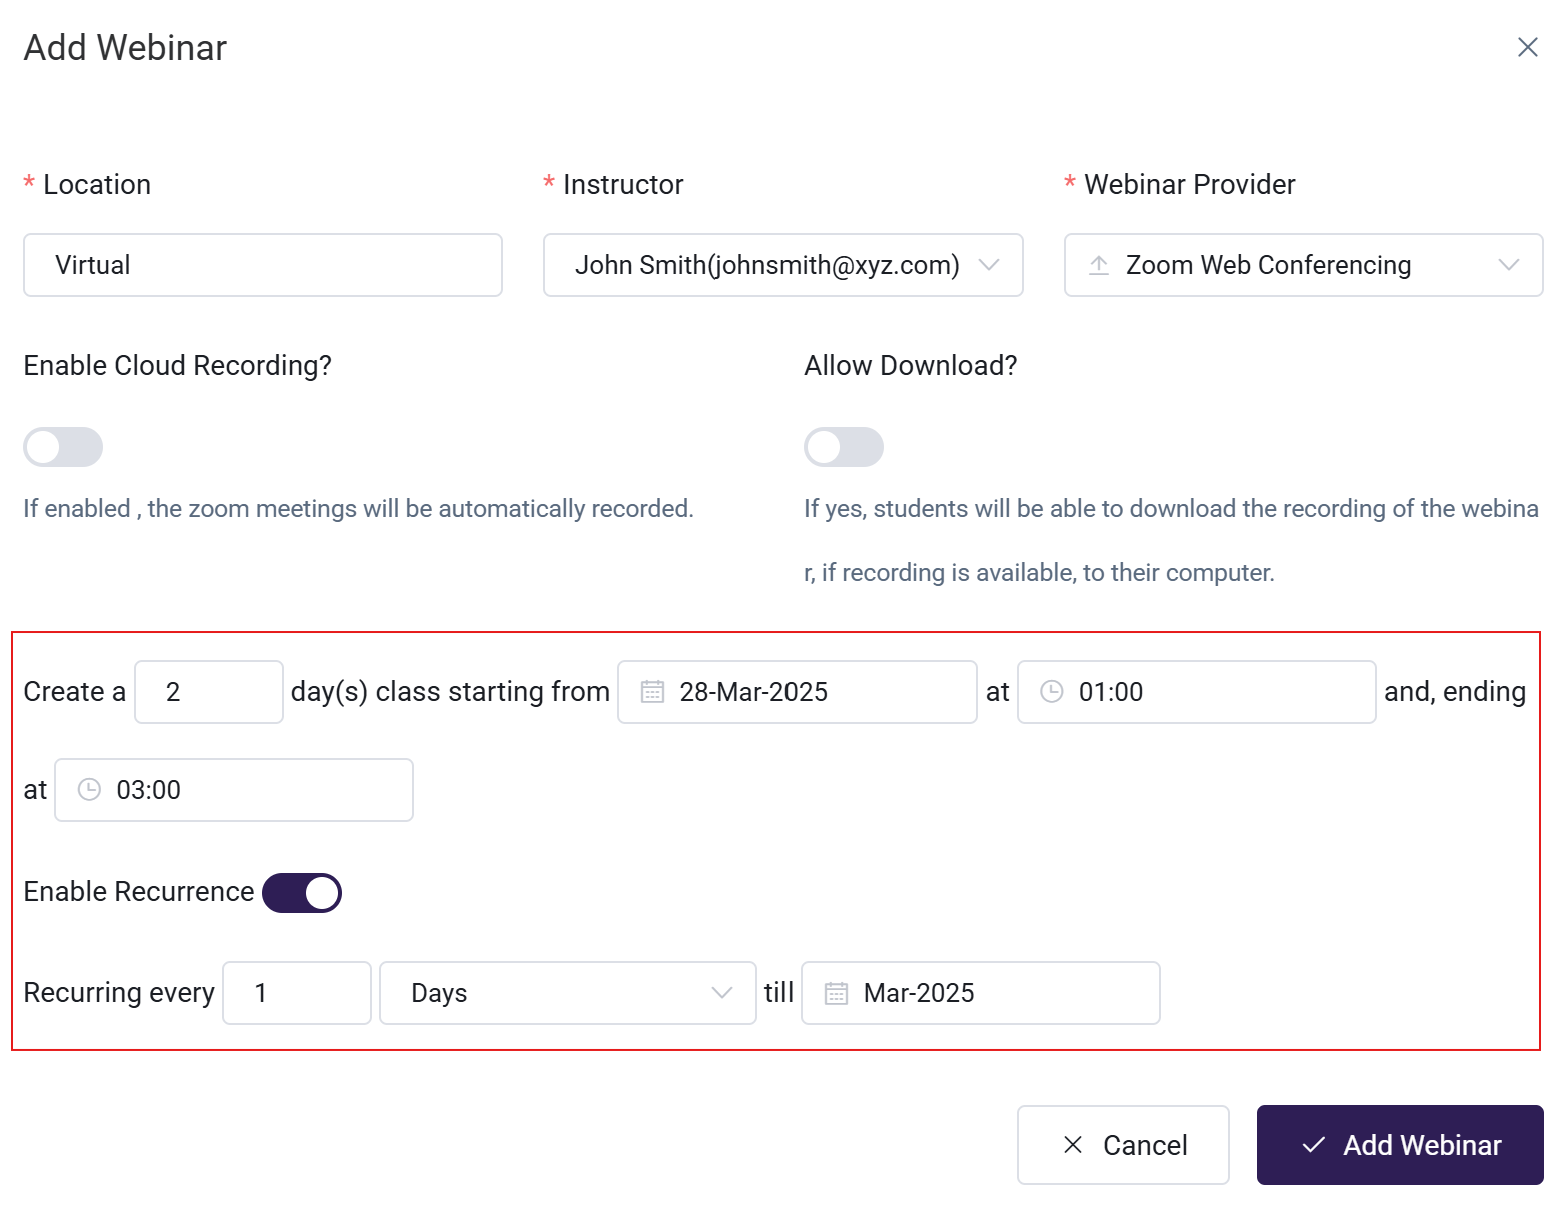
Multi-Day Webinar (Two or More Days)
- Choose this option for a webinar that spans multiple consecutive days.
- Set the start date and time, then specify the number of days and the end time on the last day.
- Suitable for conferences, training programs, or multi-session courses.

Creating a 3-day webinar that starts on 28-Mar-2025 at 09:00 and ends at 17:00, will effectively be a single webinar session with a program as follows:
- 28-Mar-2025 09:00 to 17:00
- 29-Mar-2025 09:00 to 17:00
- 30-Mar-2025 09:00 to 17:00
Recurring Webinar (Multiple Sessions Over Time)
- This option is for webinars that repeat on different dates (e.g., weekly, bi-weekly, or monthly).
- Enable the recurrence setting and define how often it should repeat.
- Useful for ongoing training series, regular meetings, or scheduled discussions.
This will create separate webinar instances for each recurrence. For example, a 1-day webinar that starts on 28-Mar-2025 at 09:00 and ends at 10:00, recurring every week until Apr-2025, would create 5 separate webinar sessions:
- 28-Mar-2025 09:00 to 10:00
- 04-Apr-2025 09:00 to 10:00
- 11-Apr-2025 09:00 to 10:00
- 18-Apr-2025 09:00 to 10:00
- 25-Apr-2025 09:00 to 10:00
Actions – Click "Add Webinar" to schedule the session(s) or "Cancel" to discard the changes.
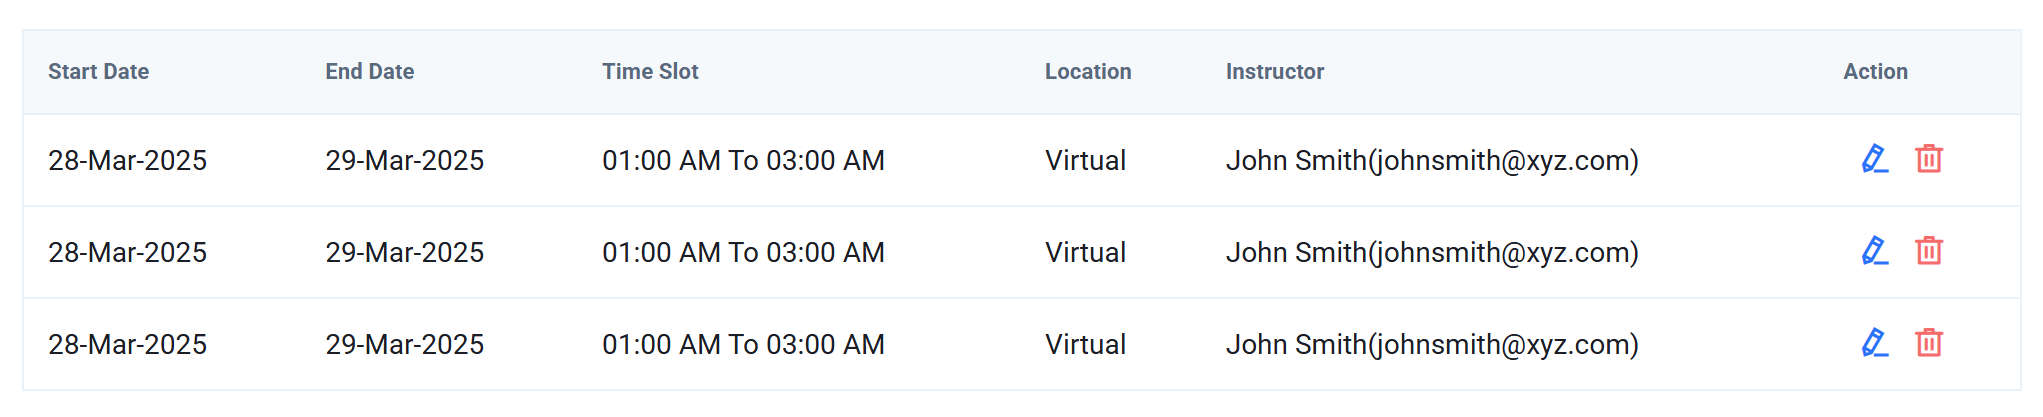
Scheduled Webinar Sessions
This list scheduled webinars with details like date, time, location, and instructor. Click the pencil (✏️) icon to edit details, update the meeting URL, and save changes. Click the trash (🗑️) icon to delete a session.
Step 4. Learning Resources
Learning Resources provide optional supplemental materials outside of the core course content.
Upload various file types (PNG, JPG, DOC, DOCX, PDF, MP4, PPT) including:
- Documents (lecture notes, guides, readings)
- Media (instructional videos, images)
- Interactive materials (worksheets, templates, infographics)
These resources enrich course content and reinforce key concepts.
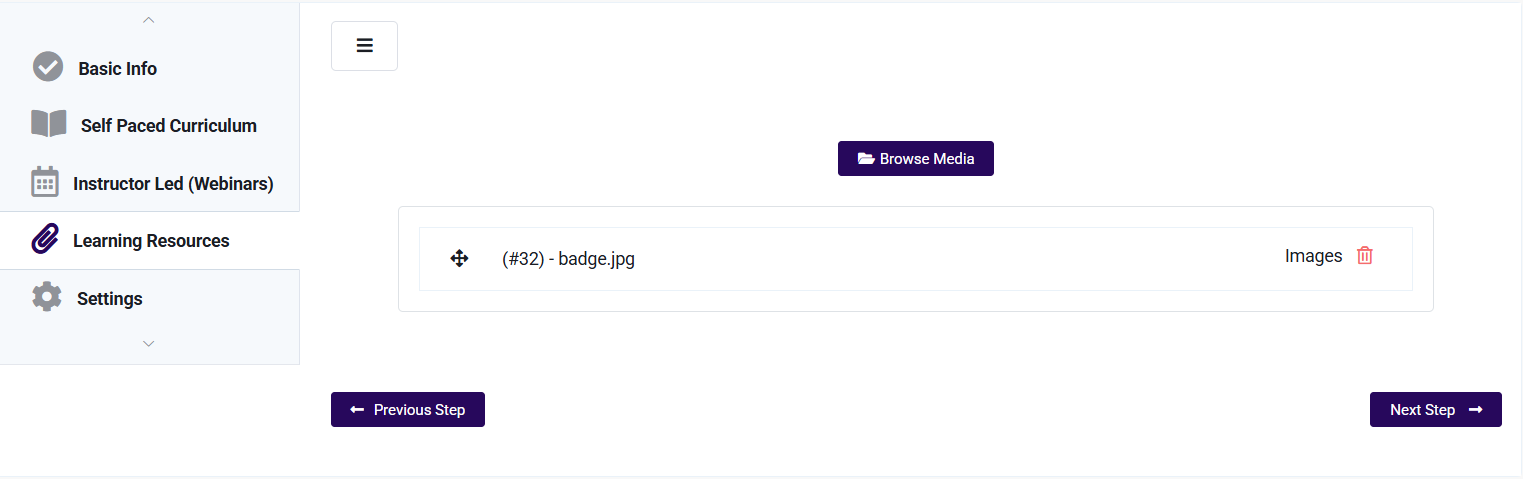
Browse Media Button: The Browse Media button opens a file upload dialog where you can select images, documents, videos, and presentations. Your selected files are then added to the Learning Resources section. To reorder, click & drag an item.
Step 5. Settings
This section covers key settings related to Grading & Certificates, Course Configuration, and Expiration Rules for a course. Here's a breakdown:
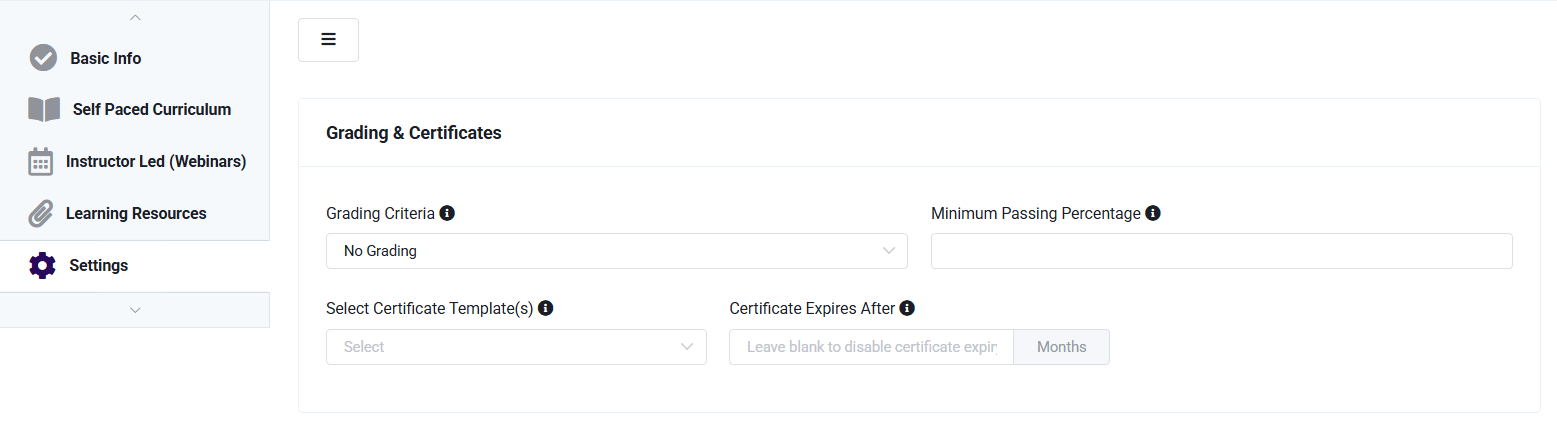
Grading and Certificate
Certificates of completion validate your learners' new skills and add credibility to their credentials. You can choose from several grading criteria or add your own custom certificates.
-
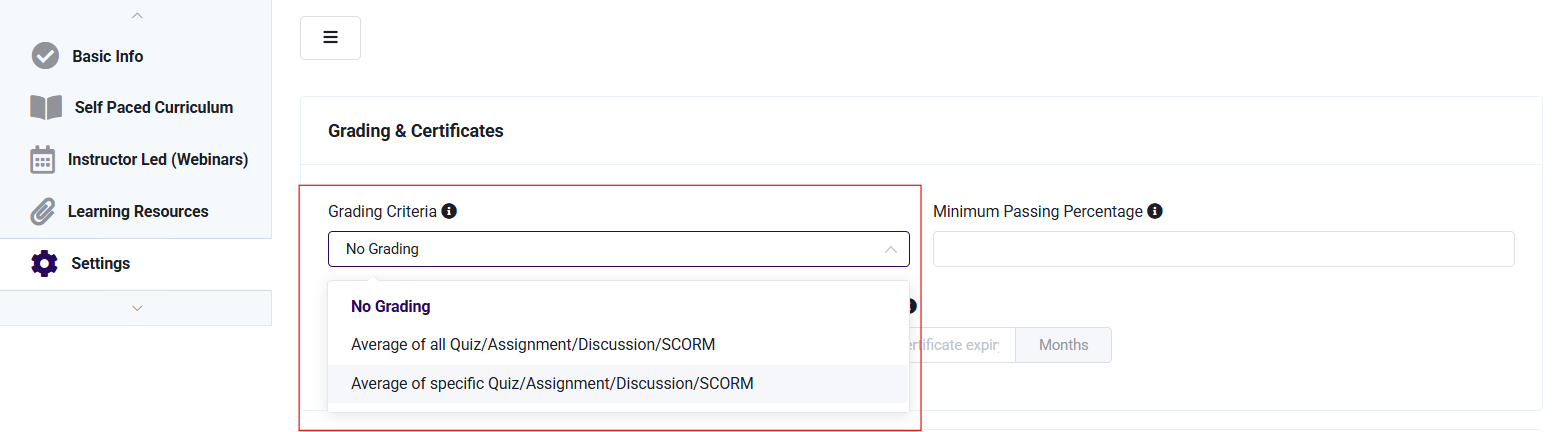
Grading Criteria
Select what grading criteria you want the certificate awarded based on:
- No Grading – Certificate awarded when all modules are completed. No grade calculation required.
- Average of all Quiz/Assignment/Discussion/SCORM – Certificate based on averaged scores from all graded modules including SCORM content. Works with any combination of module types.
- Average of specific Quiz/Assignment/Discussion/SCORM – Certificate based on averaged scores from instructor-selected modules only, including any SCORM modules you choose.
- For grading-based options, you must set a "Minimum Passing Percentage"
-
Select Certificate Template(s)
- Attach an existing certificate to your course here
- If you need to create a new certificate:
- Click "Update Course" to save progress
- Create the certificate
- Return to edit the course and attach the certificate
- Click "Update Course" again to save changes
- See Create a New Certificate for help
- Select an Accredible Group if using the Accredible integration
- Always click Update Course in the upper right to save changes before leaving the page
Learners can access, download, print, or save their earned certificates through the "My Certificates" section on their dashboard.
-
Assign a Badge or Points
The Assign Badge or Points feature rewards learners with digital badges or points based on course progress and performance. Badges recognize achievements, while points track engagement, enhancing motivation through gamification. To enable badges, go to Settings > Gamification.

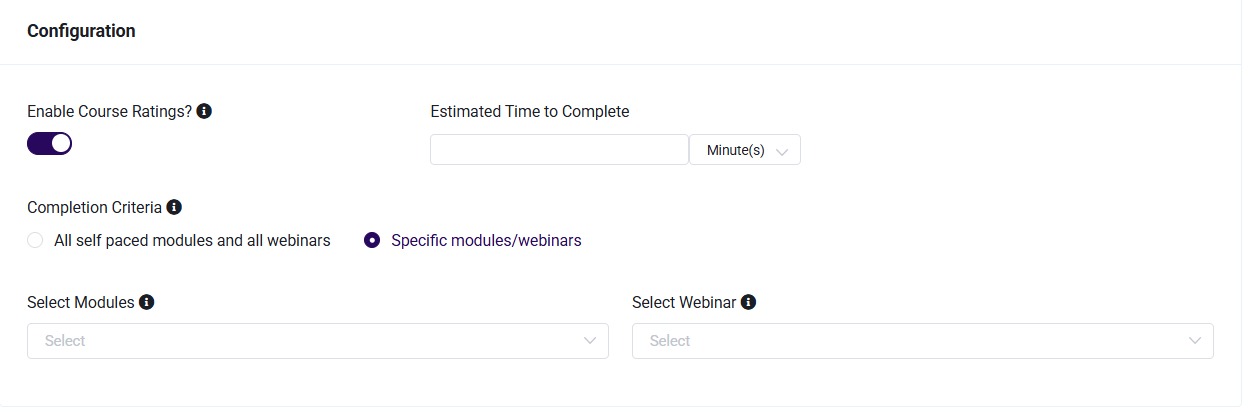
Configuration
The Configuration section lets you customize important course settings:
- Enable Course Ratings – Toggle learner feedback options to improve course quality and credibility
- Estimated Time to Complete – Set approximate course duration to help learners plan effectively
- Completion Criteria – Define requirements for course completion:
- All Self-Paced Modules and All Webinars – Requires 100% completion of all content
- Specific Modules/Webinars – Allows selection of specific required components
These options ensure your course structure aligns with your learning objectives.
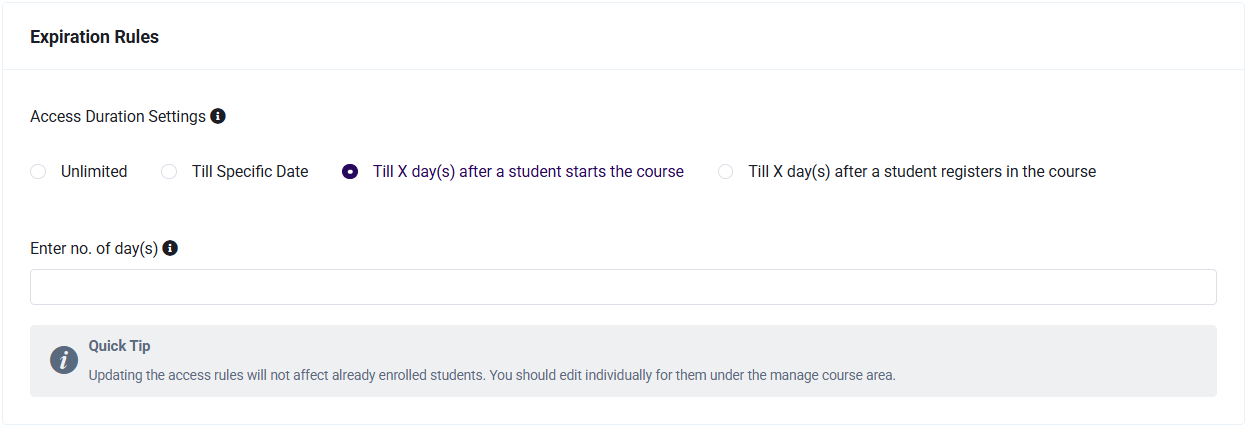
Expiration Rules
When enrolling learners, you can control how long they can access the course:
- Unlimited – Permanent access to all course content
- Till Specific Date – Access ends on the date you specify (example: if set to March 31, 2025, access ends April 1, 2025)
- Till X day(s) after starting – Access expires a set number of days after the learner begins the course (countdown starts when first module changes to "In Progress")
- Till X day(s) after registration – Access expires a set number of days after enrollment, regardless of when they start the course
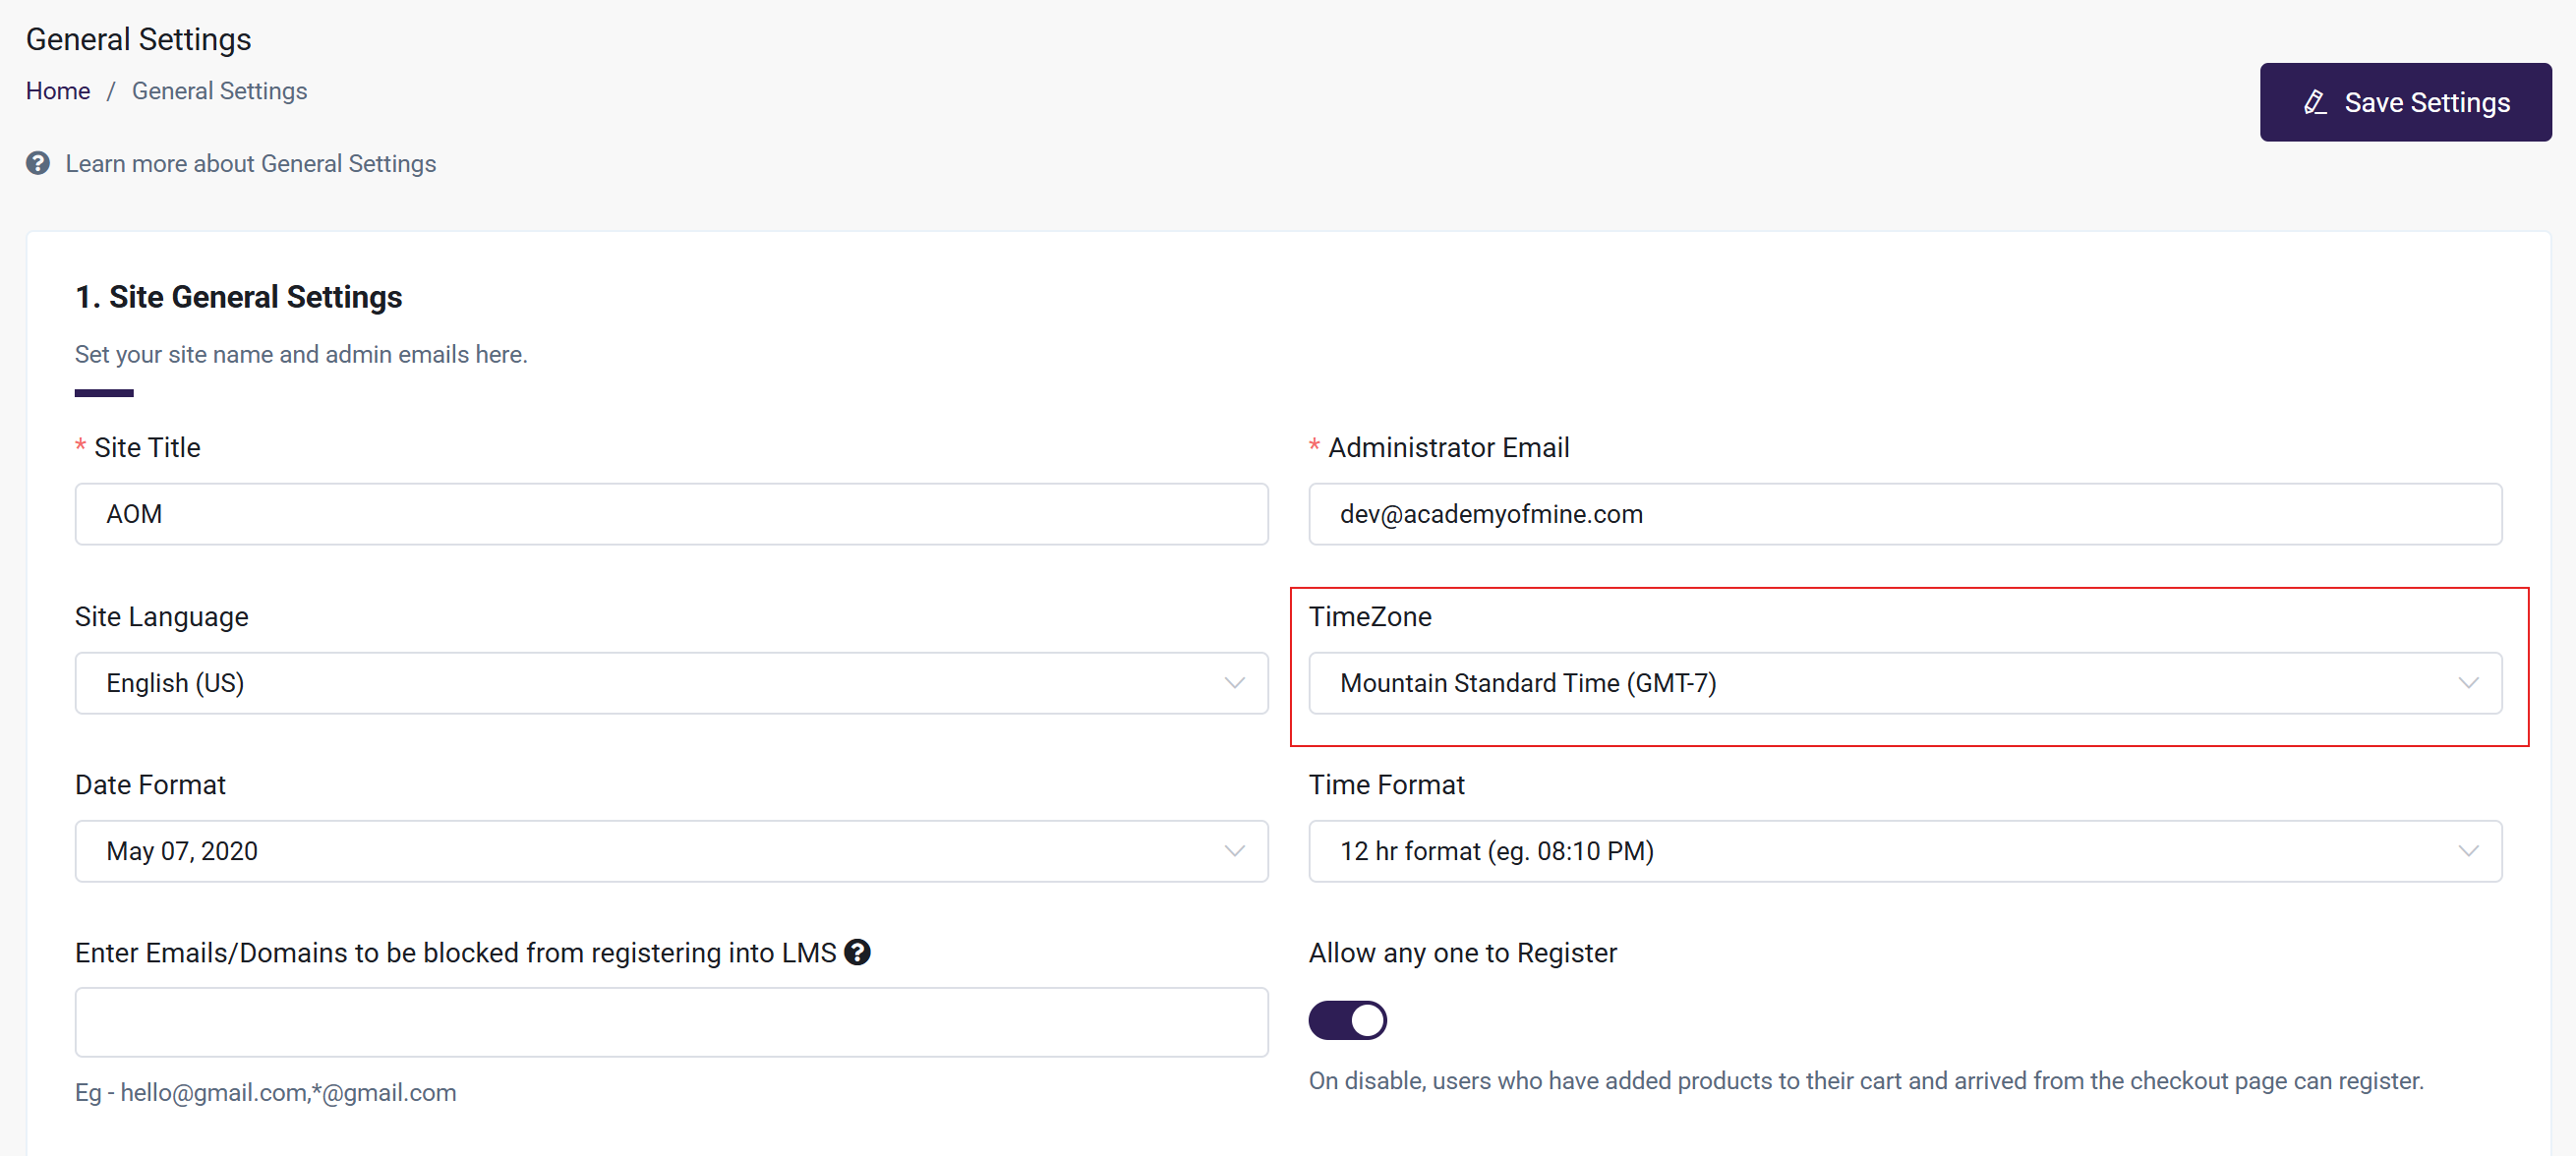
All time-based features use the time zone set in General Site Settings:
- Modules with fixed dates/intervals
- Course expiration settings (except Unlimited)
Important: Learners in different time zones may lose access even when within their local time restrictions.
Publish the Course
- Complete all required tabs in the course creation process
- Review all details (content, schedule, instructor, settings)
- Click Save Course to apply changes
- Ensure course is set to Publish to make it accessible to learners
- After initial save, click Update Course in the top-right corner to save progress while building
- Always update before leaving any page to prevent losing changes
- New courses default to "Draft" status:
- Draft courses cannot be viewed by learners
- Draft courses cannot be assigned or added to products
- When ready, switch Course Status to "Publish" to:
- Test the course
- Add it to a product
- Assign it to learners
Update or Edit a Course
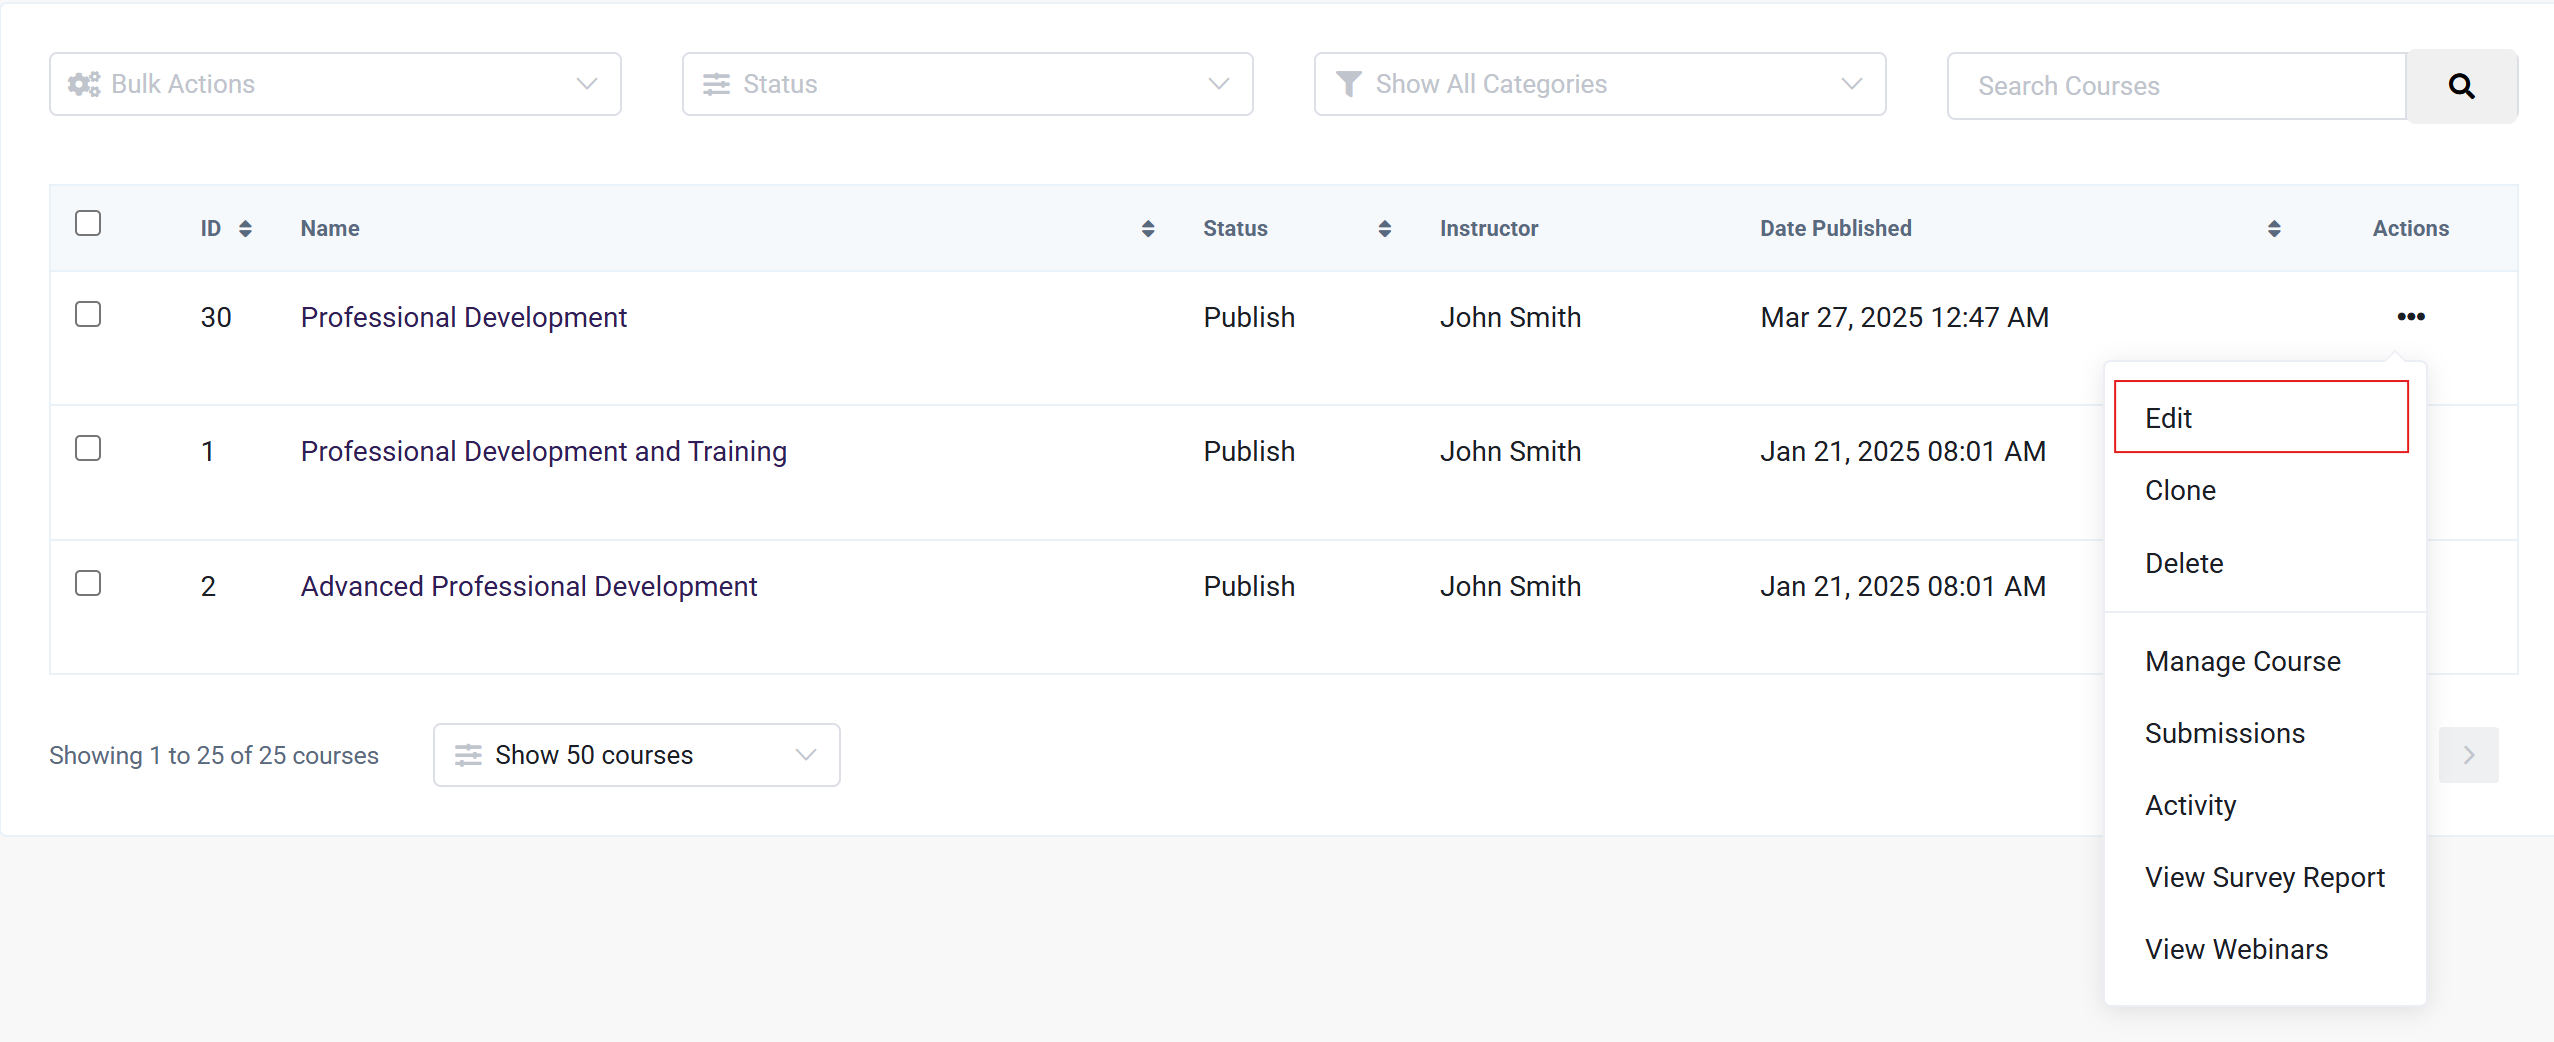
- Go to Courses > All Courses in the left sidebar
- Find the course you want to modify
- Either:
- Click the Actions menu on the right and select Edit
- Click directly on the course name
- Click the Edit option on the left of the course listing
- This will open the Edit Course page where you can make your changes
- Navigate through the tabs to find the information that needs updating
- Edit content as needed (same process as course creation)
- Click "Update Course" in the top right to save your changes
- For detailed guidance on specific tabs, refer to the tutorials above
Caution when editing courses with active learners:
- Adding modules to courses with locked modules can disrupt learner progress
- Example: If a learner has completed modules 1-4 of 6, adding a new locked module between modules 1-2 will:
- Block progress until the new module is completed
- Require completion of the new module before returning to later modules
- If modules are not locked, new modules will appear as "Not Started" and learners can continue their current progress
Next Steps
There are several ways to use the courses in your account. The next article will teach you about managing your courses: