Creating Instructor Led Courses for In-Person or Virtual Classes
If you offer material that is taught in-person in a classroom or in a live virtual format, you can create classes that are part of a course. Using our Instructor Led option, you will be able to create a course and then offer classes that are held on different dates/times for physical locations or virtually (via webinar). With the Instructor Led format, the admin or course creator will be able to track attendance for each class session, view/download the class roster for a particular class, as well as upload any study materials that the students may need to to download for the class.
From the student side of things, the student will be able to select what location and dates/time they are enrolling in from the Course Catalog, and will view the classes they are registered in within their student dashboard. They'll be able to download study materials and will receive email reminders prior to the class with the class details.
In this article, we will be reviewing the difference between Self Paced and Instructor Led courses, how to create an Instructor Led course, enrolling students in a class, configuring the related automated emails, and what the student experience is. We will also go over how to create a product that contains an Instructor Led course and create a page for those courses, so that students can self enroll into the class.
Self Paced vs Instructor Led Courses
AOM offers both Self Paced and Instructor Led courses. The difference between this is how the material is presented to the students, and therefore, each type is built a different way.
- Self Paced courses are made up of modules, which contain various types of content--PDFs, videos, text, quizzes, etc for a course that the student can take on their own, without being in a class led by an instructor. You can also include webinar modules in these courses, where students can attend the webinar to connect with you at a scheduled meeting time
- Instructor Led courses are made up of classes instead of modules. The classes each have a date, time and location that they are offered and the student will attend the classes, and the material is presented during the class. The location can be both in-person, or virtual. If virtual, you will need to connect to one of our webinar provider integrations such as Zoom, GoTo Training or GoTo Webinar. As mentioned above, the Instructor Led courses have the ability for you to track attendance: you can mark a student as registered, attended, a no show, or cancelled.
Creating an Instructor Led Course
Now that you understand the difference between the types of courses, let's go through how to create an Instructor Led course. If you are needing to create a Self Paced course, please see this document.
Add Location
Before you create the course, you'll first need to add the location of your course if you are doing in-person offerings and haven't yet added the location to your account. To do so:
- From the Admin Dashboard, select Courses, then Location
- Click Create Location
- Add the Location Name, and Address Information. You can also add a map URL if you'd like
- Click Submit to Save. Now you can move on to create the course itself
Step 1: Basic Info
In this section, you'll enter the basic information required for the Course. The more complete this section is, the better the Course foundation. This translates to better organization for those on the Admin side, and more clarity for Students.
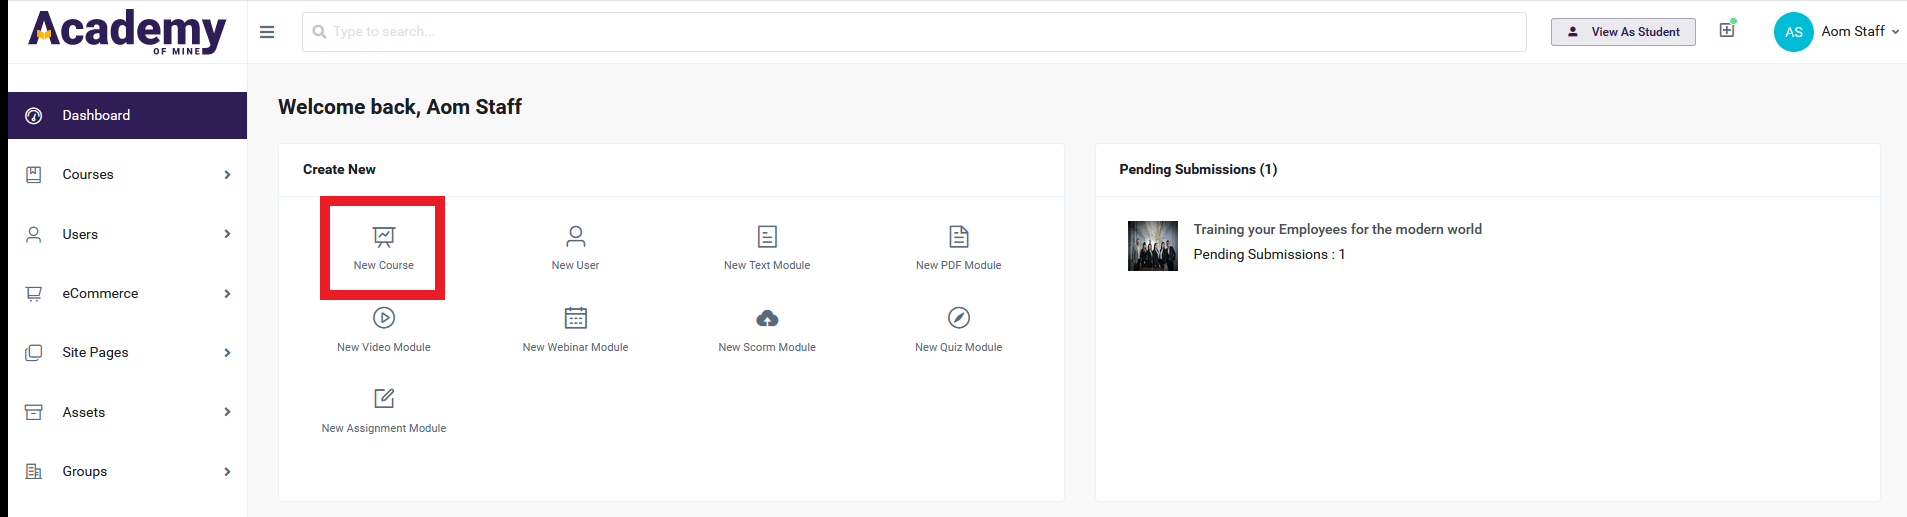
- The most direct way to create a new course is via the Admin or Instructor Dashboard, under the "Create New" area. Select "New Course"
- Admin view:
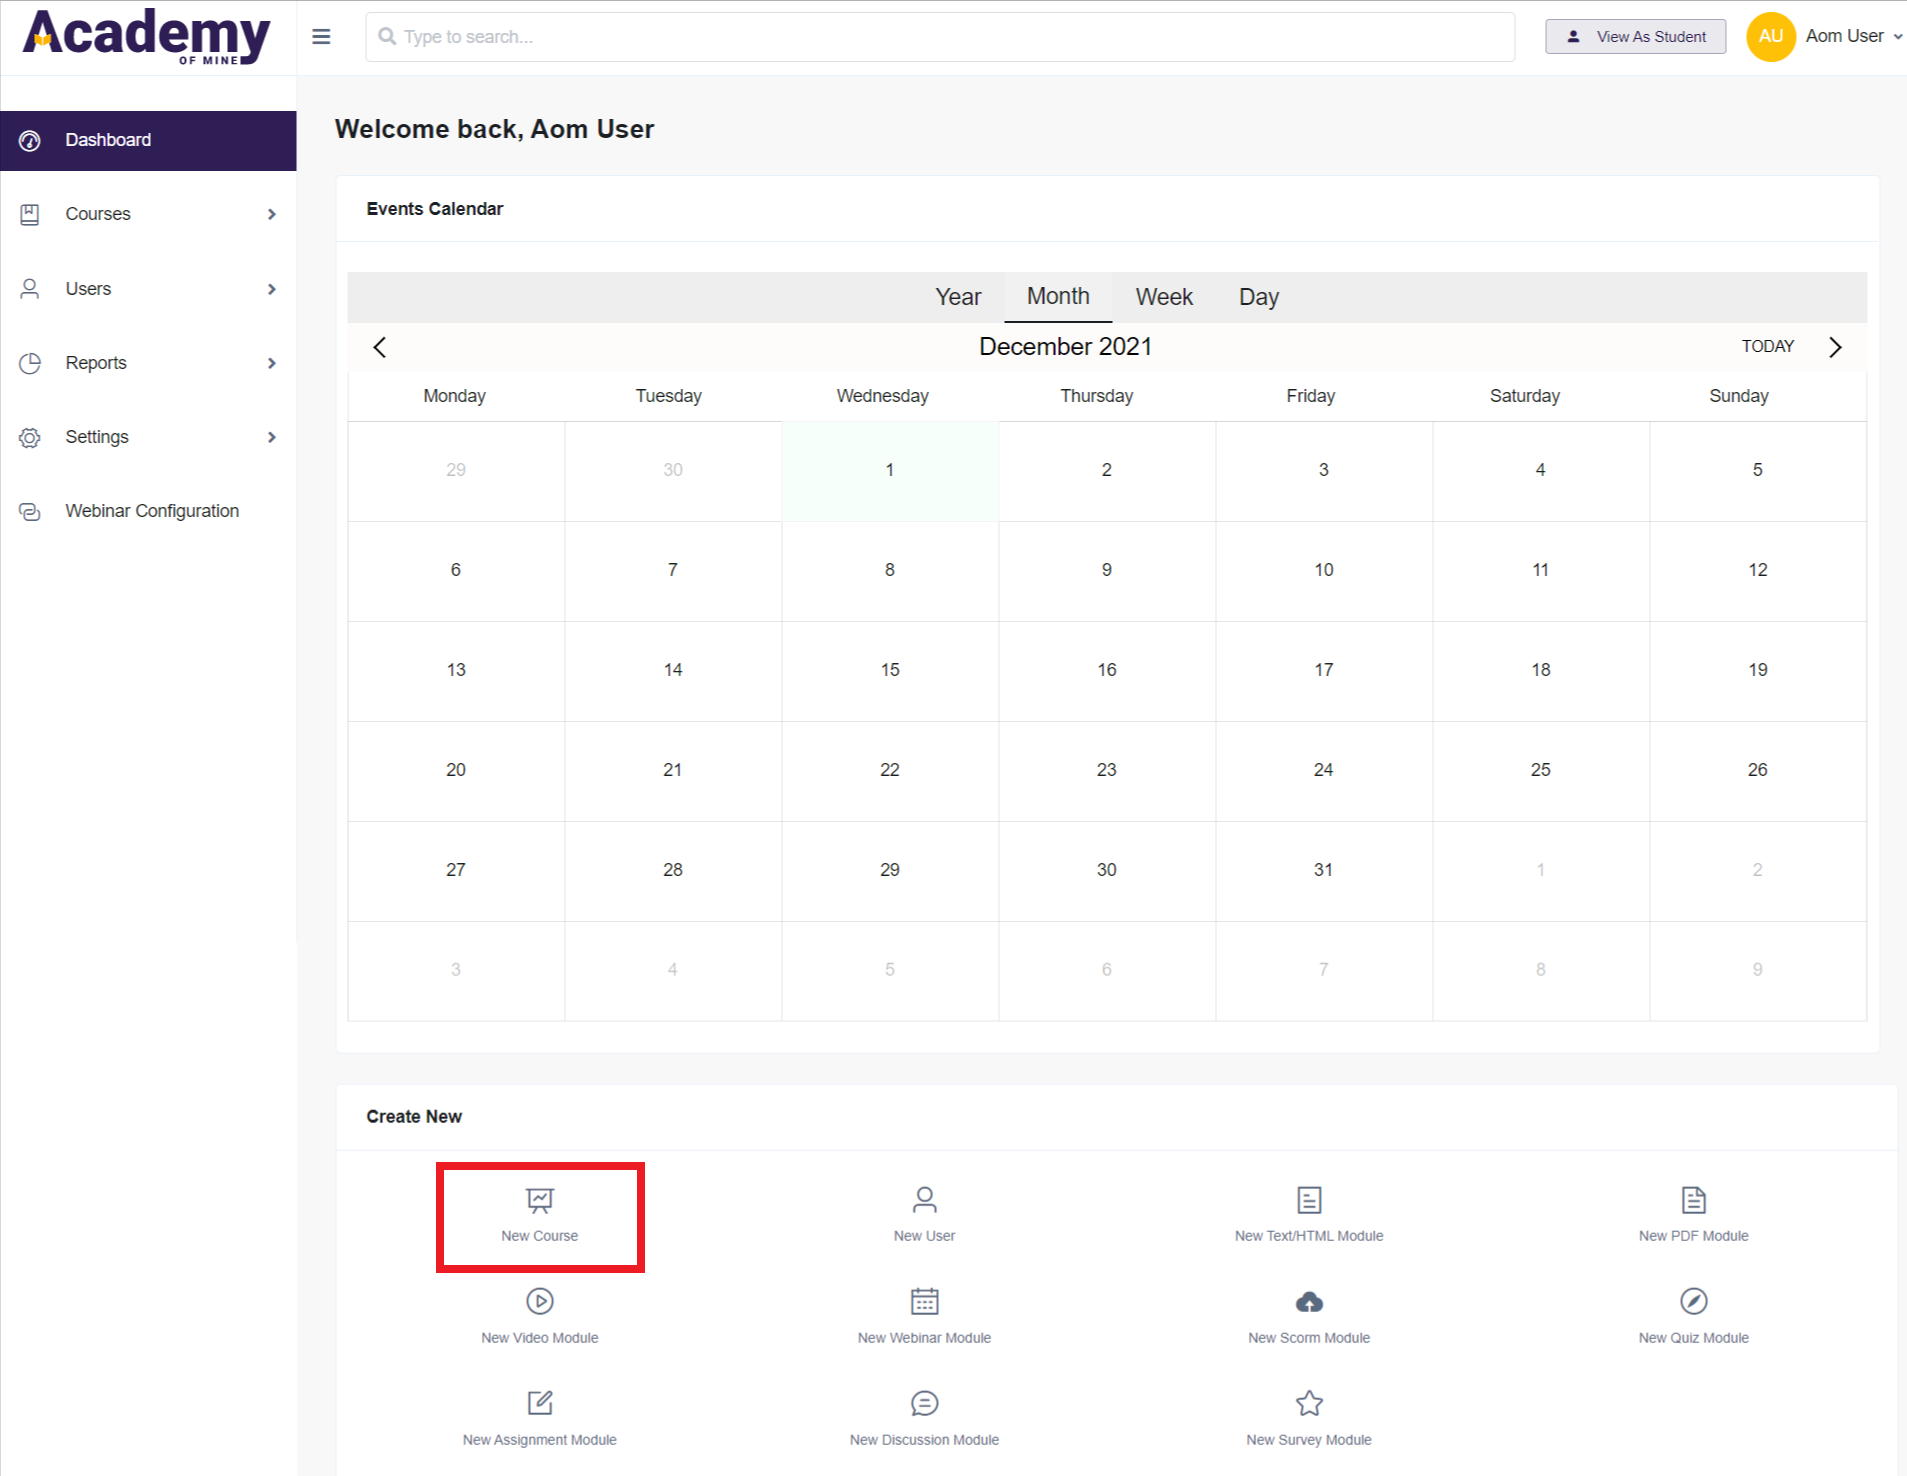
- Instructor view:
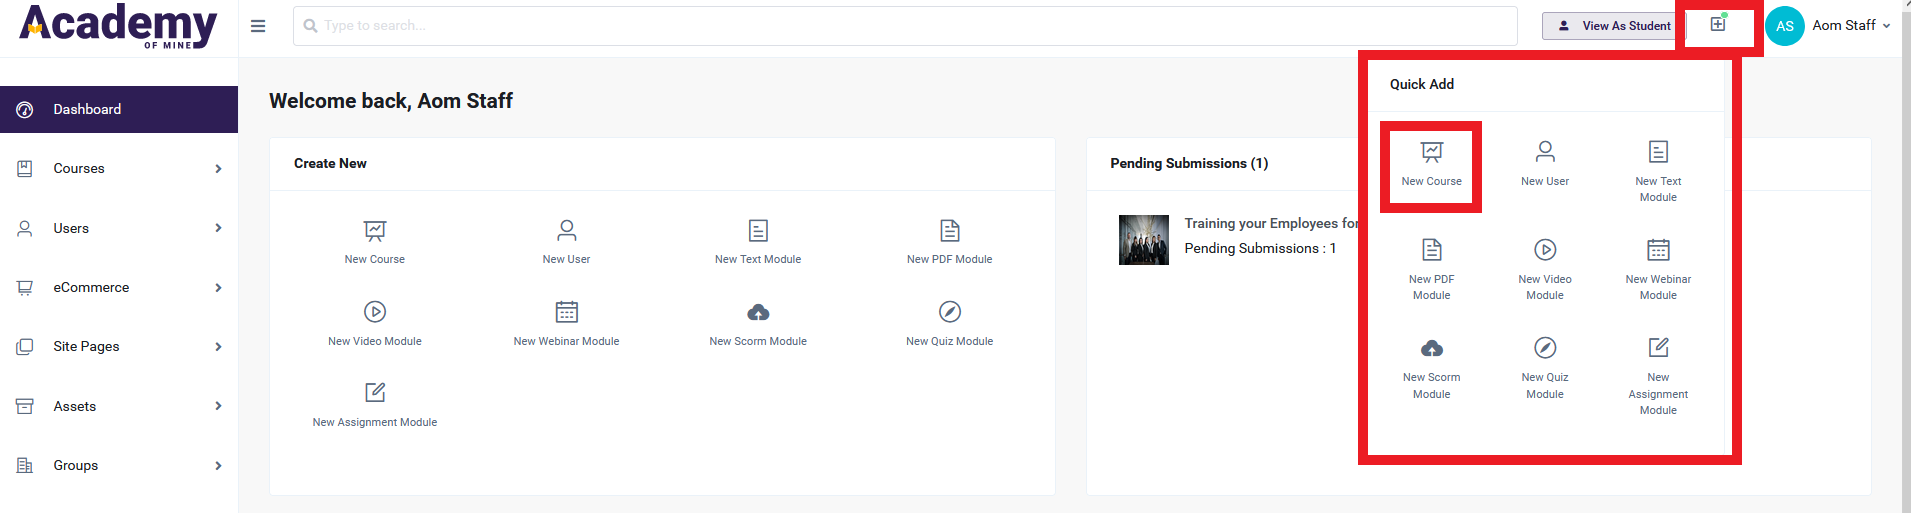
- Alternatively, you can create a new course by using the "Quick Add" menu. Select the "+" icon in the upper-right part of the screen and select "New Course".
 2. You may also create a new Course by clicking Courses on the Admin or Instructor Dashboard, then All Courses. Then select "Create Course"
- Once you're on the Course creation page, you can enter the Basic Info. First, enter the Course Name. This is the most important identifier, and will be displayed on the Course Catalog page, Products page, and many admin pages inside the account. Students will see the course name when they are logged in, and the course name will be printed on the certificates you award.
Save your course often to preserve your data. You are required to at least enter the course name before saving it, and then click Update Course as you add more information to avoid data loss.
-
Now, select the Study Method: you can choose Self Paced, or Instructor Led. Choose Instructor Led for this tutorial
-
Now, add the Course Instructions so students know exactly what to expect. Suggested information includes a quick description of the course, and any other details you'd like to include.
-
Add a Featured Image to your Course to help give students a custom visual reference to associate with the Course. Select "Browse Media" you will then see the Media Library, where you can upload the image. When a file has been uploaded successfully, it will be listed in the Media Library. Now you can select it to use in your course by clicking on "Choose / Select". You may also select a previously uploaded image for your Featured Image.
-
Note that if you're an Instructor, clicking on "Browse Media" may redirect you to the permission error page as shown below. If this happens, reach out to your administrator and ask for the Media permissions. After your administrator grants you this permission, you'll be redirected to the Upload Media page by clicking on "Browse Media".
-
Keep in mind, Featured Images are not required. If you choose not to upload an image, a sample image will be displayed instead. This sample image will be the same for all Courses that do not use a custom Featured Image.

-
If you wish to remove the featured image after uploading it, you may delete it by clicking on the trashcan icon displayed at the top right corner above the featured image. If you delete it, the sample image will be displayed instead
-
The Featured Image is in a 3:2 aspect ratio, with the width being 1.5 times the size of the height. We recommend image dimensions of 300 px by 200 px for the best performance and visibility. Larger images can cause issues with page size and performance. Smaller images can cause formatting issues. The key is that all Featured Images should be the same size, so they look uniform in the student view and course catalog.
-
When not in the process of creating a course, you can upload and view files in the Media Library by selecting "Assets" and then "Media Library" on the Sidebar.
-
Add Course Credits--if you are awarding credits to your Students you can add them here. Course credits can be used to track continuing education completion, or if the course is a part of a larger curriculum. The number of credits can appear on the Course certificate if you choose.
Warning: Once you have saved the Course, remember to use the "Update Course" button in the top right corner to save your progress as you create your Course. You must update before leaving the page to avoid losing any changes.
Also note that a new Course will have the Course Status "Draft" in the first instance. This will prevent you from making the Course publicly available until you are ready. Courses with "Draft" status cannot be used or viewed by anyone. These cannot be assigned to students or added to a Product. Once you have created the complete course, switch the Course Status to "Publish" for testing, add it to a Product, or assign it to a student.

Step 2: Classes
Now, click to Step 2. This is where you will add the classes, which have a date, time and location that they are offered and the student will attend the classes. The material is presented during the class. Think of the course as the overarching curriculum theme (for example, CPR 101) and the class is the instance that the student will be attending (like July 1st at 2PM or August 1st at 3PM).
-
If you haven't already, click Save Course.
-
Click + Add Class
-
Choose if it will be one time, or a recurring class
- For a one time class, enter the class start and end date and time.
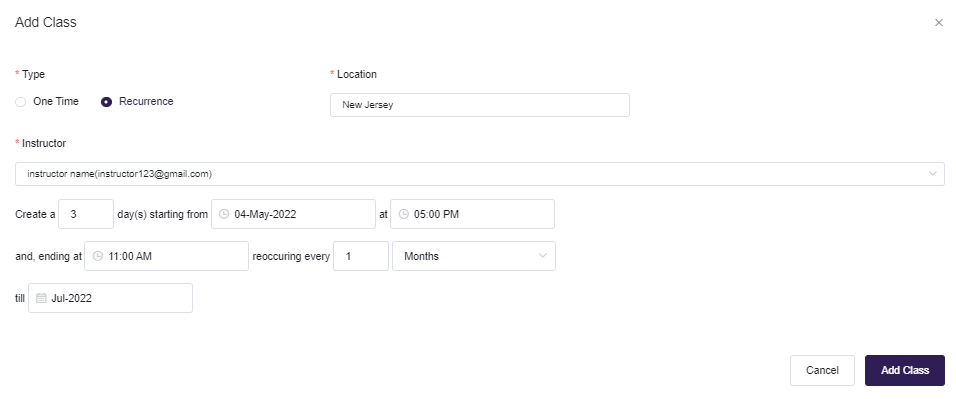
- For a recurring class, click Recurrence. Choose how many days the class will go on for, and then enter the start date/time, how often it will reoccur and when it will recur until.
For example, if you wanted to create a 3 day class starting from May 4, 2022 at 10 AM and, ending at 5 PM reoccurring every 1 month till July 2022 will result in creating the following classes:

and would be set up like so:
-
Select an instructor from the dropdown menu
-
Choose a location from the dropdown menu
- If you are doing a virtual class, you will need to select the webinar provider. If you have not yet set up the integration with the chosen webinar provider, please see this document for more details on setting that up: Setting Up Webinar Integrations
-
Click Add Class when you are done adding all information
-
If you would like to add study materials to the class for the student to download, after you have saved the class, click the Edit button
-
Then under the Study Materials heading, click Browse Media
-
Upload the study materials if they have not already been added to the Media Library, or select the materials from the Media Library shown by clicking "Choose/Select"
-
You can also click Add Section if you would like to group different study materials under different sections to organize them for students. The sections and study materials can be drag and dropped to move them around as needed.
-
Click Update Class to Save the study materials to the class
Step 3: Grading & Certificates
Certificates of completion are an important tool for any student taking your course. They authenticate student's new skillset and confer credibility to obtained credentials. We have a few grading criteria you can choose from, and you can add your own certificates.
To set up the grading and certificates:
-
From the Course Curriculum page, select Step 3: Grading & Certificates from the tabs across the top, or choose "Next Step"
-
Select your Certificate Template
- If you have already created a certificate, you can attach it to your course here.
- If you have not created a certificate, you cannotcreate a certificate while creating a Course and will need to create one before attaching it to the course. You can finish creating the Course, make sure to select the "Update Course" button to save all progress, create the certificate, and circle back to edit the Course and add the certificate, keeping in mind you will need to select the "Update Course" button again when you are done. For information on creating a certificate, take a look at the Create a New Certificate help document.
-
Choose if the certificate will expire
-
Save your course changes by clicking Update Course in the upper right corner. If you get distracted or navigate to another section of the platform, changes may not be saved if you do not update before leaving a page you have made changes to.
When a student selects "My Certificates" on their dashboard, they will have quick and easy access to the certificates they have earned. Certificates for each completed course can be downloaded and saved or printed.
Video Walkthrough
If you're more of a visual person, check out this video going through how to create an Instructor Led course for in-person classes:
Enrolling Students into a Class
Once your course has been created and you have added the classes, you can enroll students into the class. You can enroll single or multiple students into a class via the Manage Roster page, or you can bulk upload many students as well. Later in this guide, we will go over how a student can self enroll into a class as well.
Enrolling Student(s) via Manage Roster
- From the Admin Dashboard, select Courses, then All Courses.
- Find the course that contains the class you wish to enroll the student in and click the three-dot action menu--select Manage Course
- Find the class you wish to enroll the student into (you can filter by date and location) and click the three-dot action menu. Choose Manage Roster
- Here, you can adjust a student's attendance from Registered to Attended, No Show or Cancelled. You can also use the Bulk Edit feature to select multiple students at once, and adjust their attendance status or assign a certificate en masse.
- To enroll a student or students, type in their name(s) and then click +Enroll Students. This will add them to the class, and they will have the status of Registered.
Bulk Enrolling Students into a Class
If you would like to enroll a large number of Students into a class, you can use the Bulk Upload option. This allows you to upload a simple formatted Excel file containing the basic student information for up to 500 students at once. If someone in the list does not yet have a user profile, the bulk upload process will create one for them, though even when students already exist in the system we can use this method to enroll them into a course (in this case, the student is identified by the email address and is just enrolled; no account detail are changed).
- From the Admin Dashboard, choose Users, then choose Bulk Upload. (Selecting the Bulk Enroll option on the Manage Course page will take you to the Bulk Upload Users page.)
- Follow the instructions on the page to upload the Excel file. The file must be in Excel format and comply with the header structure as presented in the instructions. A sample file is available to download on the Bulk Upload Users page, which can be used as a starting point. This file already has the header columns formatted correctly, and only requires you to add the student records.
The file must be formatted with the following header/first row values:

Email (mandatory): If the email address is already in use by a user profile, the existing user will be enrolled in the courses selected.
First_Name (mandatory).
Last_Name (optional): The Last_Name column does not need to be filled in for the user but can be used to immediately populate this value.
Password (optional): The Password value does not need to be filled in for the user but can be preset as well. If a password is not provided in the file, one will be auto-generated for the student who change this later, and the student will find the password it in their New Account email (which by default is enabled).
There is a limit of 500 students that can be uploaded per file to ensure there are no timeouts in the middle of the upload. If you have more than 500 Students, please separate them into multiple files, and upload them back-to-back.
- Select the Instructor Led course that you want the students to be uploaded to, and the location and date of the specific class
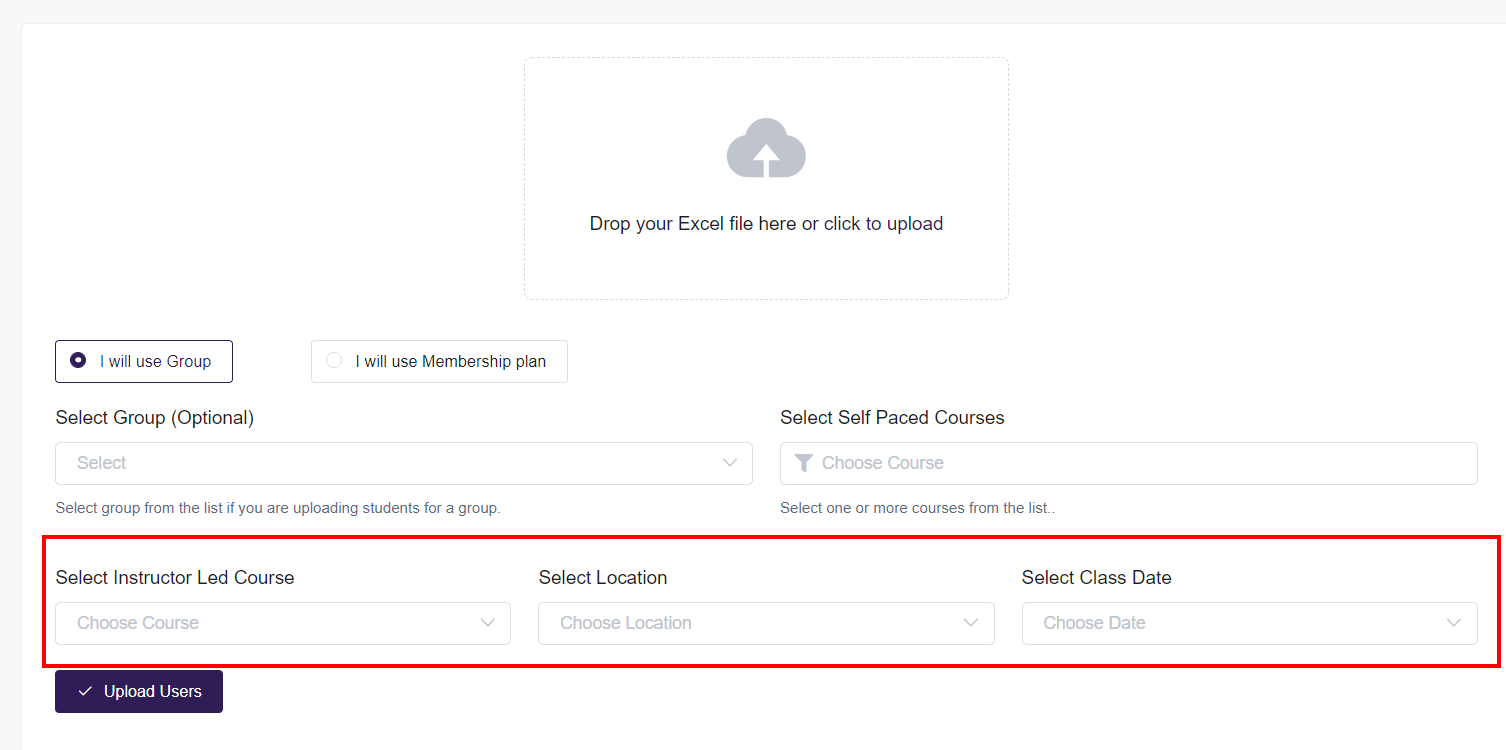
- Click Upload Users
Managing the Roster
On the Manage Roster page, Admins and Instructors of a class can view the roster, adjust attendance status, assign certificates and enroll students into a class (as mentioned above). You can also remove a student from the course, or log in as them to see what they see.
- From the Admin Dashboard, select Courses, then All Classes. This page can also be filtered by date and location.
- Find the class you wish to view or manage the roster and click the three-dot action menu--select Manage Roster.
- Here, you can adjust a student's attendance from Registered to Attended, No Show or Cancelled. You can also use the Bulk Edit feature to select multiple students at once, and adjust their attendance status or assign a certificate en masse
- To assign a certificate to an individual student, click the three-dot action menu next to their name and click Assign Certificate
- You can also use that three-dot action menu to remove a student from the class, or switch to their login to view things from their perspective. This is helpful with troubleshooting with a student
Setting Up an Instructor Led Course for Self-Enrollment by Students
If you would like students to be able to self enroll into a class, you will need to create a product that includes the Instructor Led course. Courses are the content, while the product is how the student can purchase and enroll into the class of their choosing.
This article goes into depth on creating a product. The only change is that when you choose the content access, you will select the type of course: Self Paced or Instructor Led. Once you select Instructor Led, you will be able to select the appropriate Instructor Led course. Note that unlike the self-paced course, there can only be one course for each product.
You will also need to create a new page with a product listing block for Instructor Led courses. A single product block (which lists your products automatically on a page when the block is added) can't have both Instructor Led and Self Paced courses in one block, due to their fundamentally different set ups--for example, students will be able to filter an Instructor Led catalog page by date and location, which does not apply to Self Paced courses.
To create a page for your Instructor Led courses, follow these steps:
- From the Admin Dashboard, select Pages & Menus, then Pages
- Click + Create Page
- Build the page using our page builder as you see fit, using sections (the blue boxes), rows (the green boxes which organize blocks) and blocks (the grey boxes that contain the actual content--this is where you will add the product listing block that will contain your products). For more details, please see this article: Using the Page Builder
- You will need to add a product listing block so that your products will show on this page. Once you have configured the page, click the grey + to add a block and choose product listing block.
- Select the gear icon on the product listing block to open settings
- Choose Instructor Led as the Product Type
- Choose if you would like the products to be shown in a card, list, or calendar view
- You can also configure other settings such as the sort direction and if you want to exclude certain products
- Click Save Changes when you're done
- Click Preview to ensure your page is looking how you want
- Click Save Page
Now, you can add that page to a menu using the steps here: Customizing Navigation Menus
Configuring the Class Enrollment and Upcoming Class Email Notifications
There are two automated emails that can be configured related to the classes:
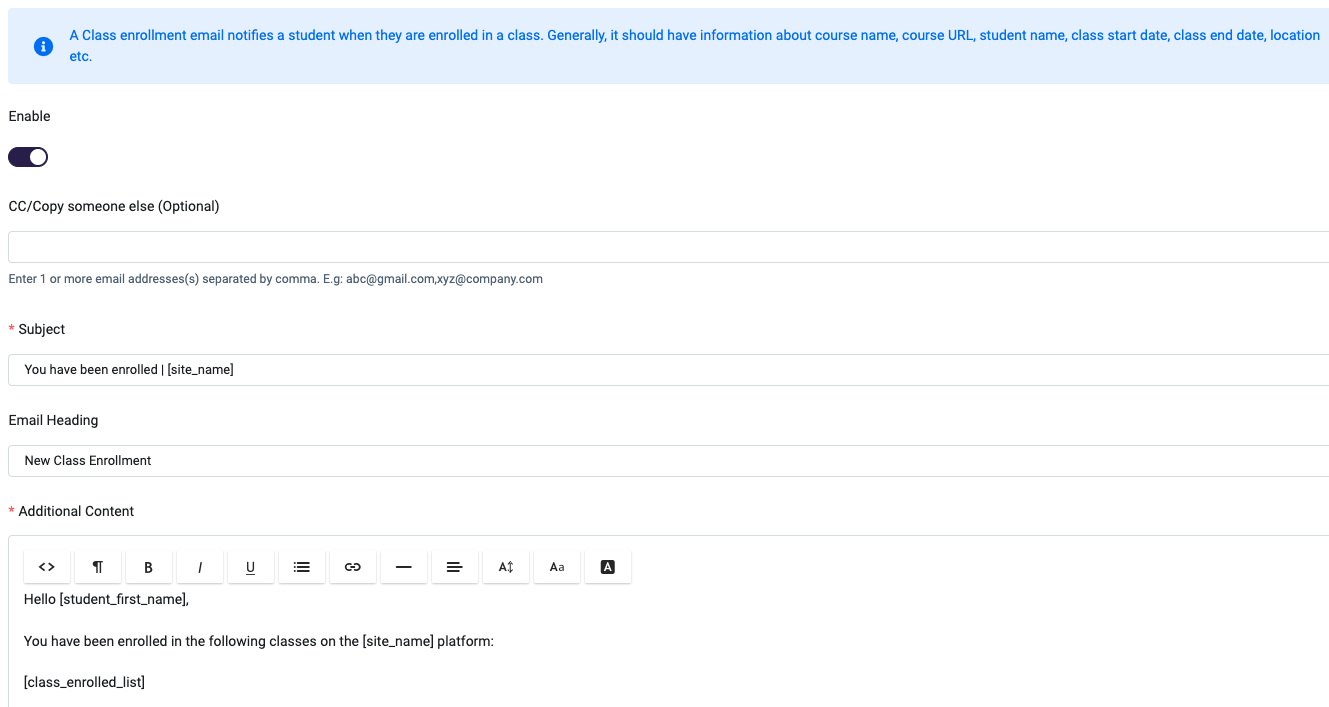
- Class Enrollment Email: this notifies a student when they are enrolled in a class
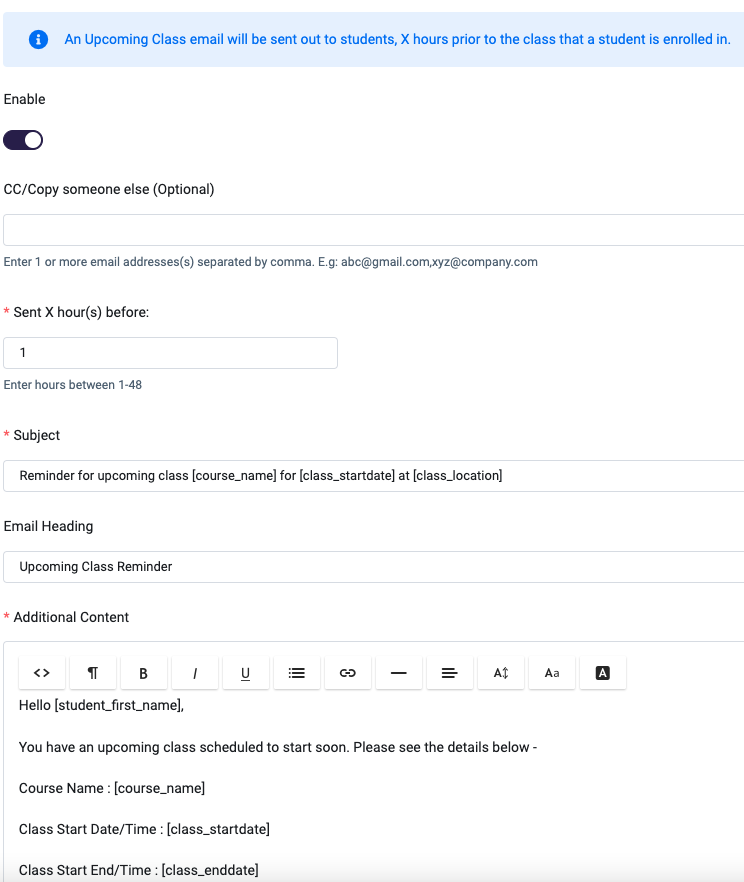
- Upcoming Class Email: This is a reminder email that will be sent out to students, X hours prior to the class that a student is enrolled in
Each type of the above automated email must be enabled before it will be sent automatically. The enabled button must be toggled on for both Primary Recipient or Other Users to be Notified, if you plan on using either.
-
From the Admin Dashboard, select Settings, then Email
-
Choose the LMS tab across the top
-
Then you'll see those two email types at the bottom of the left sidebar. Select which one you'd like to enable or edit
-
The enabled button must be toggled on for both Primary Recipient or Other Users to be Notified, if you plan on using either.
-
Now, let's look at recipients. There are three different types of recipients who can be named to an automated Account email: the Primary Recipient, Other Users to be Notified, and CC'd Recipients.
-
For Primary Recipients:

- Each automated email is sent to a Primary Recipient. In the case of both of these emails, the primary recipient is the student.
-
CC'd Recipients: You can also CC other email addresses to receive these messages if you wish. The addresses can be added to the CC field, separated by commas.
-
Other Users to be Notified: The emails will also has an option to send a message to Other Users to be Notified. These other users must be added to the CC field.

- The Other Users to be Notified message uses a separate email template from the Primary Recipient message. It's possible to customize this message in any way you wish. It's generally recommended for the Other Users message to be set up for internal use, and sent to an accounting team for recordkeeping, for example.
-
Subject: You can edit the subject line to be what you'd like
-
Heading: You can also adjust the email heading
-
Additional Content: This is the main body of the email and you can change this template as well. As mentioned above, you will see shortcodesat the bottom, which are dynamic fields that will fill with the appropriate information. Simply copy them into your email body if you'd like to use them.
- For the reminder email, enter the number of hours prior to the class start you would like the student to be notified
-
Once you have made all necessary changes, click Save Template, or send yourself a test email
Once saved, the student will receive these emails when they are triggered by a class enrollment, or when their class is coming up! More screenshots here:
Student Experience of a Class
Now let's review what the student experience of a class is. We'll go over what they see if they are going through self-enrollment, as well as how they can access study materials.
Purchasing a Class Product as a Student
If you have set up a product that contains the Instructor Led course, this is what the student will see on your Course Catalog, and how they can enroll:
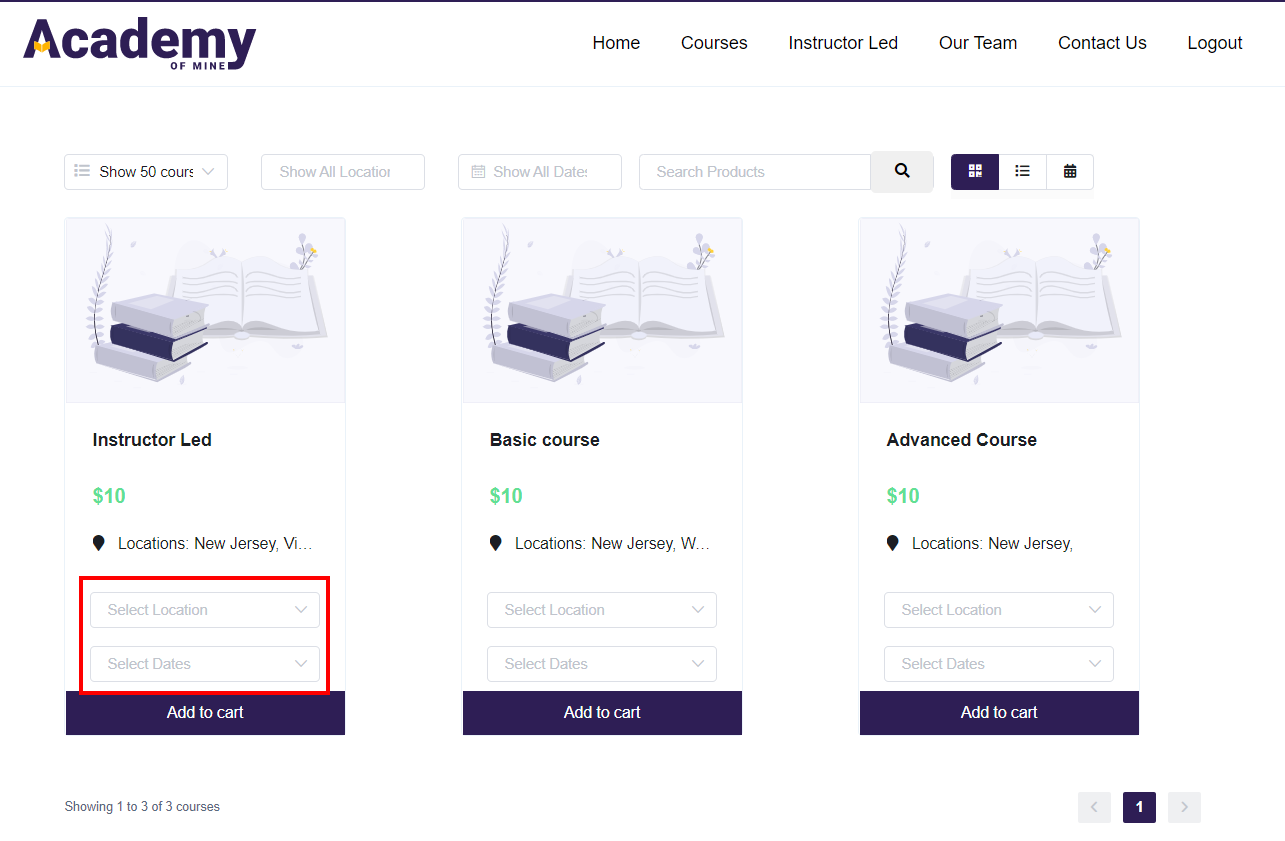
- On the Instructor Led catalog page you created, the student will see the Instructor Led products. They will be able to filter the catalog page by date and location, and will also be able to view the products on a calendar or list view.
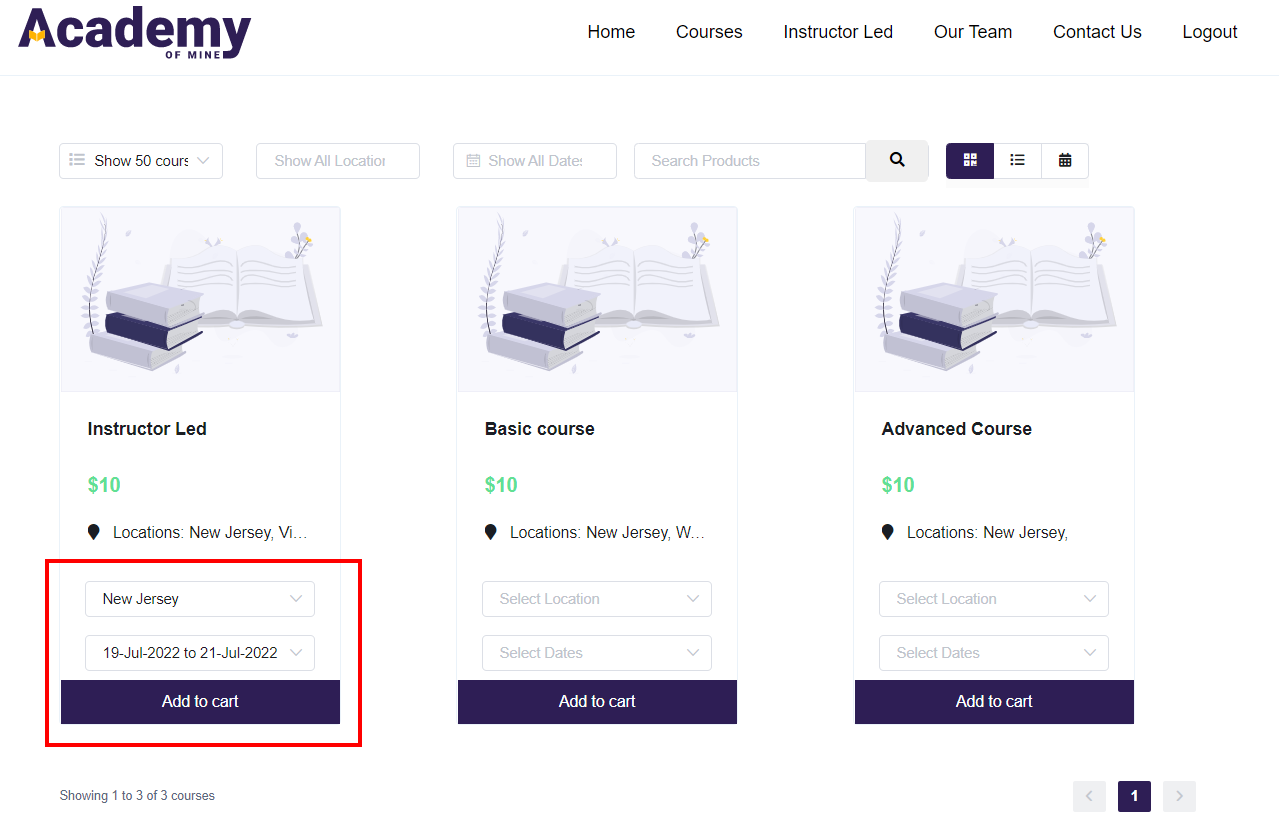
- When they have found the product they would like to purchase, the student can select the location and date of the class they would like to enroll in:
- Once they have selected the date and location, they can add the product to their cart
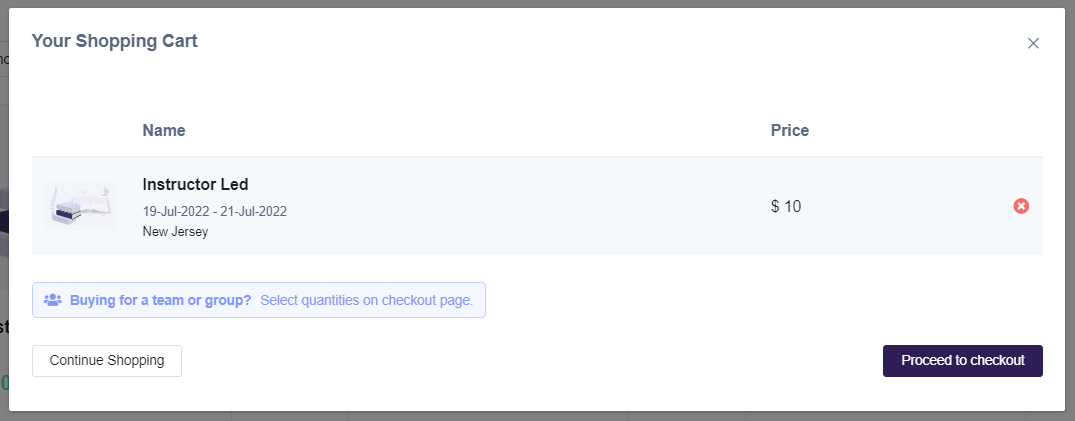
- From there, they can Continue Shopping add additional products to their cart, or Proceed to Checkout:
-
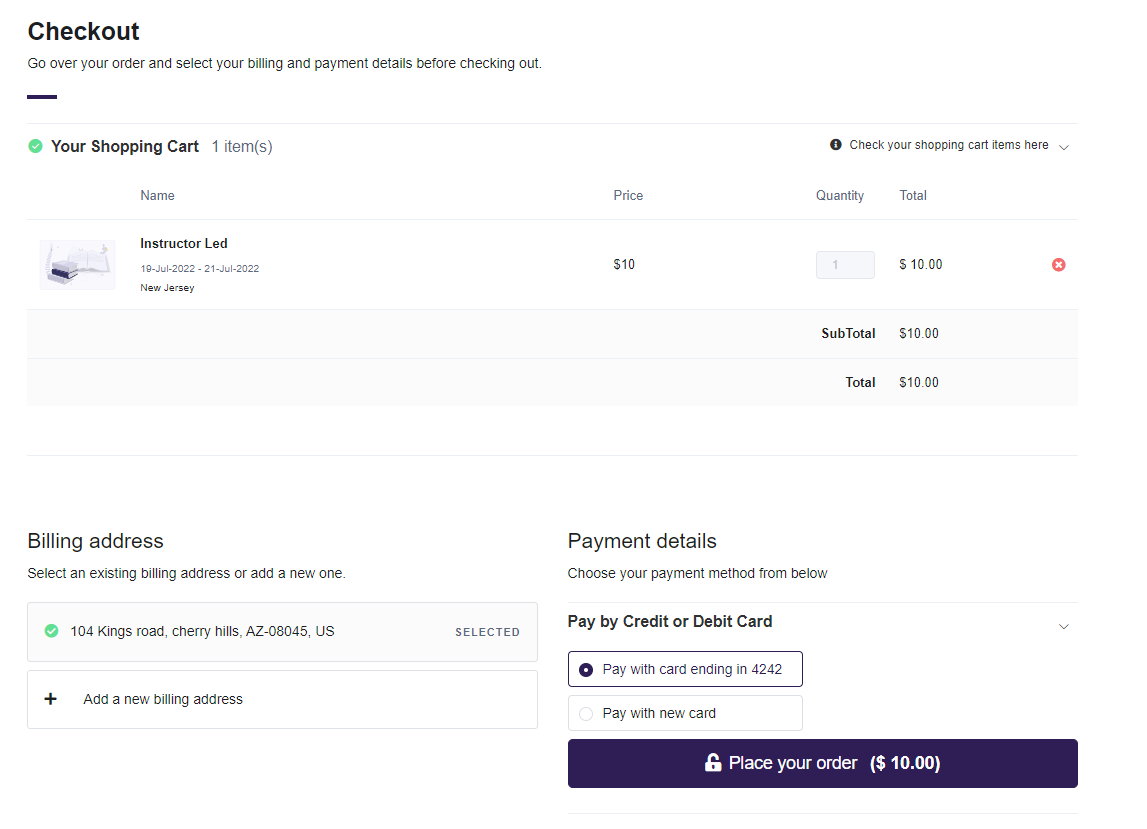
Once they Proceed to Checkout, they will be prompted to login in if they aren't yet, or create an account if they don't already have one
-
Then the student will enter their payment information--billing address and payment details. If it is a free product, they won't be required to enter any payment information. When they click Place your Order, the order will be completed and they will be enrolled in the class
- Upon completing the order, the student will see this screen, and they can click Go to My Courses to view their courses:
Viewing a Class as a Student
Whether the student has self-enrolled, or has been enrolled by an admin, once they have been added to the class, they will be able to access it on their Student Dashboard. We'll go through that here, and how they can access study materials.
- When logged in, the student will see their student dashboard. This is an overview of their account, and they can access their recent courses from here, and view their overall status.
- To view all their courses, they will click All Courses, and then to view their classes, select Instructor Led:

- When they select Instructor Led, they will see a list of classes they are enrolled in. From this page, they can view their status for the class, view their classes on a calendar view instead of a list, and access study materials. They can also filter the view by date, location and instructor.
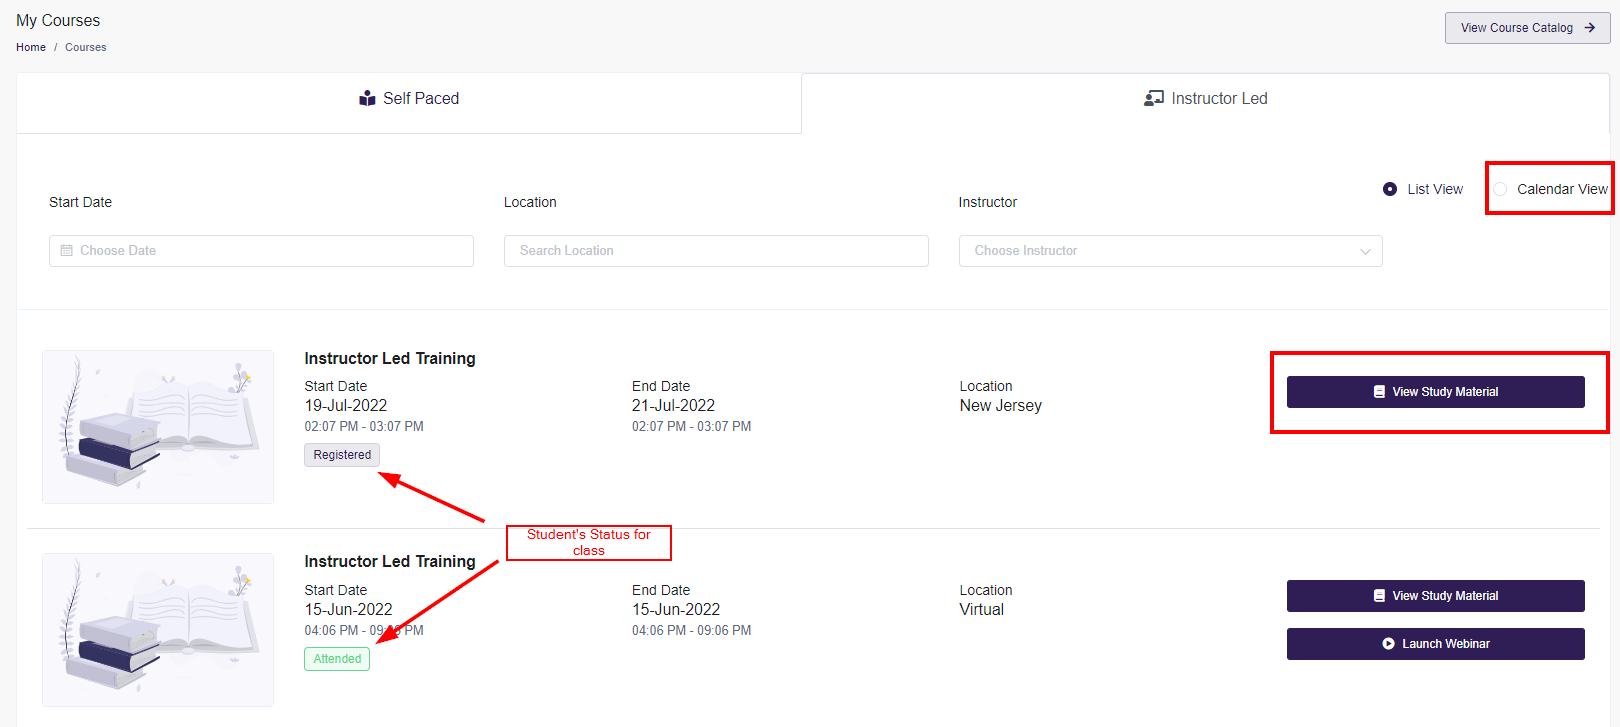
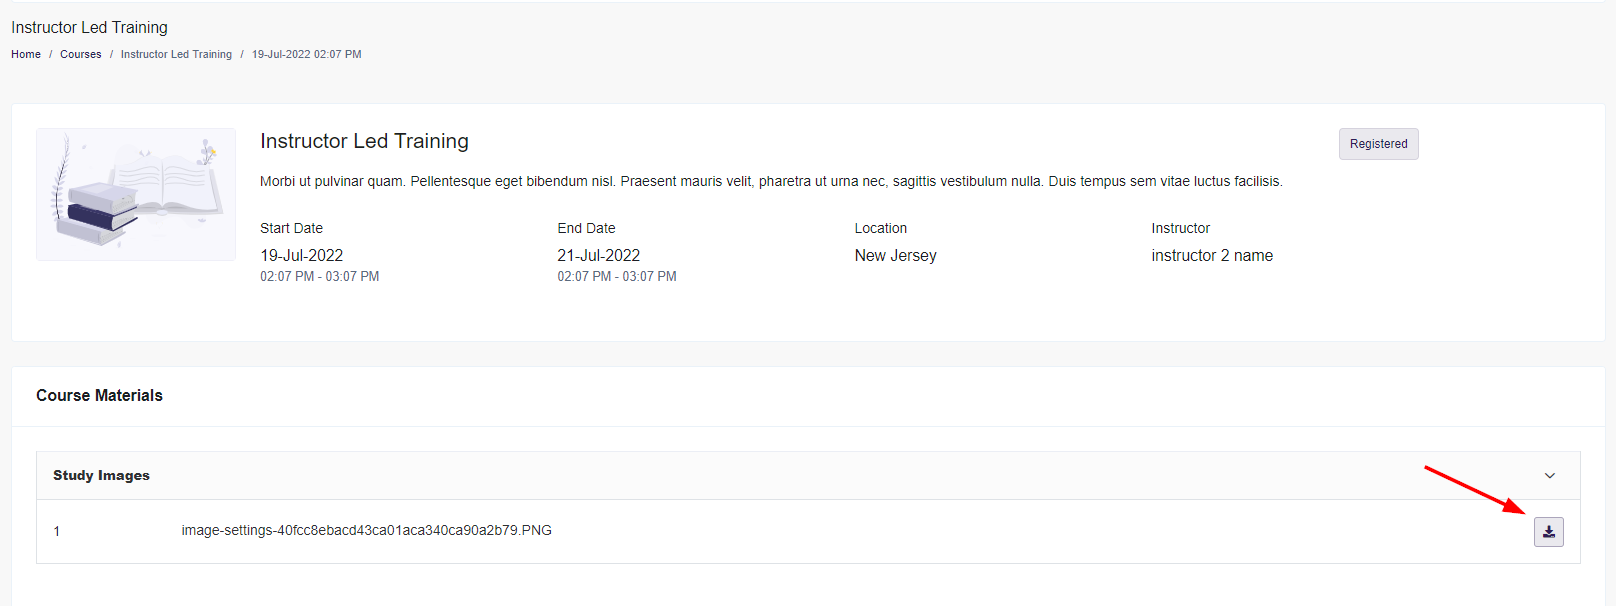
- When the student selects to View Study Material, they will then be able to download the materials if any have been added:
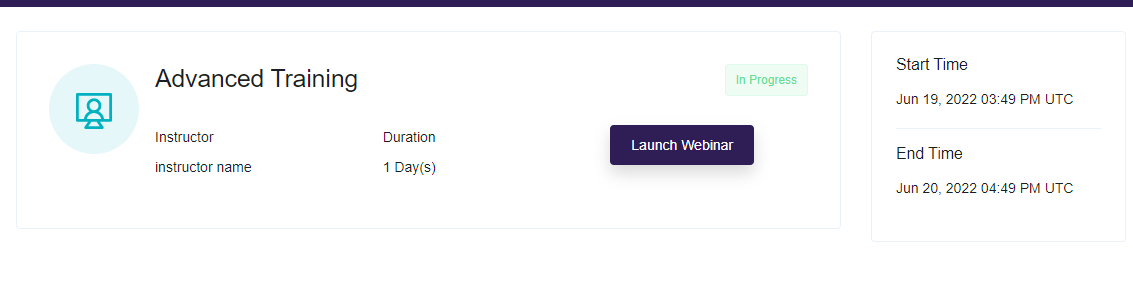
- For a virtual class, they will see the option to Launch Webinar:
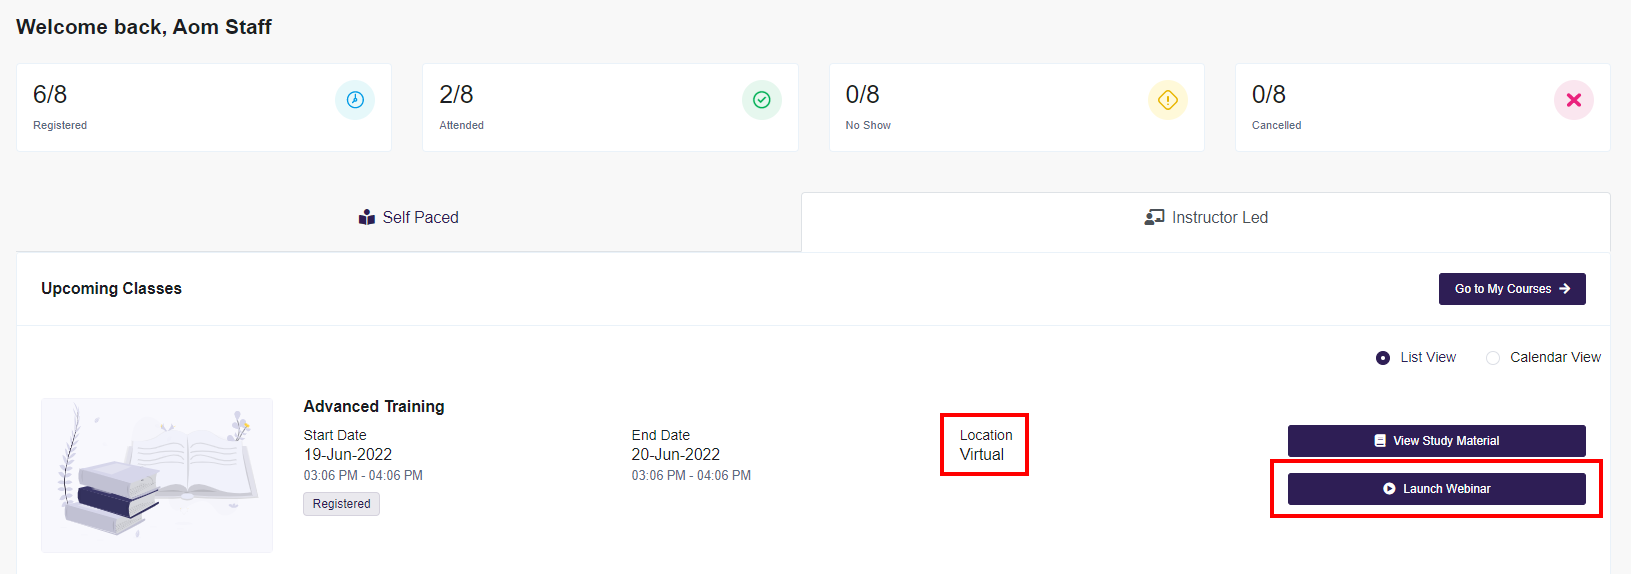
On the following page, they will be able to launch the webinar and join the class: