Using Certificates of Completion
A certificate of completion is the official documentation of a student's achievement in your Course. These PDF certificates validate that a learner has successfully mastered the course material, helping them verify their newly acquired skills to employers and others. For enhanced credential verification, you can also connect your learning system with Accredible, a digital credentialing platform.
This guide will walk you through everything you need to know about Course certificates. You'll learn how to create them, award them to students (either automatically or manually), edit them when needed, and manage them effectively. We'll also show you what the experience looks like from a student's perspective.
\
Creating a Certificate
You can include as much information as you like on a certificate, and the system will automatically fill in the specific details for each student. Certificates are fully customizable, allowing you to design them to fit your style. You can use a template found online or create your own from scratch.
To create your new certificate:
-
From the Owner Dashboard, select Courses, then choose Certificates
-
Here, you'll see a list of certificates if you have already created some, and you can add a new one. Click Create Template to create a new certificate template.
-
Enter the Title: the certificate title is used for administrative purposes inside your account, and will not be seen by students.
-
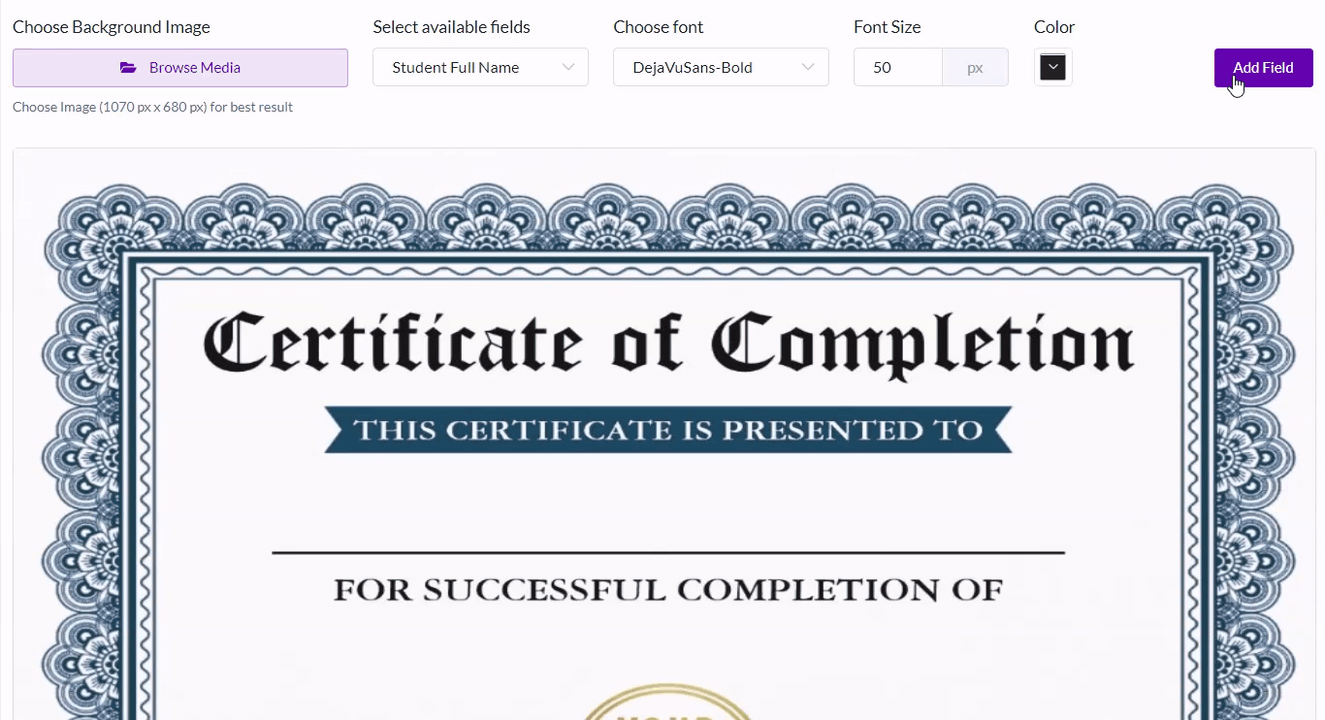
Enter the Canvas Dimensions (length and width): certificates can be any size or dimensions. You can choose to have a landscape displaying certificate.
- It is important to update the Canvas Height and Canvas Width fields on the Create Certificate Template page to match those of your original image file. That way the certificate background does not get squeezed or stretched, and lines up nicely.
- Note: For best results, we recommend using the dimensions 1070 px by 680 px for a landscape certificate, and 680 px by 1070 px for a portrait certificate.
-
To Choose Background Image, the file must first be uploaded to the Media Library, where it can then be selected for your certificate template.
- Note: The Background Image must be an image file (.jpg, .png, .gif, etc) and cannot be a PDF or document file.
- To upload the file to the Media Library, click Browse Media. Add your certificate file by dragging your file or selecting Upload Media. Once the file has been uploaded successfully, it will be listed in the Media Library. You can then select it for use in your template.
- You may also upload files outside of creating a certificate to the Media Library through your dashboard by navigating to Assets > Media Library.
-
Now, Select Available Fields: there are eight fields available to add to your certificate that can be automatically filled with Course data. The fields are:
- Student Full Name taken from the Student's profile
- Student First Name taken from the Student's profile
- Student Last Name taken from the Student's profile
- Course Name taken from the name the Instructor has given the Course
- Date of Issue is the calendar date the Student completes the Course
- Instructor Name is the Author of the Course, who created the Course initially
- Certificate Code a unique code (date of completion+course ID+student ID) that serves the purpose of helping to manually validate your students' certificates. Example code: "20210312-5-2".
- Course Credit is the number of credits associated with the course when it was created
- Custom Text is any special message you would like to write to include on the certificate
-
To add any of these fields to the certificate:
- Select the field you would like to add from the dropdown menu, then choose the font, font size, and color that would best match your certificate.
- Select Add Field to place the field on your certificate, in the top left corner. Then drag the field into position on the certificate.
-
Select Edit to make any changes to the field you have clicked on, or add a Certificate Code or Custom Text.
-
Click Save Template when you're done
Adding a Certificate to a Course
Once your certificate is created, you can add it to a Course. Certificates are added to an individual Course on that Course's curriculum page. It is possible to use the same certificate for multiple Courses if you wish.
-
From the Admin Dashboard, select Courses, then All Courses.
-
Find the Course you wish to add the certificate to and opt to Edit via the three-dot menu to the right of the Course
-
Click on "Step 3: Grading & Certificates" along the top bar of the Course.
-
Under the "Select Certificate Template(s)" use the dropdown menu to select the certificate. You may also add optional grading criteria and a minimum passing percentage for graded Courses.
- You may also choose if the certificate expires, and if so, after how many months. Leave this blank if the certificate never expires. If it does expire, you can also enter if there is a Recertification Grace Period (how many days before certificate expiration that a student can recertify).
-
Click Update Course to save your changes.
Certificate Expiration & Recertification
When a course is set up with a certificate that expires, the main things that change are the following:
- In My Certificates, a learner's certificate status will change to "Expired" on the expiration date (the learner can still download the certificate without issue).
- The "Date of expiry" field can be used in the certificate template.


Now, if you combine a certification expiry with a grace period, the following changes. For this example, let's assume the certificate expires after 12 months, and a grace period of 90 days has been set:
- An automated email can be enabled, to send an email when the grace period starts (12 months minus 90 days ~ 9 months).
- In the My Certificates page, the learner will see that their certificate shows a status of "Expiring".
- If the learner repurchases the course within the grace period (i.e., within 9-12 months in this example), then the course will automatically be reset for them, and they will be able to achieve a new certificate.


Viewing and Editing Certificates
You can quickly preview certificates, as well as make any edits or updates to them by following these steps:
- From the Admin Dashboard, choose Courses, then select Certificates. This Certificates page will list all certificates, as well as the Courses that are associated with them, and will reward them upon completion.
- Select the name of a certificate to open the Edit Certificate Template page.
- Download a preview PDF of your certificate by selecting the Preview button.
- Make any necessary Edits--you can add fields or edit/delete fields already on the certificate by clicking on them directly.
- Click Update Template to save any changes.
Managing Student Certificates
Now, let's go over where to find awarded certificates and how to manually award a certificate to a student if needed.
Viewing Awarded Certificates
You may view a student's certificates on their profile. From there, you can download the certificate as well as edit the issuance date or delete the certificate.
- From the Admin Dashboard, click Users, then choose All Users.
- Locate the student in question and use the three-dot Actions menu to select View Certificates.
- On the Certificates page, the student will find all of the certificates they have earned from the courses, and you can download a copy of the certificate, edit the issuance date (via the Edit Certificate button), or even delete the certificate from the student account.
Manually Awarding a Certificate
A student can be awarded a certificate even if they haven’t fully completed the course. This is useful in cases where the student came close to meeting the requirements but didn’t quite pass—for example, scoring 65% on the final quiz instead of the required 70%. You may decide they still deserve the certificate.
There are two methods here: (1) identifying the student and going to Manage Courses, or (2) identifying the Course first, and locating the student in question.
Option 1 (via the Student):
- From the Admin Dashboard, click Users, then choose All Users.
- Locate the student in question and use the three-dot Actions menu to select Manage Courses.
- Click the three-dot Actions Menu to the right of the Course you'd like to assign a certificate to and choose Assign Certificate.
Option 2: (via the Course):
- From the Admin Dashboard, choose Courses, then All Courses.
- Find the Course on the list, and from the three-dot Actions Menu, select Manage Course.
- On the Manage Course page, locate the student, open the Actions menu, and select Assign Certificate. Note that you'll also have the option of downloading a copy of the certificate from the Actions menu on the Manage Course page, once the student has actually been issued a certificate.
After assigning the certificate to the student, she will be able to view or download a copy of their certificate on the My Certificates tab of their Student Dashboard, which we'll go over in the next section.
Removing a Certificate
If you need to remove a certificate from a student's profile for any reason, you can do so by following these steps:
- From the Admin Dashboard, select Users, then All Users
- Find the student you wish to remove the certificate from and click the three-dot action menu. Opt to View Certificates
- Click Delete Certificate under the certificate you wish to remove and confirm
Once it has been deleted, the student will no longer see it under their certificates in their Student Dashboard.
Student Experience of Certificates
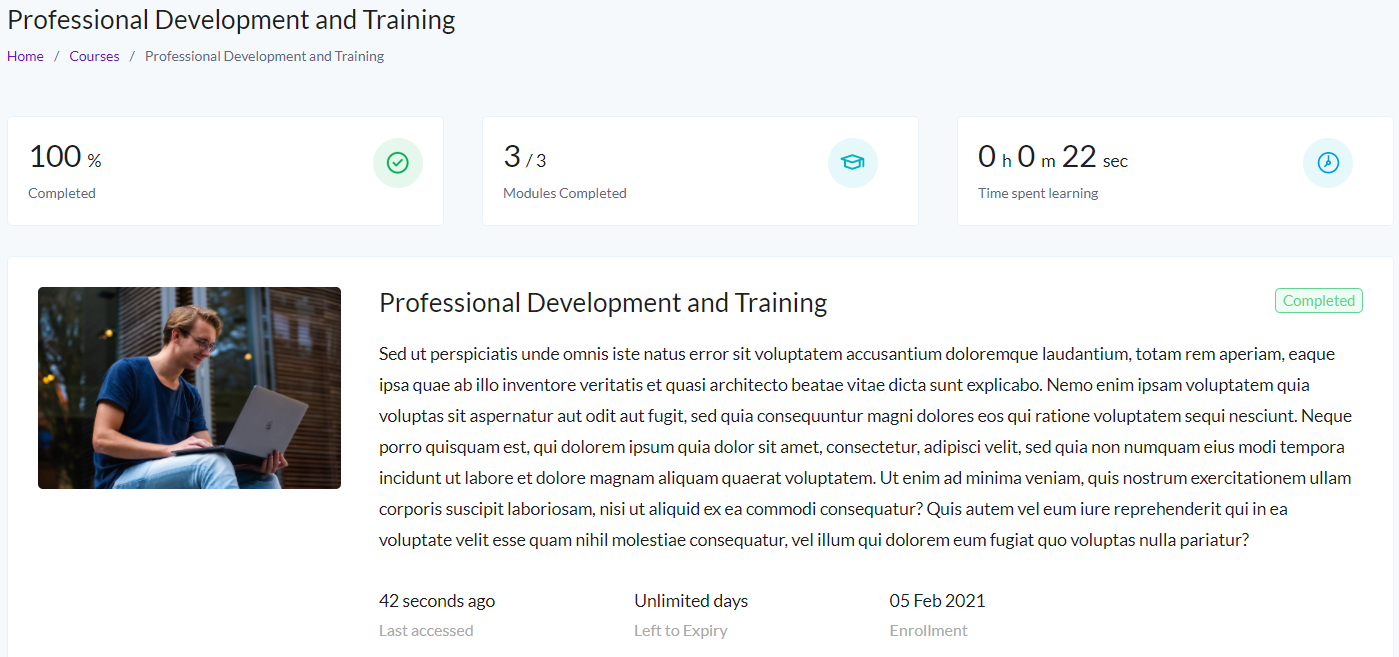
Once your certificate of completion is added to a Course, students will qualify to receive the certificate once they have successfully completed the Course (and met the Grading Criteria, if necessary). Let's go over how a student will find certificates for completed Courses, and how they can save their own PDF copy.
-
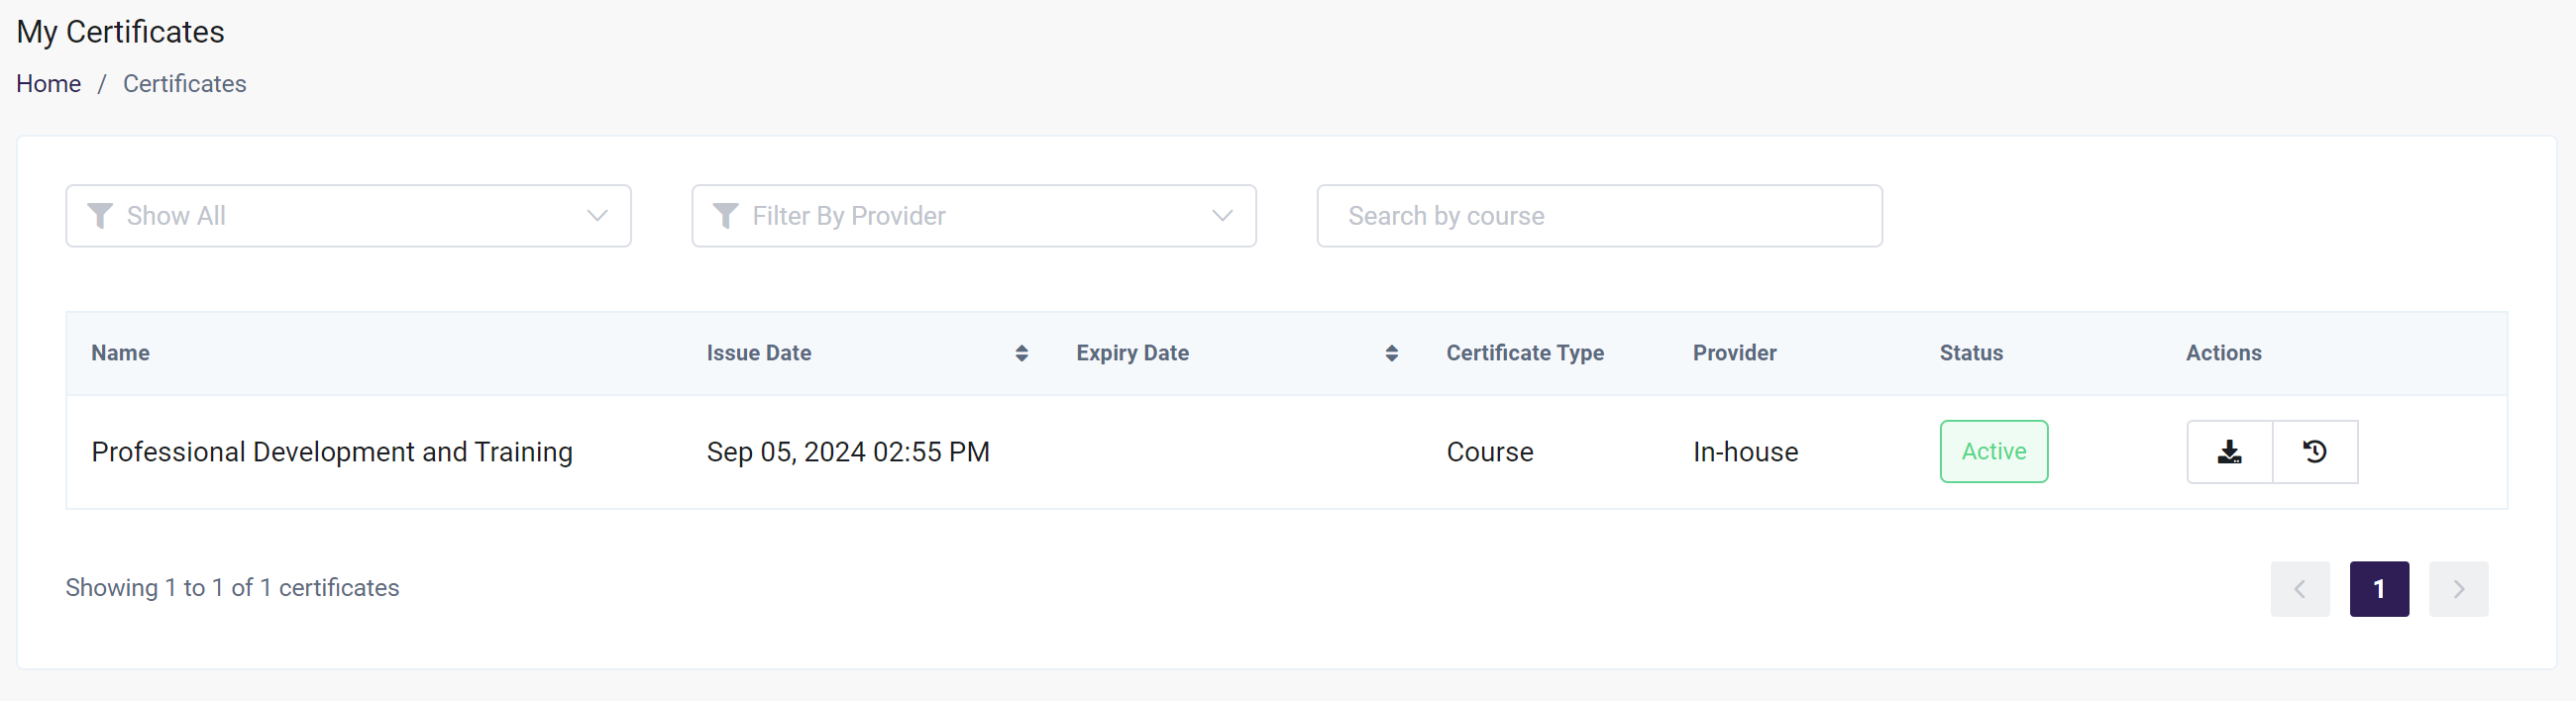
All certificates awarded to a student can be found in the My Certificates section of the Student Dashboard
-
Students will see each of their awarded certificates listed by Course, where they can opt to Download as PDF for their records
-
They will also see if the certificate is Active, or Past. This is based on if their certificate is not expired (Active) or expired (Past)
-
-
When a student completes a Course and a certificate is awarded, they will also be able to view their progress in the Course, as well as launch the Course again. Launching a completed Course will display the student's stats from the Course.