Automated LMS-Related Emails
Automated LMS emails are initiated based on a Student's coursework activity. When a Student completes a Course module and submits work requiring grading, an email notification is sent to the course author. After the Instructor/Admin evaluates the submission and assigns a grade (if applicable), another automated email is sent to the Student, notifying them that their evaluation is complete.
This guide will cover the different types of automated LMS emails, when they are sent, and what steps to take as both a Student and an Instructor.
If you haven't already, please see these guides as well:
In this article
LMS Email Types
There are several LMS email options available, that are related to many different actions. These automated emails will keep both parties aware of any updates in their Course. The LMS emails types are:
- Course Enrollment: Course enrollment emails are sent to a Student as soon as they are enrolled in a Course. This automated email is triggered by both a Student purchasing a Product through a Course Catalog, and an Admin manually enrolling a Student in a Course.
- Course Completed: Course completion emails are sent to a Student as soon as they complete the Course. This automated email is triggered by a Student when they complete the course.
- Quiz Submission: When a Quiz module has been completed by a Student, a notification is sent to the author of the Course
- Discussion Submission: When a Student has submitted a comment in a Discussion module, the author (either an Admin or Instructor) of the Course is alerted. For more information on Instructor evaluation of discussion comments, please review our guide: Evaluating Student Comments.
- Assignment Submission: When a Student submits a response in an Assignment module, an automated email is triggered so the author of the course (either an Instructor or Admin) knows to evaluate it. For more information on Instructor evaluation of assignments, please review our guide: Evaluating Student Assignments.
- Assignment Evaluation: Once an Instructor/Admin completes their evaluation of the Student's response in the Assignment module, the Student will be sent an automated email letting them know they can view their evaluation, including a grade and/or Instructor's comments.
- Assignment Rejection: If an Instructor evaluates a Student assignment and selects the Reject option, an assignment rejection email will be triggered and sent to the Student to let them know they will need to go back to the module and re-submit a new response to the assignment.
- Upcoming Webinar: Upcoming webinar emails are sent to a Student X Hours prior to the launch of a webinar.
- Certificate Expiration: A Certificate Expiration email notifies a student that a certificate's expiration grace period has begun and to take the course again. The email is sent on the same day the grace period begins.
- Course Expiration: A Course Expiration email notifies a student of all courses that are about to expire in the upcoming X days. The value of X can be configured from the email template's settings. If there are no upcoming course expirations, this email will not be sent.
- Class Enrollment Email: this notifies a student when they are enrolled in a class, if you have Instructor Led courses set up on your platform. Instructor Led training may be available depending on your plan--please reach out to support if you have questions on the availability of this feature.
- Upcoming Class Email: This is a reminder email that will be sent out to students, X hours prior to the class that a student is enrolled in, if you have Instructor Led courses set up on your platform. Instructor Led training may be available depending on your plan--please reach out to support if you have questions on the availability of this feature.
- Course Inactivity Email: This is a reminder email that goes out to a student after X days of the enrollment if they have not yet started the course, as a prompt to remind them to do the course.
- Learning Path Enrollment: A Learning Path enrollment email notifies a student when they are enrolled in a learning path. The list of courses within the Learning Path can also be sent out to the student as well.
- Learning Path Completed: A Learning Path Completed email notifies a student that they're completed a Learning Path. The list of courses within the Learning Path can also be sent out to the student as well.
Enabling & Editing Emails
Each type of the above automated email must be enabled before it will be sent automatically. The enabled button must be toggled on for both Primary Recipient or Other Users to be Notified, if you plan on using either.
-
From the Admin Dashboard, select Settings, then Email
-
Choose the LMS tab across the top
-
Then you'll see each of the email types on the left sidebar. Select which one you'd like to enable or edit
-
The enabled button must be toggled on for both Primary Recipient or Other Users to be Notified, if you plan on using either.
-
Now, let's look at recipients. There are three different types of recipients who can be named to an automated Account email: the Primary Recipient, Other Users to be Notified, and CC'd Recipients.
-
For Primary Recipients:
- Each automated email is sent to a Primary Recipient. Depending on the email type, the default Primary Recipient is either the user the issue is about, or the Site Admin listed in the Site General Settings found in the dashboard at Settings > General.
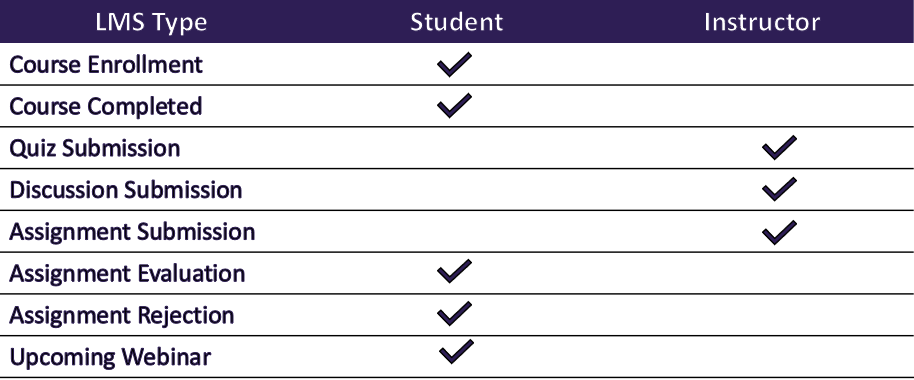
- This chart shows who is set as the default Primary Recipient by Account email type:

-
CC'd Recipients: You can also CC other email addresses to receive these messages if you wish. The addresses can be added to the CC field, separated by commas.
-
Other Users to be Notified: The emails will also has an option to send a message to Other Users to be Notified. These other users must be added to the CC field.
- The Other Users to be Notified message uses a separate email template from the Primary Recipient message. It's possible to customize this message in any way you wish. It's generally recommended for the Other Users message to be set up for internal use, and sent to an accounting team for recordkeeping, for example.
-
Subject: You can edit the subject line to be what you'd like
-
Heading: You can also adjust the email heading
-
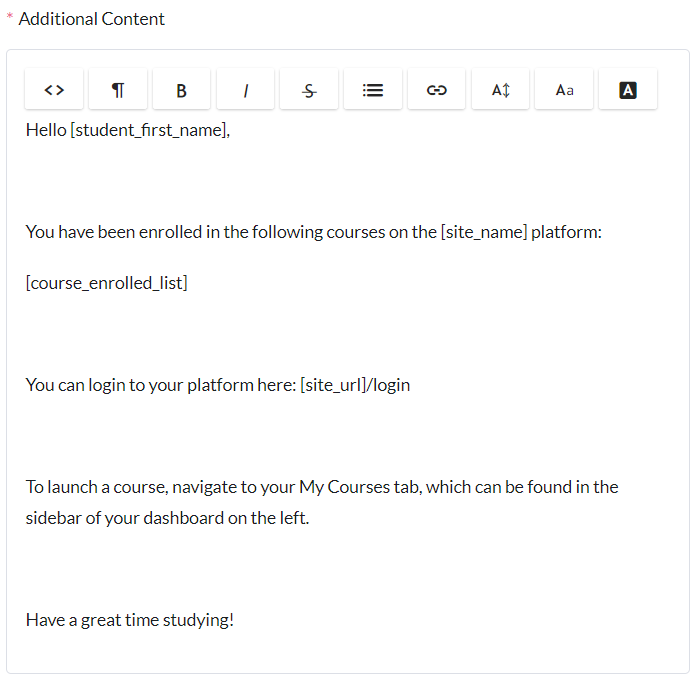
Additional Content: This is the main body of the email and you can change this template as well. As mentioned above, you will see shortcodes at the bottom, which are dynamic fields that will fill with the appropriate information. Simply copy them into your email body if you'd like to use them.
-
Once you have made all necessary changes, click Save Template, or send yourself a test email
User Experience of Emails
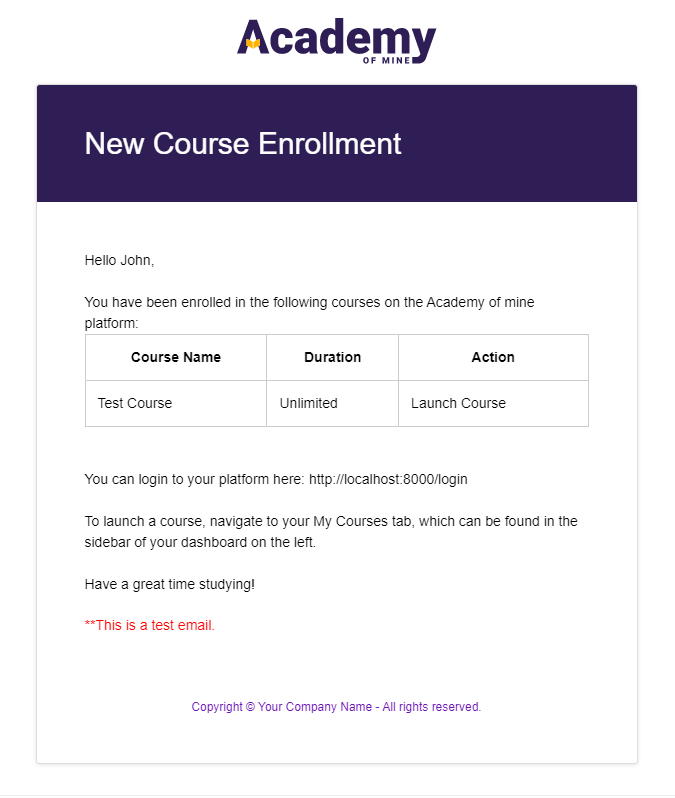
When editing the template of any of the emails above, you will of course see the template that you are typing into. You can send a test email to see what the email will look like to the end user receiving it, though here is an example of what the template looks like, and what the end email looks like, using the Course Enrollment email as the example. As you can see the template words are transferred over, and the shortcode (dynamic fields) are filled in with the correct information for that
Here is the course enrollment email template. You are free to customize this in any way you wish, including using shortcodes:

And here is what the Student will see in their inbox:

Next Step
Up next, learn about our automated eCommerce emails. They will notify you that new orders have been completed, and alert customers if a failed payment has occurred: