Creating & Managing eCommerce Orders/Invoices
Any payment created in the platform will have a corresponding order--such as when a user purchases a Product online via your Course Catalog. Orders are made for both Simple and Subscription Product purchases. It's also possible to create manual orders for offline payments if you set up the order outside of the platform, or to create a pending payment invoice that a user can pay through their account. An order will be generated even if the purchase amount was zero due to a free Product.
This guide will explain how orders are generated, the information they contain, and how they can be edited. We'll also go over how to manually create an order/invoice in the case of an offline order/payment agreement.
Be sure to review our overview of eCommerce Setup guides: Introduction to eCommerce
In this article
- How Orders are Generated
- Understanding the Structure of an Order
- Understanding Order Statuses
- Refund Order
- Automated Order Emails
- Order Notes
- Invoices
- User Experience of Orders
- Orders Reports
- Manually Creating an Order/Invoice
- Next Steps
How Orders are Generated
There are two types of orders: automated and manual. Let's take a look at what separates them.
Automated Orders
Automated orders are triggered by events on the platform. Users going through the Course Catalog checkout process and completing a payment, or a subscription payment processed at set intervals. The also will include if the user purchases a free Product--while they won't be charged, an order is still created detailing what Product they processed through checkout.
Manual Orders
Manual orders are generally available for accounting purposes. It's possible to create an order yourself to reflect an offline agreement made with a customer. Including manual orders will help you keep a complete record of all payments for more accurate reporting. To learn how to create a manual order, read on or jump to this section.
Understanding the Structure of an Order
An automated order is placed when someone places one or more Products in their shopping cart via the Course Catalog, completes the checkout process, and makes a payment. This process is necessary for simple Products, subscription Products, and even free Products, minus the payment step. Or, you can create a manual order.
Say a user places an order to purchase a Product that contains four Courses. The user will gain access to all four Courses associated with that Product. If the Product is subscription based, and more Courses are added to the Product later, the user will gain access to those Courses as well.
Subscription orders will have an initial parent order placed by the user, and then continue with renewal orders processed at set intervals.
An order will contain the following information:
- Date
- Customer Name
- Billing Address
- Order Status
- Inventory of items
- Order Notes

For more information on Products, please visit our Using Products to Offer Course Enrollment to External Users guide.
If you need more guidance on the checkout process, please visit our Navigating the Checkout Process guide,
Order Statuses
An order can have one of the following statuses:
- Completed: The payment was processed successfully.
- Failed: The payment was not processed successfully.
- Payment Pending: A status of Pending Payment is meant to be temporary. A new order will display as Pending Payment just before it is processed, where it will change to either Completed or Failed. In a rare instance where an order remains in Pending Payment, there may have been an issue between the time when the order was created and when it reached the payment processor.
- Cancelled: To cancel an order, it needs to be manually changed to Cancelled status. This can be done on the Edit Order page.
- Refunded: A refunded order will be updated to Refunded automatically after a order has been refunded.

Refund Order
To initiate a refund for an order, please follow the steps below:
- On the Edit Order page, you'll find a button for initiating a refund for an order.
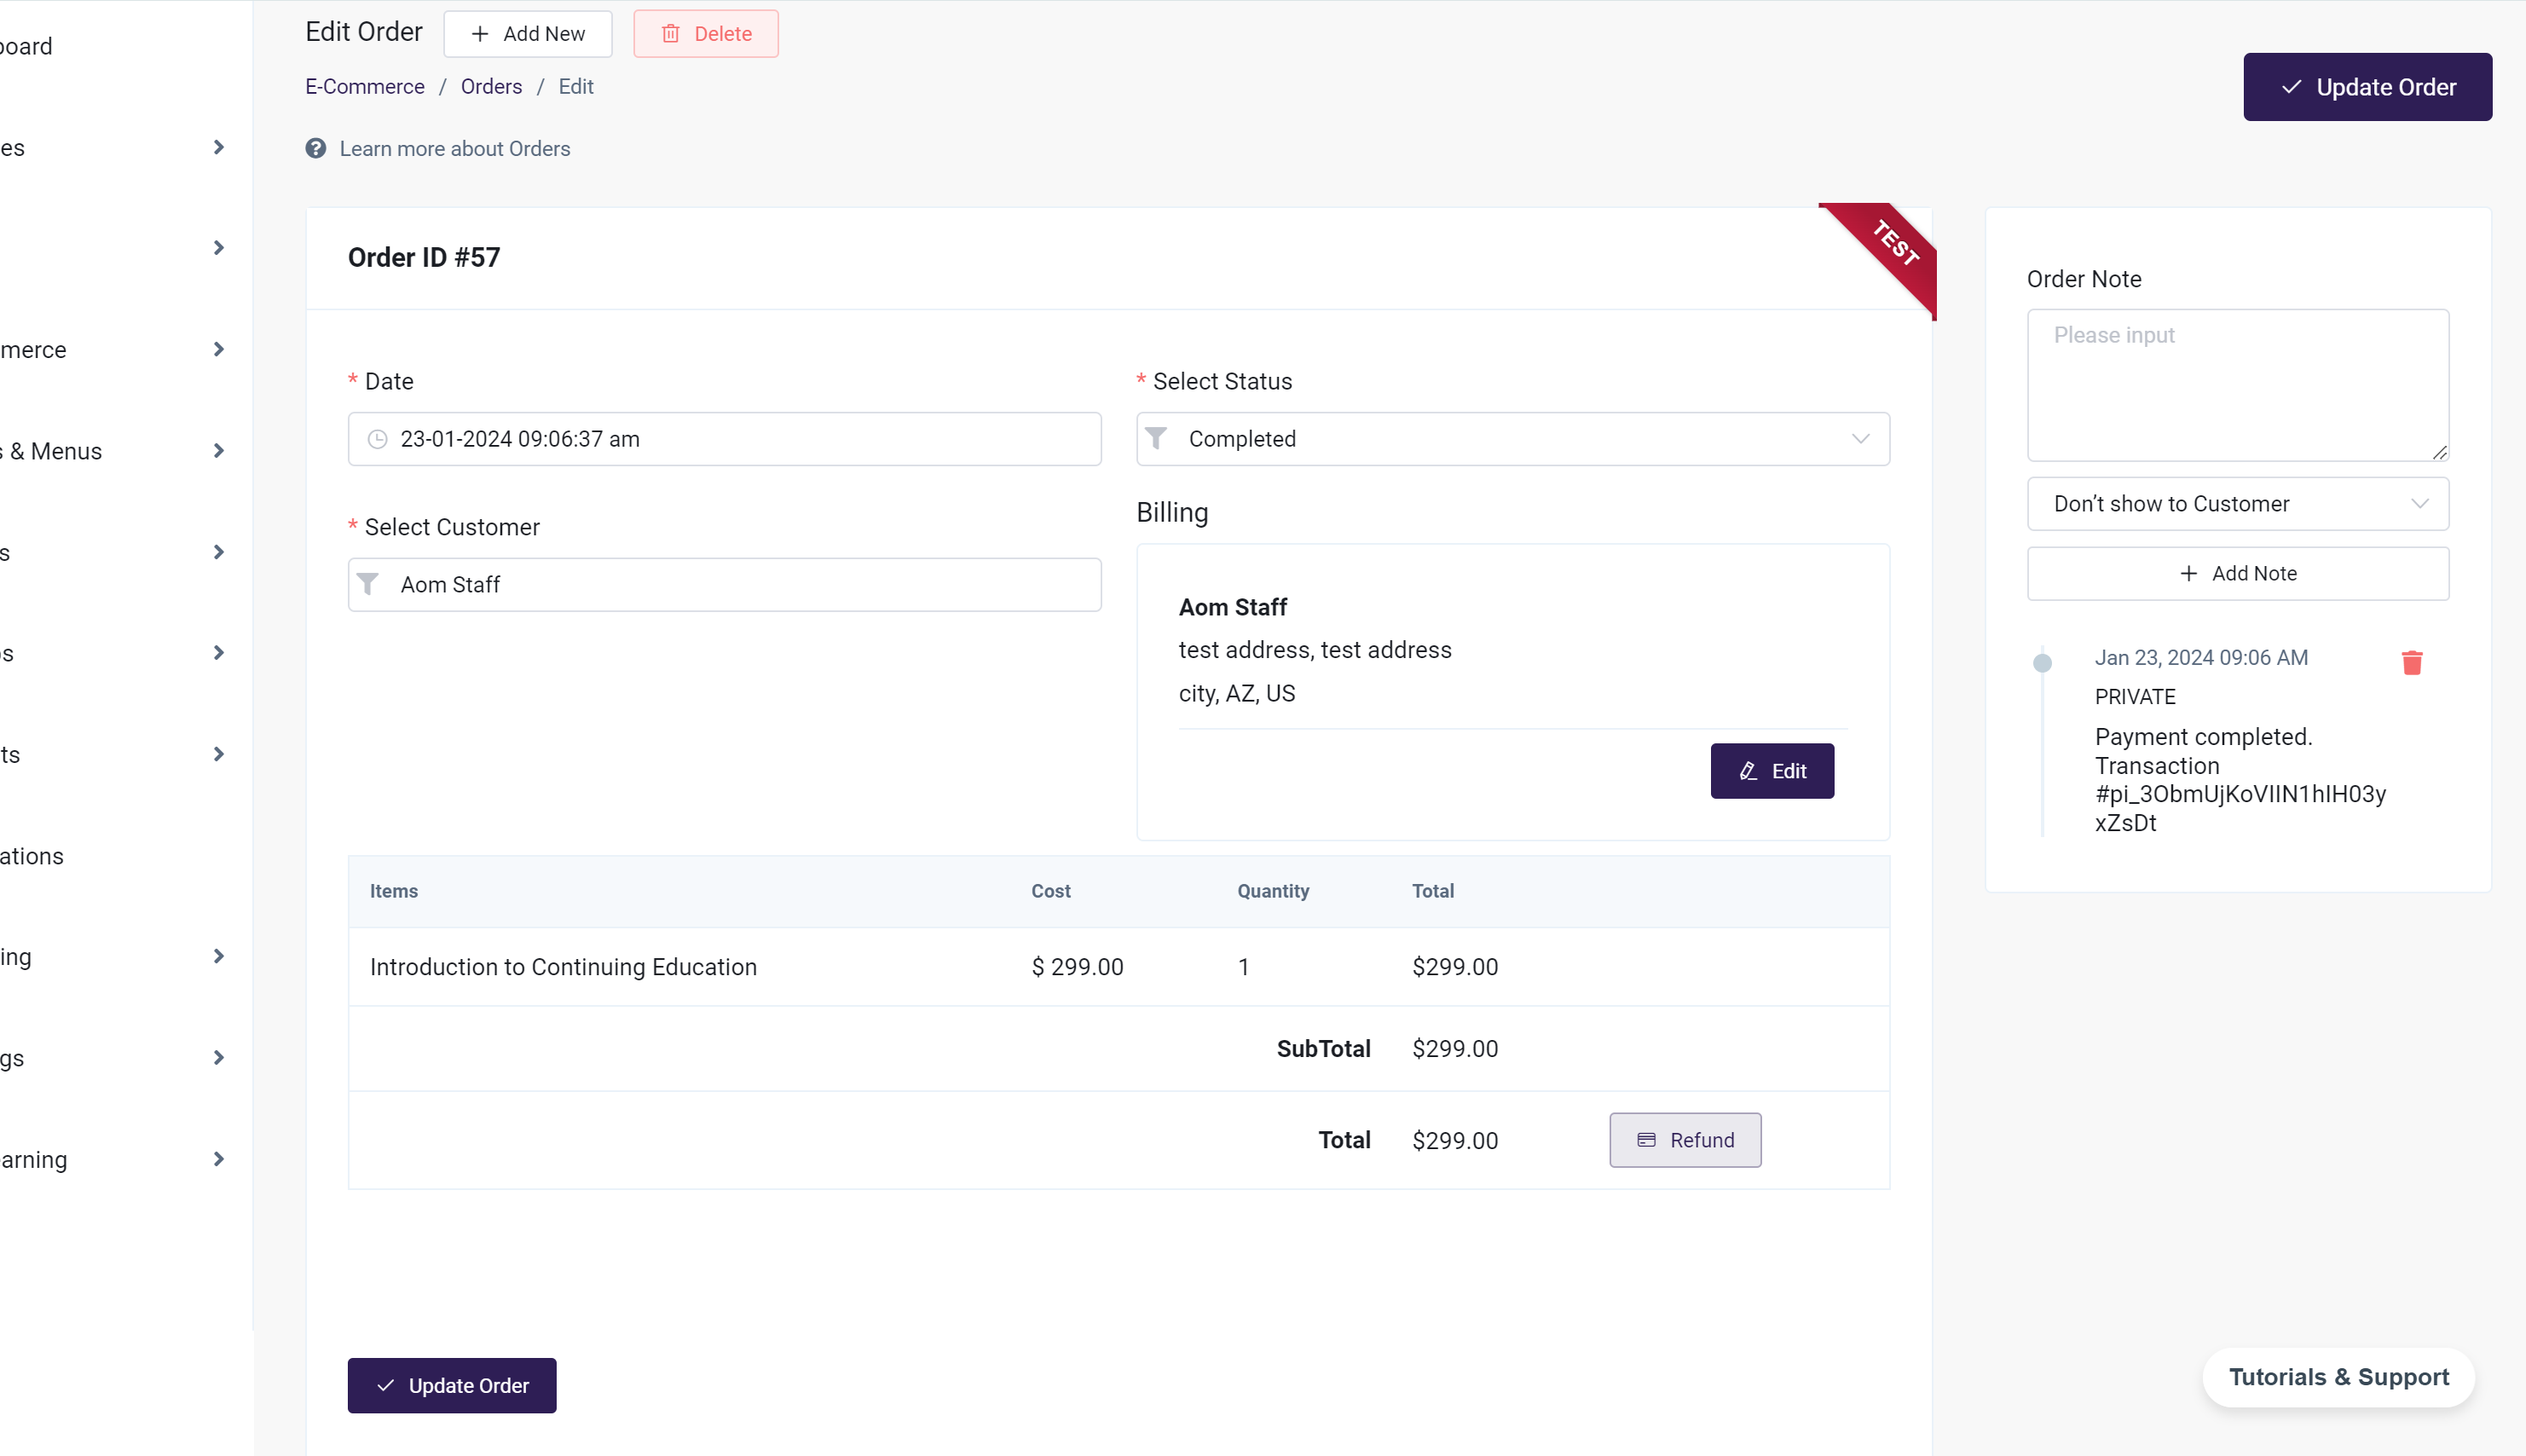
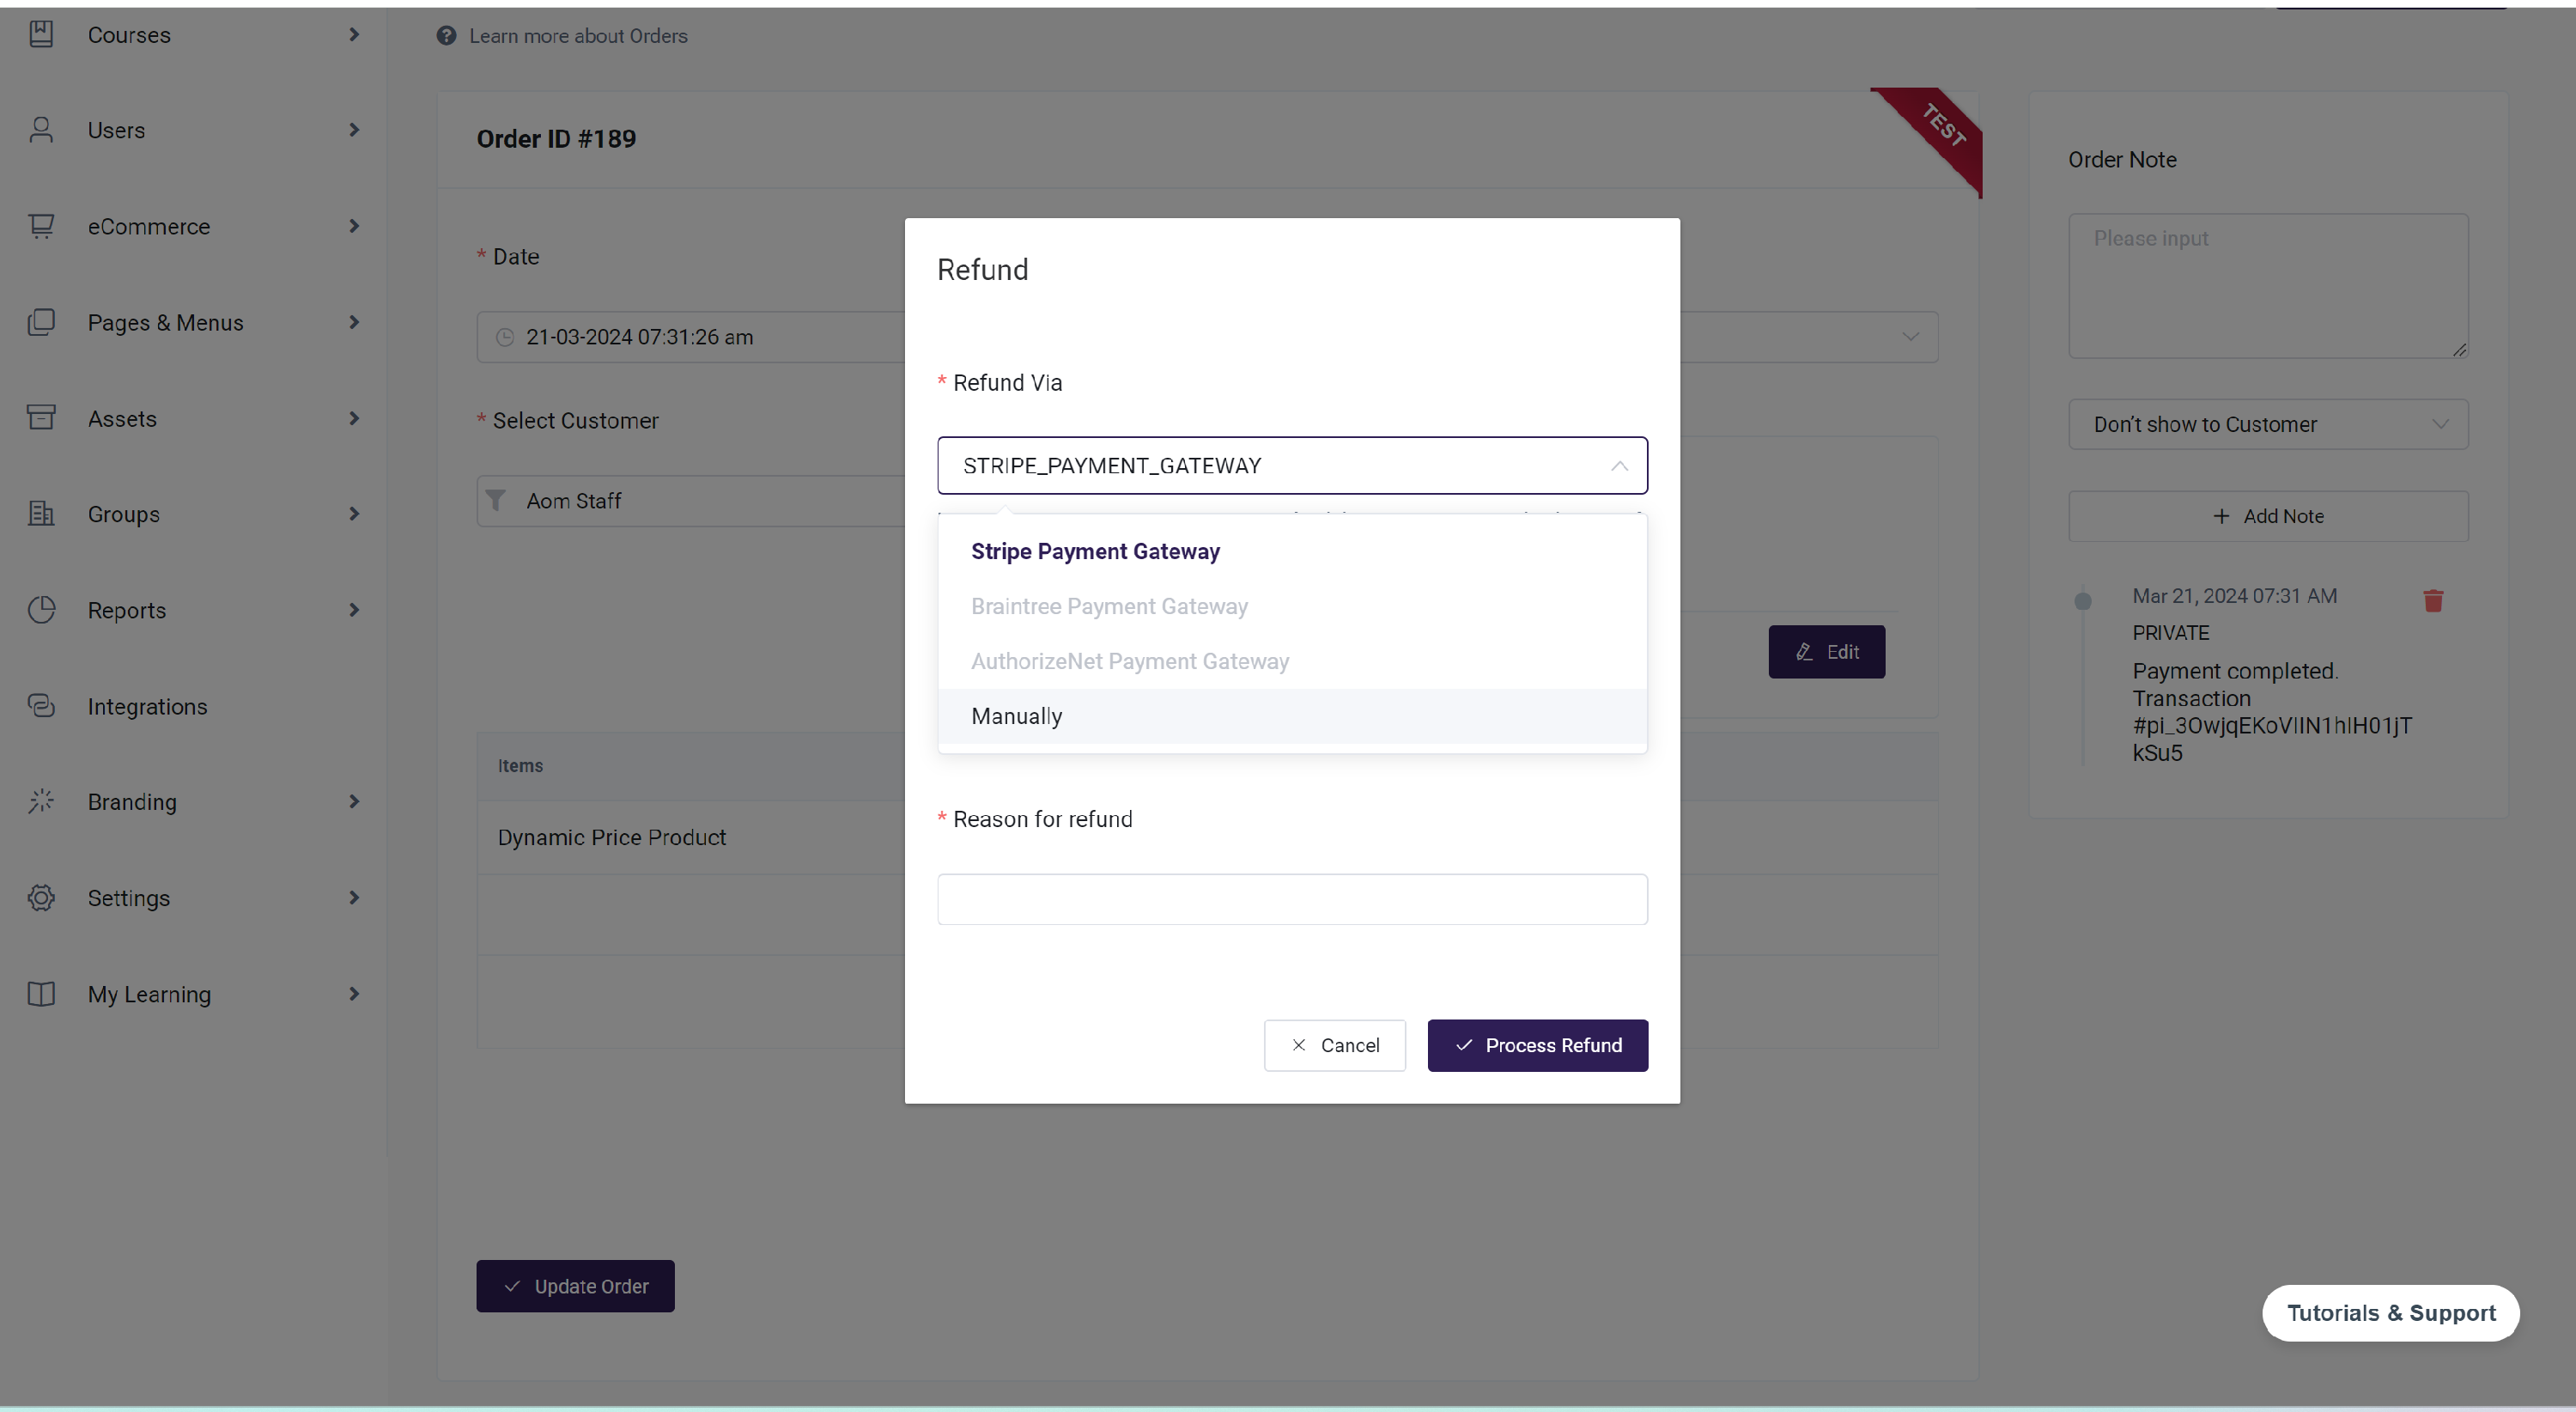
- Clicking the button will trigger a pop-up, allowing you to choose the refund processing method. You can select the following options:
- Refund Via: Choose between refunding through the Stripe Payment Gateway, Braintree Payment Gateway, Authorize.Net payment gateway or processing the refund manually.
- Refund Type: Opt to refund the entire amount in one go or make partial refunds as needed.
- For a Complete Refund, you only need to specify the reason, while for Partial Refunds, you must provide both the reason and the desired refund amount.
- Once the refund is successfully processed, the status will be changed to "Refunded," and no further updates can be made. Additionally, the refund details will be shown.

Automated Order Emails
There are several automated emails that are triggered in response to orders being placed:
- New Order: A New Order email is sent to the user/student/buyer and other chosen cc'd recipient(s) whenever an order is placed. This email is sent immediately after an order is COMPLETED for or by the user
- Failed Order: A Failed Order email is sent to the site admin immediately after an order fails to successfully process/charge
- Pending Payment: Pending Order emails are sent to a customer when their orders are in pending payment state.
- Refunded Order: An Order refunded email is sent to the customer when an order is refunded by the admin.
- Failed Subscription: Failed Subscription email is sent to the customer when their subscription fails to renew.
For more information on automated emails and how they can be customized, please visit our Automated eCommerce Emails guide.
Order Notes
Order Notes can be found on the Edit Order page. You have the option of manually adding a note about the order. Manual notes can be public or private. A public note will be visible to the user. Automated notes about each payment processing attempt will be kept here.
To add or view Order Notes:
- From the Admin Dashboard choose eCommerce, then Orders.
- Find the order you wish to view or add a note to, and choose the three-dot action menu to the right of the order and click Edit.
- The Order Notes will be on the right side. Type in your new note and click Add Note to add it.
- Click Update Order

Invoices
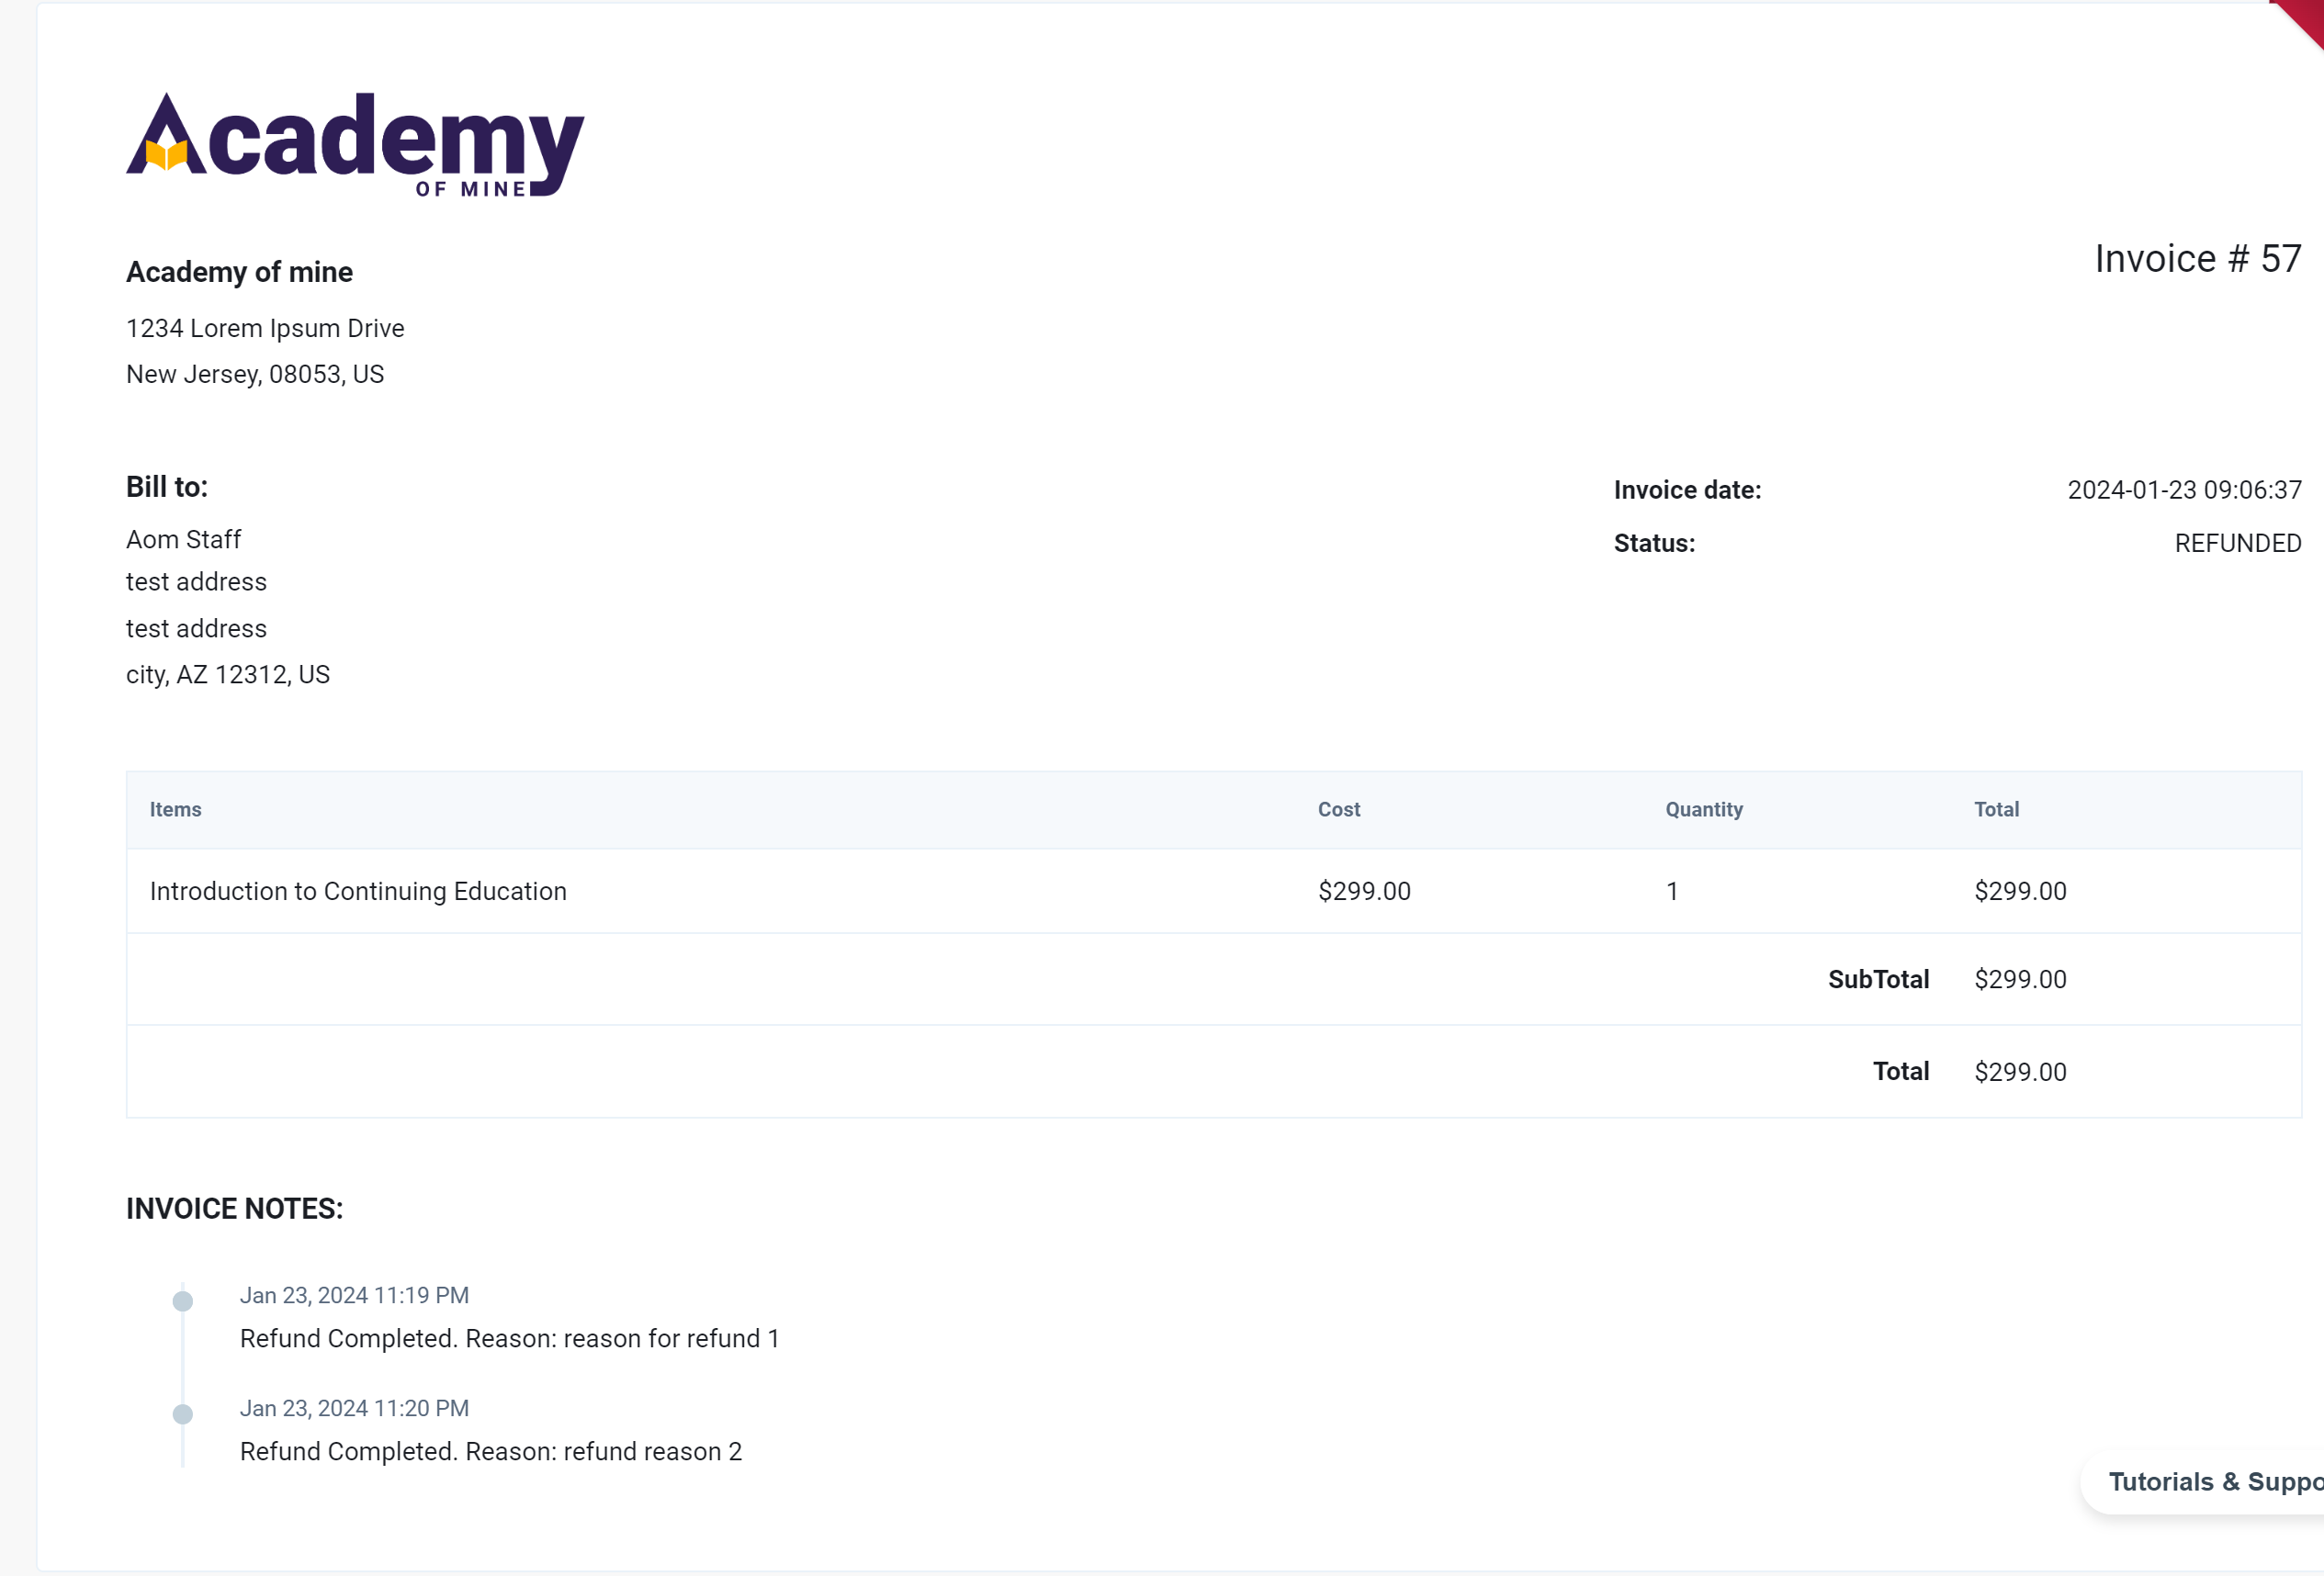
A viewable and printable invoice is created for each order processed. The invoice will update with any changes you make on the Edit Orders page.
Each invoice will contain:
- Company name and company address taken from eCommerce > Settings
- Company logo taken from Branding > Logos & Colors
- User name and billing address taken from the user's profile
- Invoice number, date, and status taken from the order
- Inventory of products purchased, quantity, and price taken from the order
- Invoice notes which will be visible only if the type of the note is PUBLIC(Show to customer).
User Experience of Orders
Users will have access to their order history in the dashboard in the My Orders section. Here, users can view all of their orders in one place. They can also use View Details to view a copy of their invoice, and Download Invoice to save them as a PDF.

If the user has a pending payment (and you're set up with a payment processor) they will be able to make payment on the order by clicking Make Payment next to the order:

From there, they will be brought to the checkout screen for that order and will be able to enter their payment information to complete the payment:
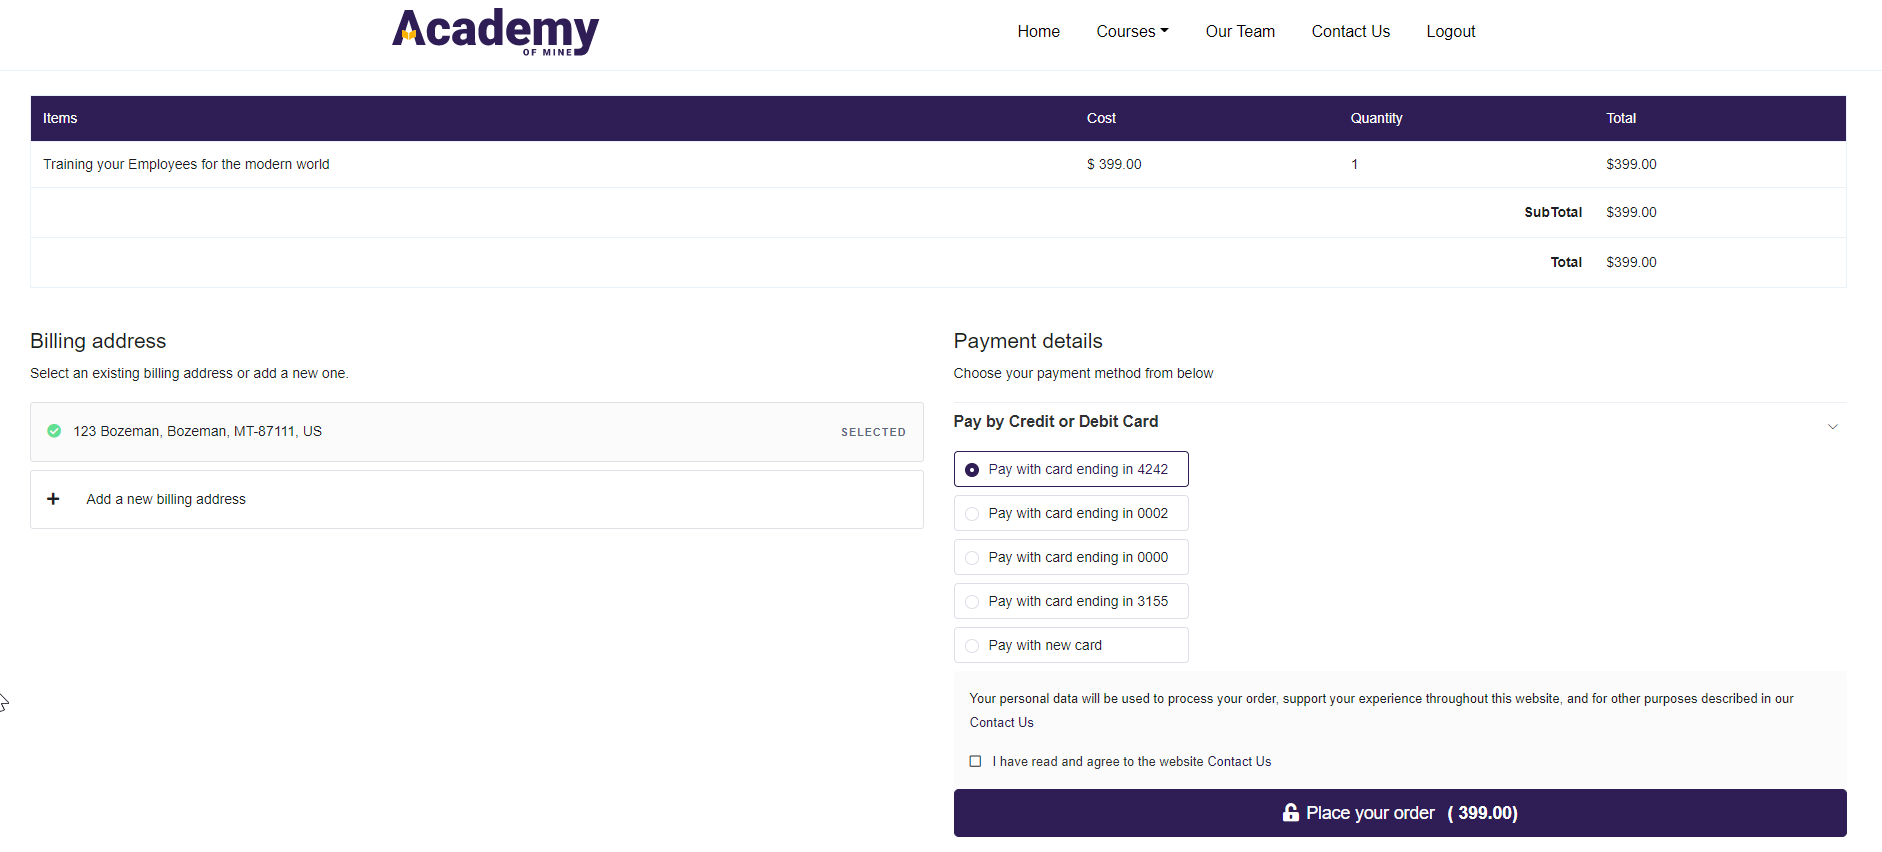
Once the pending order has been completed by the user, they will be enrolled into the course(s) that were part of the product(s) on their order. The order status will also update to "Completed" for both the user and the admin.
Orders Reports
The Export Orders report is helpful if you are needing to export orders to outside the platform. The report will be exported as an Excel spreadsheet. Before exporting, you can filter the report as needed.
- From the Admin Dashboard, select Reports, and then Export Orders
- The Export Order report can be filtered by the following fields: Date Range, Status, Customer Name, Products, and Coupons Used.
- After you have selected your filters, click Export Orders
- When completed, the report will export as a .xlsx file.
For more information on reporting, please visit our Pulling Revenue and Order Reports guide.
Manually Creating an Order/Invoice
Orders and invoices for all purchases made on the platform via the course catalog/checkout will be created automatically. However, if you ever have an offline purchase made by a customer or want to create an invoice for a user to complete payment on, you can still add that order information to your Academy of Mine account for accounting purposes, as well as more accurate organization and reporting.
Now let's go through how to create an order manually, to add it to your existing list of automated orders.
- From the Admin Dashboard, select eCommerce, then Orders
- This will show a list of all orders in the account. A new manual order can be created by selecting the Add Order button.
- Inside the Create Order page, you can add all the elements to build your manual order.
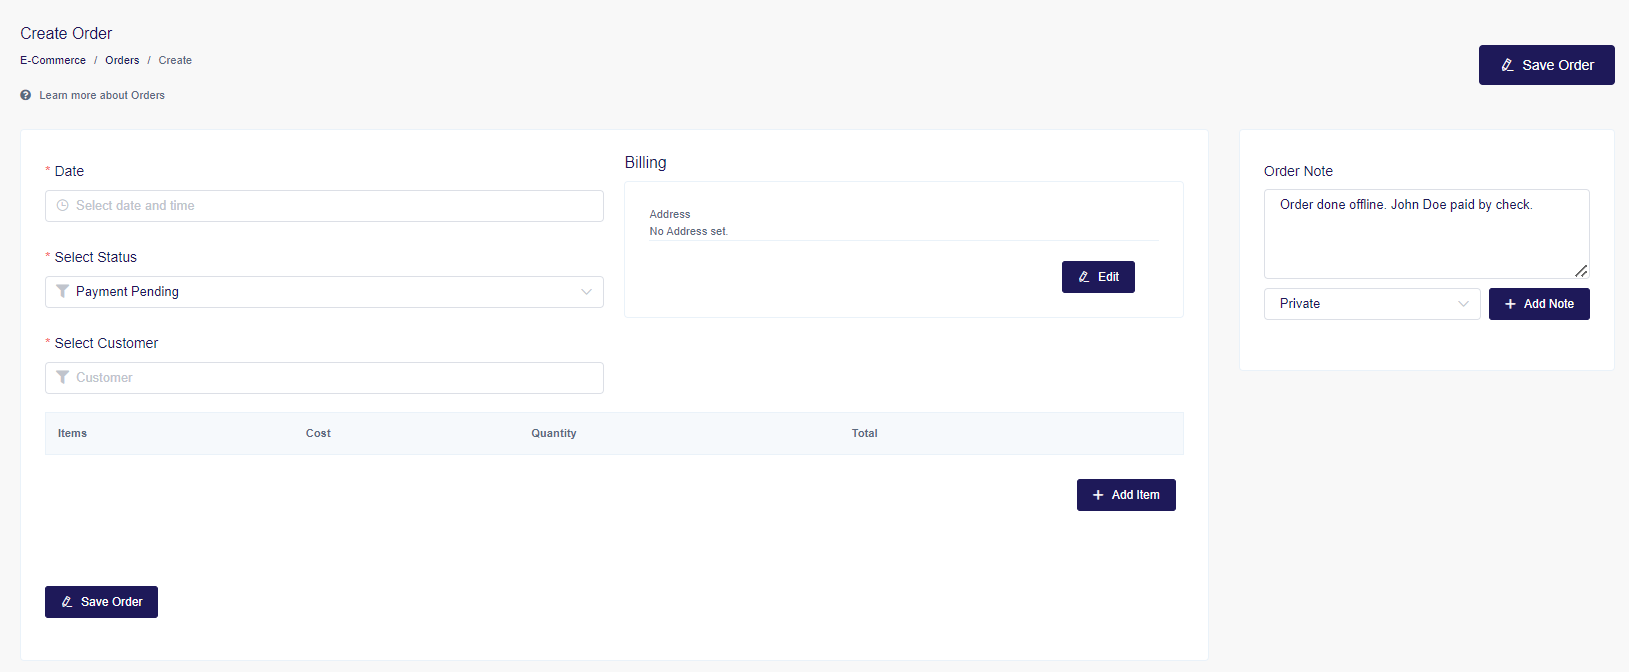
- Select an existing user from the Select Customer dropdown menu. If this is a new user, you will need to create a user account for them first in Users > All Users. The user must be on the existing user list to complete the order.
- Add the Billing Address. If the user has an address saved, you can select it from the menu. Otherwise, you can add a new address.
- Select the date of the purchase. For optimal accuracy, try to match the date to the date of your bank deposit.
- Select the order status. For more information about the status types, please check the Order Status section above. If you need the user to complete the payment on their end via the platform, choose Payment Pending so they can make payment, as detailed in the User Experience section above.
- Add an order note. This is a crucial step in the manual order process, as it will help you identify this order later as a manual order and not an automated order. Set the note to Private for internal use, or Public for it to be viewable by the customer.
- Add Products to the order by selecting from the list of existing Products. Also, add the quantity of Products purchased. Multiple Products can be added to the order one at a time.
- Click Save Order to complete the order
Once the order creation has been completed, the order will be managed exactly the same as an automated order.
Next Steps
Up next, you'll want to review our guides on managing subscriptions, and setting up the automated eCommerce emails you can send out.