Enrolling Learners into Courses
In order to take a Course and view the learning material, a Learner first needs to be enrolled. Learners can be enrolled in courses in two ways; by purchasing Products through the Course Catalog or by being directly enrolled by an Admin.
Learners can be enrolled individually or through bulk enrollment. Bulk enrollment is useful for adding many learners to your platform quickly and easily.
In this guide, we'll be going over how to add learners on the Admin side of your account, as well as enroll them into Self Paced and Instructor Led courses. If you'd like more information on how learners can self-enroll into Courses, please check out this article.
Note that Instructor Led courses may not be available to legacy users. Please contact support if you have questions about the availability of this feature and adding it to your platform!
If you aren't yet familiar with Users or Course, please review these guides before proceeding:
In this article
- Enrolling Existing Learners into a Self Paced Course
- Enrolling Learners into a Class in an Instructor Led Course
- Bulk Enrolling Learners
- Course Enrollment Automated Email
- Class Enrollment Automated Email
Enrolling Existing Learners into a Self Paced Course
A learner can be manually enrolled in a course using two methods: either at the course level, through the Manage Course page, or at the learner level, through the All Users page.
Regardless of the chosen enrollment method, the learner will always receive a Course Enrollment email. This email can be customized under the Settings → Email → LMS tab.
Enrolling Existing Learner(s) via Manage Course
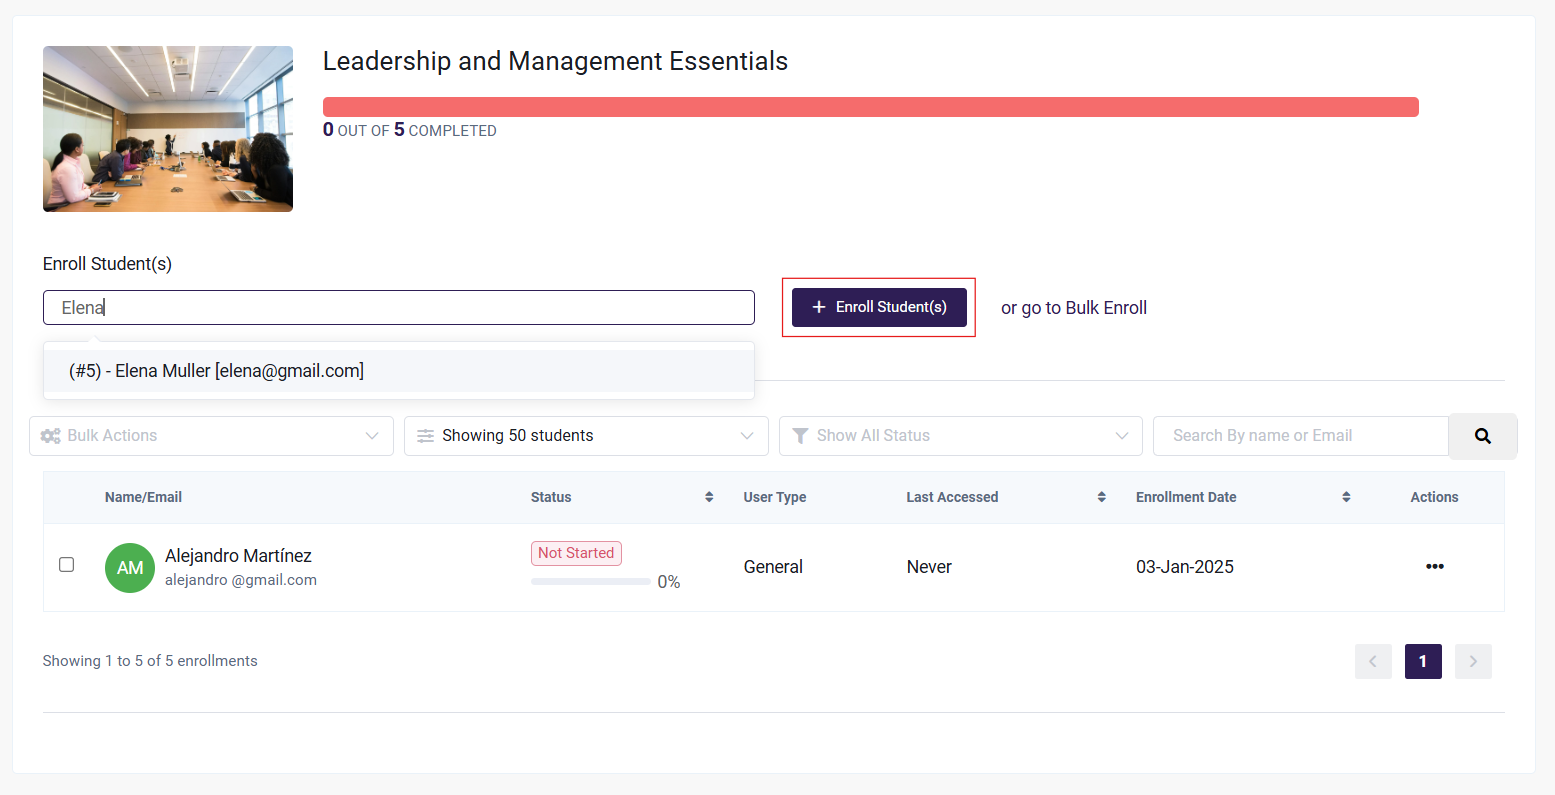
You may enroll single or multiple learners into a Course via the Manage Course page. This is handy if there are several learners you'd like to enroll in a specific Course.
- From your Dashboard, choose Courses, then All Courses
- Click the three-dot Action Menu to the right of the Course you'd like to enroll the learner in, and choose Manage Course
- Type in the name of the learner(s) you want to enroll and click Enroll Learner(s)
Enrolling an Existing Learner via All Users
If the learner you'd like to enroll is already added to your account, you may enroll them by following these steps from their profile as well:
- From your Dashboard, choose Users, then All Users
- Click the three-dot Action Menu to the right of the learner you'd like to enroll and choose Enroll in a Course
- Type in the name of the Course(s) you want to enroll them in. Once they have been entered, click Confirm
Enrolling Multiple Existing Learners via All Users
You can also enroll multiple learners into course(s) via All Users by following these steps:
- From your Dashboard, choose Users, then All Users
- Check the box next to the learner(s) you wish to enroll, or click the top box to select all learners on the page
- Click Bulk Actions, and choose Quick Edit
- Select the Courses you want to enroll the selected learners in
- Click Confirm
Enrolling Learners into a Class in an Instructor Led Course
Now let's go over how to enroll learners into a class that's a part of an Instructor Led course. Note that Instructor Led courses may not be available to legacy users. Please contact support if you have questions about the availability of this feature and adding it to your platform!
- From the Admin Dashboard, select Courses, then All Courses
- Hover over the Instructor Led course you want to enroll the learner into a class for, and choose Manage
- Within the course, find the class you wish to enroll learners into, and click the three-dot action menu. Select Manage Roster
- This will list the learners already enrolled. To add an existing learner(s), type in the learner's name into the search bar as shown below and select them from the dropdown menu. You may add more than one learner here.
- Click + Enroll Learner(s) to add them to the class and trigger the Class Enrollment email
Bulk Enrolling Learners into Self Paced and Instructor Led Courses
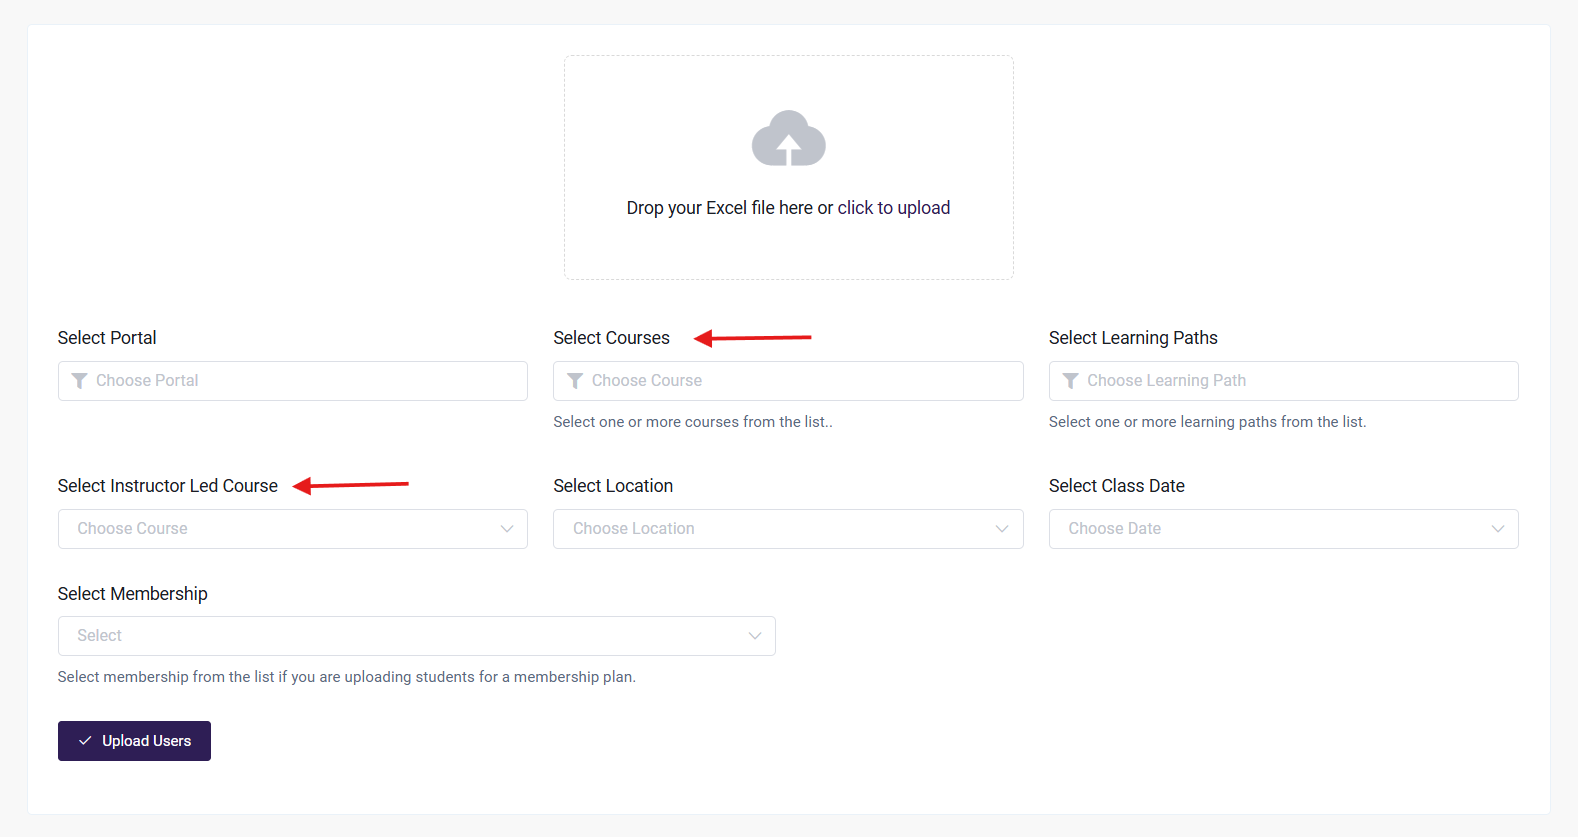
With the Bulk Upload feature, you can easily add up to 500 learners by using a simple, formatted Excel file. If a learner is not already in the system, their profile will be created. Even for existing learners, you can use this to bulk enroll them in a course based on their email.
- From the Admin Dashboard, select Users, then Import Users. (Selecting the Bulk Enroll option on the Manage Course page will take you to the Bulk Upload Users page.)
- You will get two options to export Users . One being Excel and other being Hubspot.
- Importing using Excel
3.1. Follow the instructions on the page to upload the Excel file. The file must be in Excel format and comply with the header structure as presented in the instructions. A sample file is available to download on the Bulk Upload Users page. It has the header columns formatted correctly, and only requires you to add the learner records.
The file must be formatted with the following header/first row values:

Email (mandatory): If the email address is already in use by a user profile, the existing user will be enrolled in the courses selected.
First_Name (mandatory).
Last_Name (optional): The Last_Name column does not need to be filled in for the user but can be used to immediately populate this value.
Password (optional): If a password is not provided in the file, one will be auto-generated for the learner and sent to them in their New Account email (which is enabled by default). They can change this password later on.
There is a limit of 500 learners that can be uploaded per file to ensure there are no timeouts in the middle of the upload. If you have more than 500 learners, please separate them into multiple files, and upload them back-to-back.
3.2. You have the option of immediately assigning the learners to a Portal. This would automatically enroll the learners as part of that particular Portal. To learn more about how Portal are used, visit our Introduction to Portal article.
3.3. And lastly, you can select one or more Courses to enroll your learners into for Self Paced courses, or you can select a Learning Path. Selecting a Learning Path will enroll learners into the Courses included in within it.
If you are enrolling learners into an Instructor Led course, select the course under the "Select Class" dropdown, and the location and class that you want to enroll the learners into.
- Import Using Hubspot . To import users using HubSpot follow the steps mentioned in https://docs.academyofmine.com/article/220-hubspot-integration-with-aom
- Lastly , Click Upload Users
You can also check out this video, which goes through how to bulk upload:
Course Enrollment Automated Email
By default, the learner will be notified via an automated email that they have been enrolled into a new Self Paced course, which is sent immediately after enrollment. If you'd like to edit this Course Enrollment email template, follow these steps:
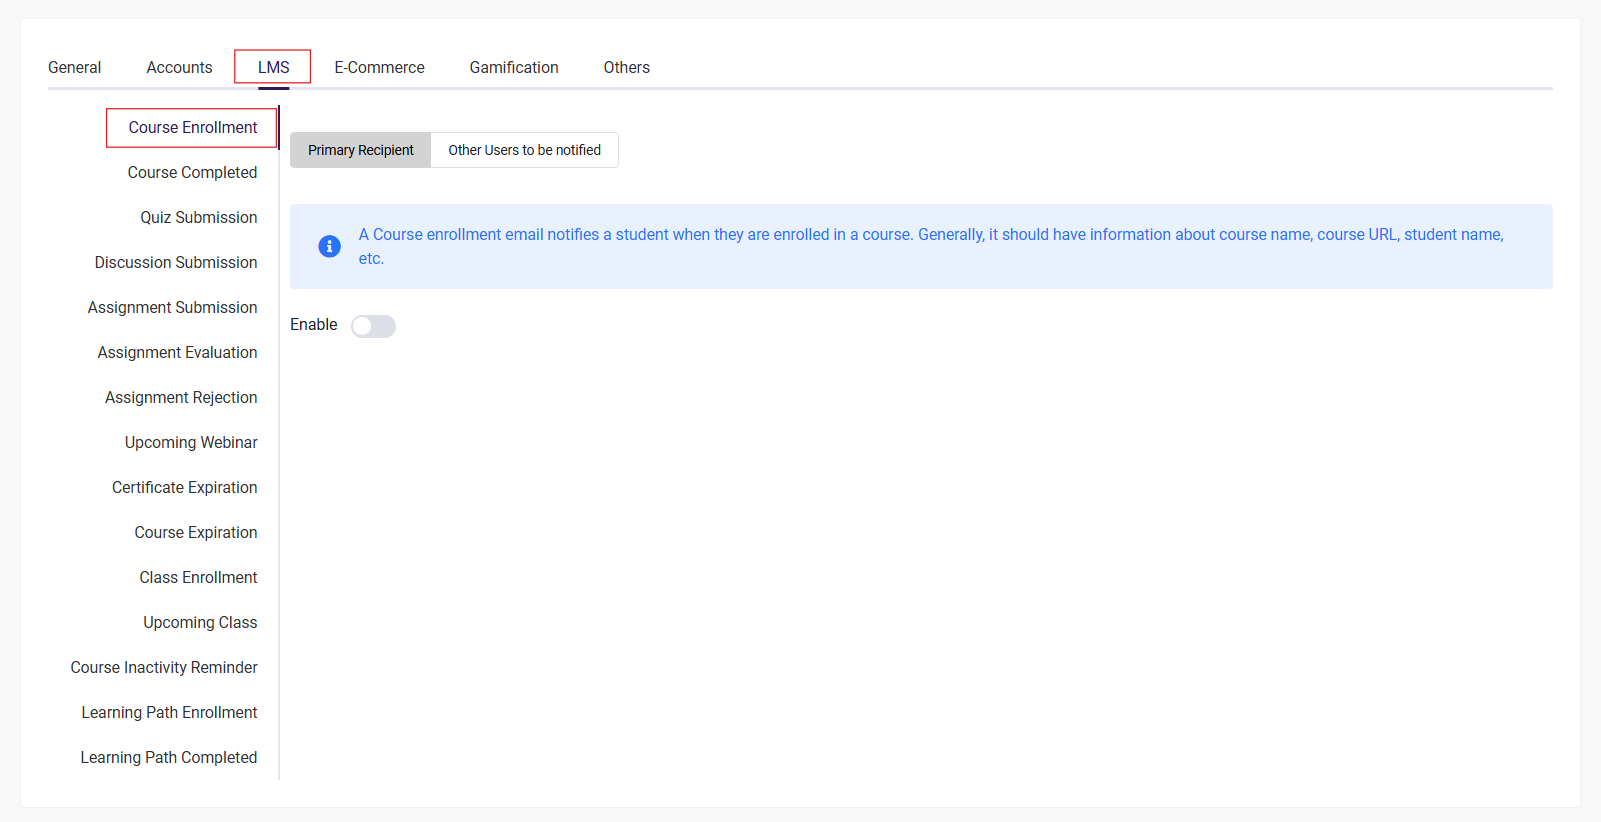
- From the Admin Dashboard, choose Settings then Email
- Select the LMS → Course Enrollment tab:
- The email can be enabled/disabled and the template can be modified to your liking. Every email template has its own short codes (listed below the Additional Content field) that can be used to pull in dynamic data, such as learner name, list of the enrolled courses, site name, and so forth. Note that if a learner is enrolled into multiple courses at the same time, they only receive one email that lists them all (short code: [course-enrolled-list]).
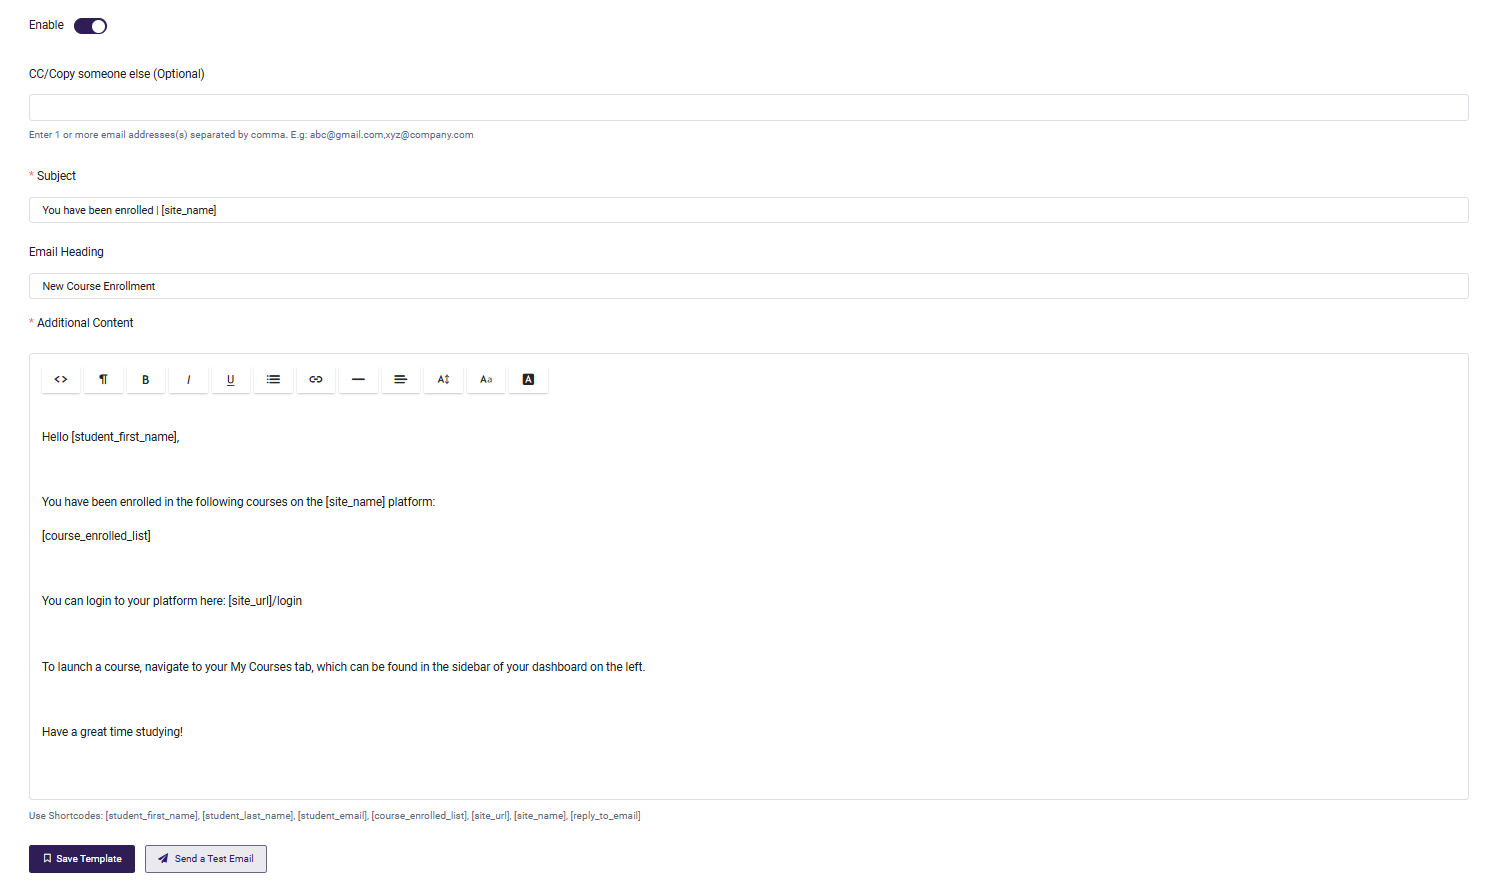
- Click Save Email to save your changes, or you can also choose to send a test email to preview it.
- Once saved, the Course Enrollment automated email will be delivered when a user is enrolled in its completed form with all short-codes populated.
Class Enrollment Automated Email
By default, the learner will be notified via an automated email that they have been enrolled into a class as a part of an Instructor Led course, which is sent immediately after enrollment. If you'd like to edit this Class Enrollment email template, follow these steps:
- From the Admin Dashboard, choose Settings then Email
- Select the LMS → Class Enrollment tab
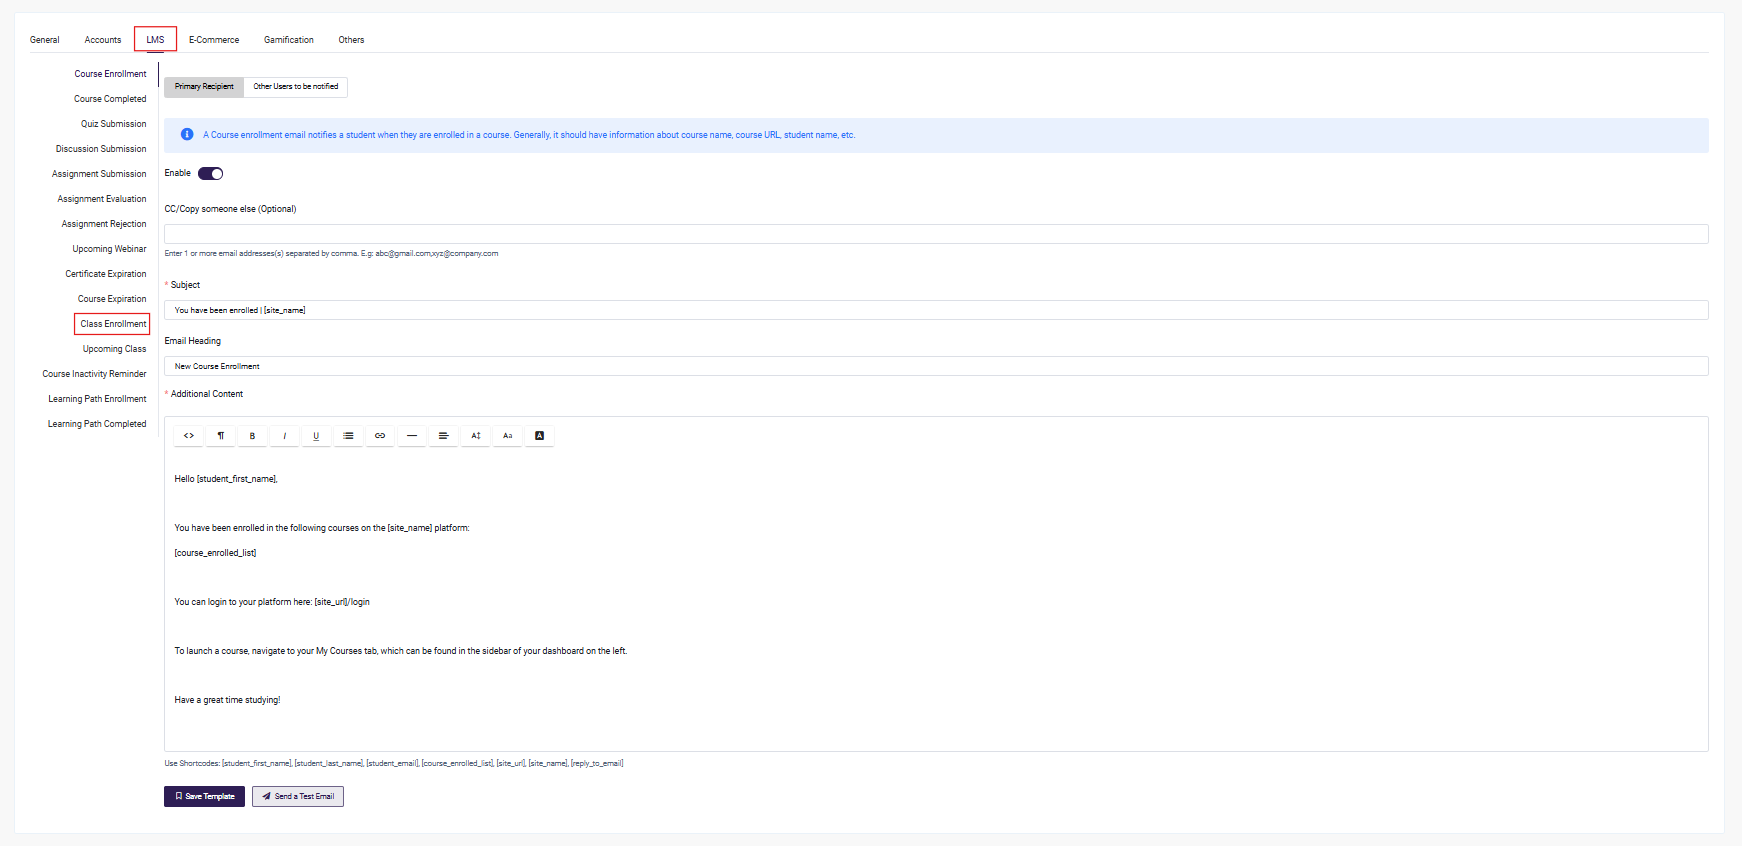
- The email can be enabled/disabled and the template can be modified to your liking. Every email template has its own short codes (listed below the Additional Content field) that can be used to pull in dynamic data. such as learner name, list of the enrolled class, site name, and so forth. Note that if a learner is enrolled into multiple courses at the same time, they only receive one email that will list all those courses (short code: [class-enrolled-list]).
- Click Save Email to save your changes, or you can also opt to send a test email to see what it will look like
- Once saved, the Course Enrollment automated email will be delivered when a user is enrolled in its completed form with all short-codes populated.
Next Step
Now that you know how learners are manually enrolled in a course, you may want to learn how to manage learner certificates or how a learner can get course access by purchasing a Product: