Using Badges, Points and Tiers with Gamification
Gamification brings game elements to your platform and educational content, and is a great way to engage and encourage learners with your courses. For example, learners can earn badges or points based on course or module completion, or other activities within the platform, such as time spent learning or how much money they've spent. Learners will also be ranked on a leaderboard based on their points. Using these points, badges and leaderboards can motivate your learners to move up the ranks, as well as reward them for their effort.
In this guide, we will review how to set up gamification in AOM, the different aspects to gamification and what it looks like from the learner experience.
Glossary of Gamification Terms
- Gamification: An educational approach that seeks to motivate learners by using game design elements in learning environments. The ultimate goal in applying gamification to learning is to maximize enjoyment and engagement of the learners, by keeping their interest piqued and inspiring them to continue learning.
- Points: For ranking learners on the leaderboard
- Badges: Earned by the learners for completing certain events or modules/courses
- Can be earned by completing an event as set up in Gamification settings OR
- By completing a module and/or course that has had badges assigned to it within the course settings
- Badges can have points assigned to them so that if a learner earns a badge, they also will receive points.
- Tiers: Learners will have a tier assigned based on their ranking on the leaderboard. The tiers are created in settings, and the Admin will enter the rank range required for each tier. Based on their place on the leaderboard, they may be placed in a tier.
- Leaderboard: This is available on the learner dashboard, and will show them what learners are ranked with them in their tier. If a user is not within a tier ranking range, their leaderboard will show the top ten learners.
Enabling Gamification
The first part of setting up gamification is to enable the feature using these steps:
-
From the Admin Dashboard, select Settings, then Gamification
-
Toggle Gamification to on
-
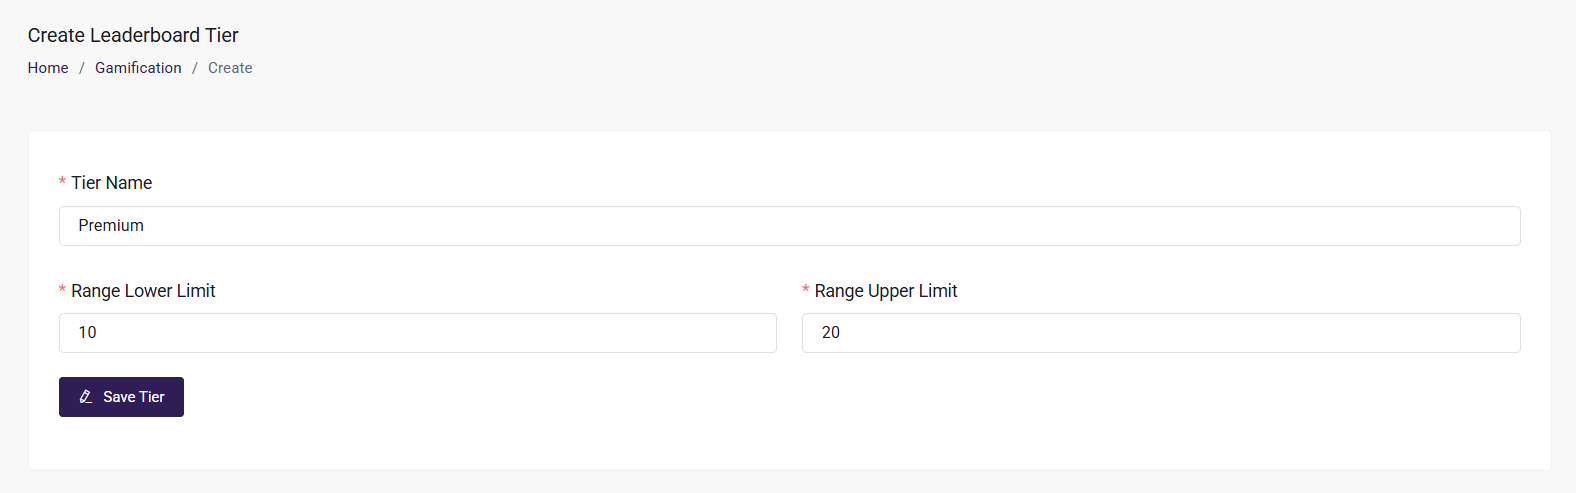
To set up the Leaderboard:
- Click +Add Tier to create a tier. Each tier will include a range of rank. The learners will be assigned to a tier based on their ranking place they have on the leaderboard
- Enter a name for the tier, as well as the upper and lower limit of the ranking that tier will include. Note that range limits will depend on other tiers that you may have created, since tiers can't overlap rank ranges.
- Click Save Tier when you’re done
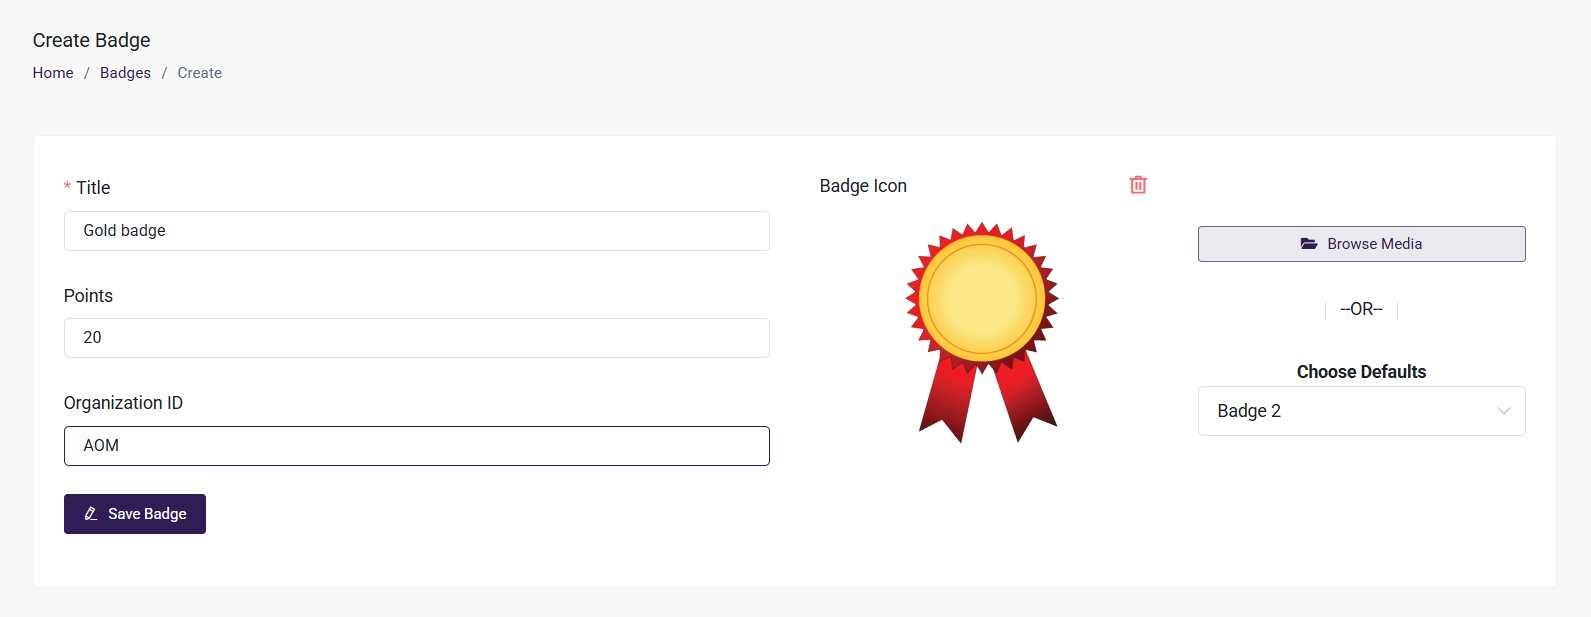
Creating Badges
Now you can create the badges that will be awarded to learners based on the events added by the Admin.
- From the Admin Dashboard, select Assets, then Badges
- Click +Add Badge
- Enter the title of the badge
- Select a default badge from the dropdown menu, or you may add your own image by clicking Browse Media. From there, you may upload a new image or choose one that is already in your Media Library
- Enter the number of points that the badge will be worth. If a learner achieves the badge, they will be awarded the number of points entered here. This will impact their leaderboard score.
- Click Save Badge when complete
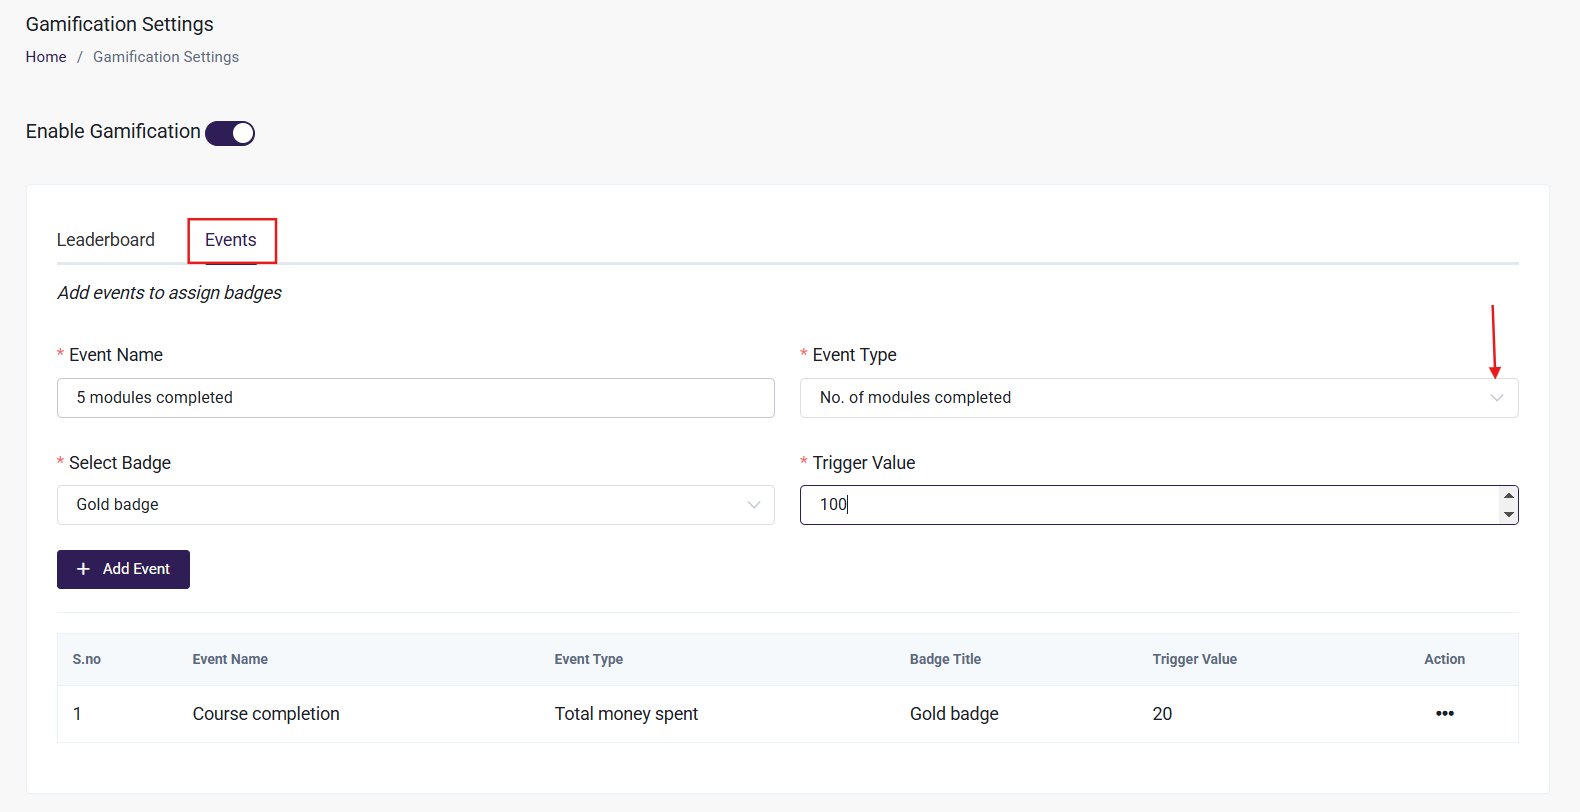
Now that you have created your badge, you must assign an event to the badge. When the event is performed, the badge will be awarded to the learner.
-
From the Admin Dashboard, select Settings, then Gamification
-
Choose Events
-
Name the Event–for example, “5 modules completed”
-
Select the Event Type from the dropdown menu. There are four event types:
- Total money spent
- Total time spent learning (in hrs)--This is based on the amount of time the learner has spent on modules within the course
- No. of modules completed–this will be based on the total number of modules the learner has completed, regardless of the course(s) the modules are a part of
- No. of courses completed
-
Choose the badge you want to assign to this event from the “Select Badge” dropdown menu
-
Enter the trigger value. For example, if you want the badge to be awarded after the learner completes 5 modules, you would select the Event Type as “No. of modules completed” and set the trigger value to 5. If you want a badge to be awarded after the learner spends $100, choose “Total money spent” as the Event Type, and enter 100 as the trigger value.
-
Click +Add Event when you’re done
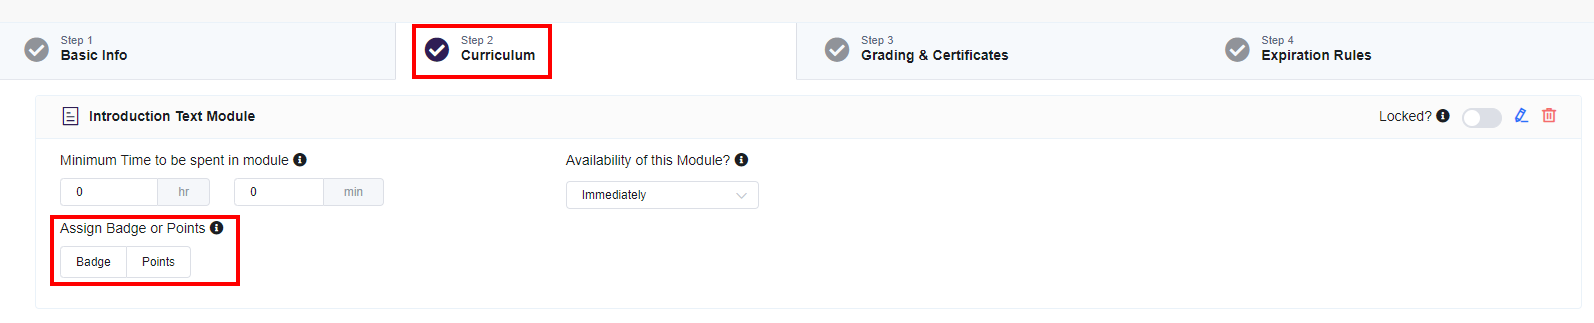
Adding Badges or Points to Modules and Courses
Points or badges can also be assigned to modules within a course, or to the course itself. Once the learner completes the module(s) and/or course, they will receive the associated badge or points.
-
From the Admin Dashboard, select Courses, then All Courses
-
Find the course you wish to add points/badges to (on either a course or module level) and click the three-dot action menu. Opt to Edit
-
If you wish to add points or a badge to a module(s), click to the Curriculum tab
- Find the module you want to assign points or a badge to and select if you would like to add either points or a badge.
- If points are chosen, enter the number points to be assigned, or select the badge to be awarded if you opted to assign a badge instead
-
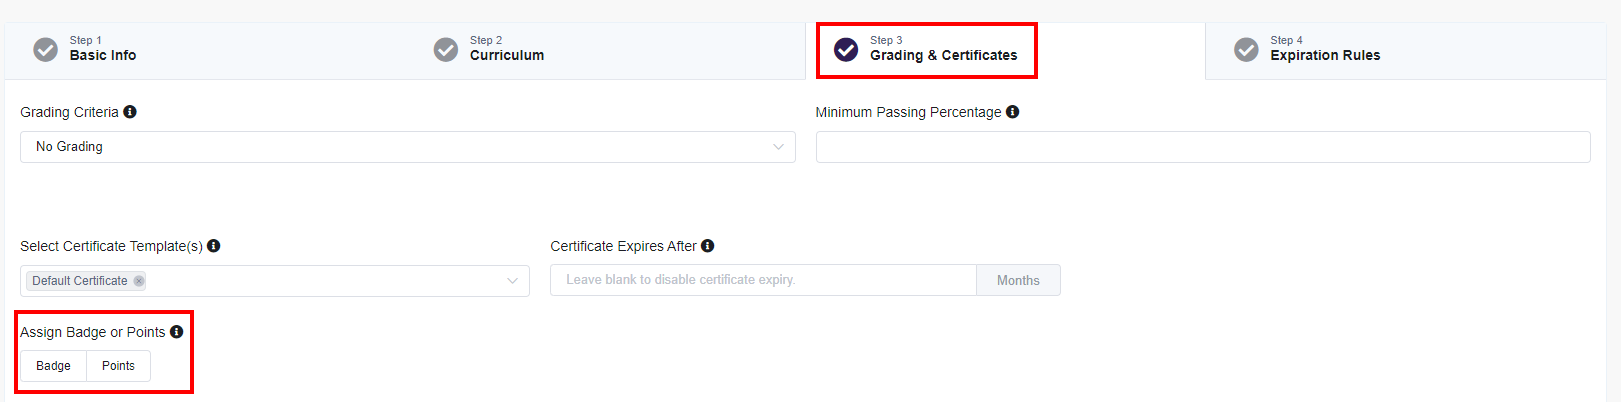
If you wish to add points or a badge based on an entire course, click to the Grading & Certificates tab
- Choose if you would like to assign either points or a badge to the course
- If points are chosen, enter the number points to be assigned, or select the badge to be awarded if you opted to assign a badge instead
-
Be sure to click Update Course when you are done making changes
When the learner completes the module or course, they will automatically be assigned the badge or points you have set up.
Gamification Automated Emails
There are a handful of gamification related automated emails:
- New Badge Email: This will be sent to learner about any new badges they receive in the platform.
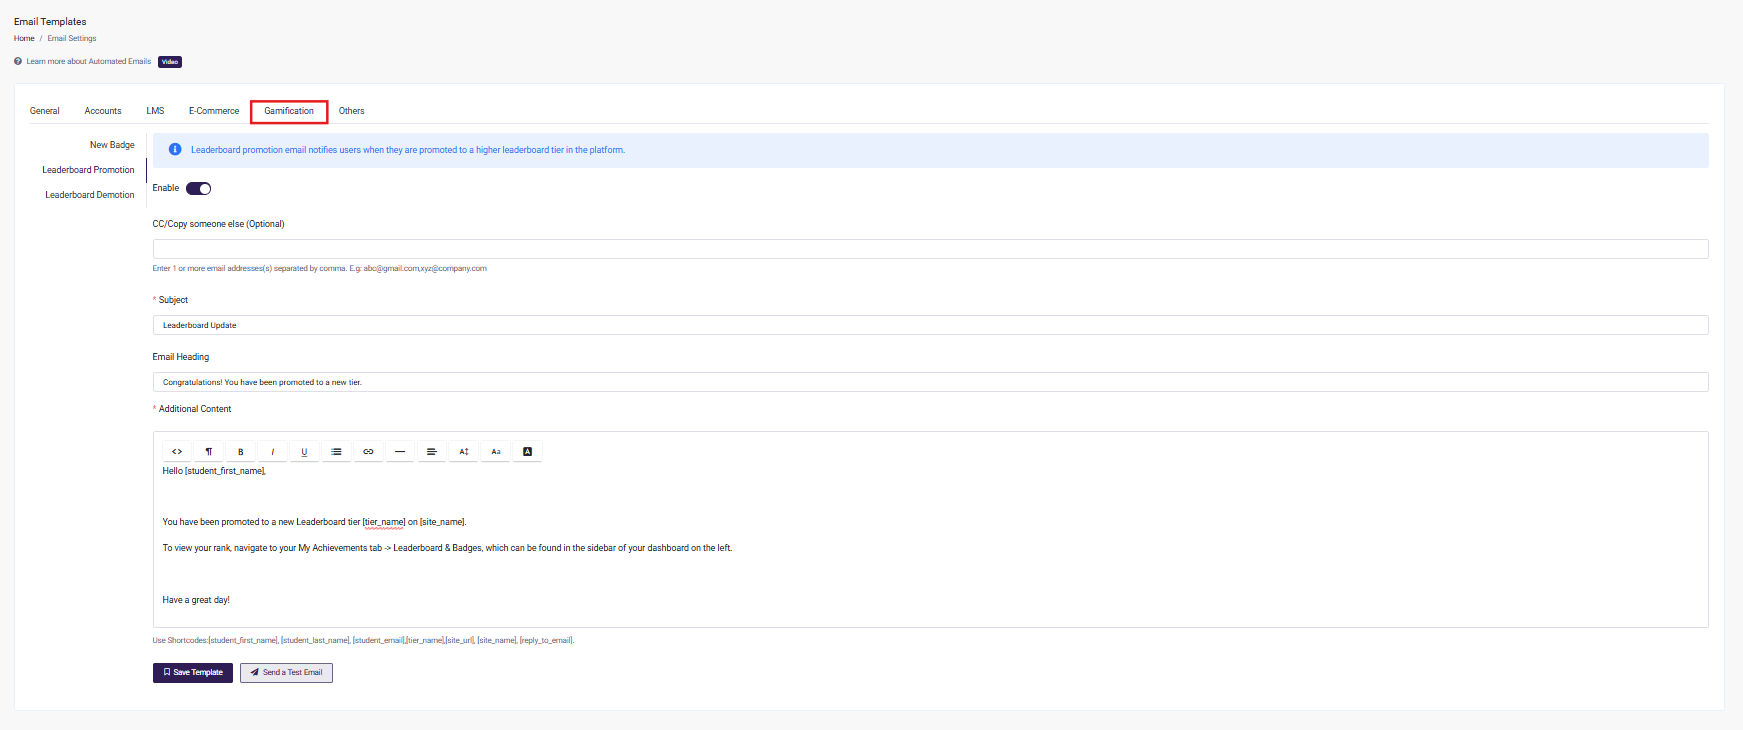
- Leaderboard Promotion: This email is sent when learner are promoted to a higher tier based on their ranking on the leaderboard
- Leaderboard Demotion: This email is sent when learner are demoted down a tier, based on their ranking on the leaderboard
These can be enabled and configured in the Email Settings area:
-
From the Admin Dashboard, select Settings, then Email
-
Choose Gamification across the top
-
Select what Gamification email you would like to configure from the side menu: New Badge, Leaderboard Promotion, and Leaderboard Demotion
-
Enable Emails: toggle the Enable button to On to have these emails sent out
-
Recipients: For the Gamification emails, the Primary recipient is the learner
- You may also opt to CC/Copy someone else: The addresses can be added to the CC field, separated by commas and they will get the same email as the primary recipient
-
Subject: The Subject of the email is customizable, and the use of shortcodes is allowed. The Subject will appear in the customer's inbox when they receive the message.
-
Email Heading: The Email Heading is also customizable, and the use of shortcodes is allowed. The Email Heading will appear to the customer at the top of the body of the message, with the header background color chosen in your General Email Settings.
-
Additional Content: Each email has a pre-formatted template, ready for use as soon as you enable the email. However, you are free to customize the message in any way you see fit. The HTML editor is available to help further customize the message. You also have the option of using shortcodes to include information specific to a single order.
-
Be sure to click Save Template when you are done making any changes, and you can also send a test email as well to see what the final product will look like at any point as you make changes.
Learner Experience of Gamification
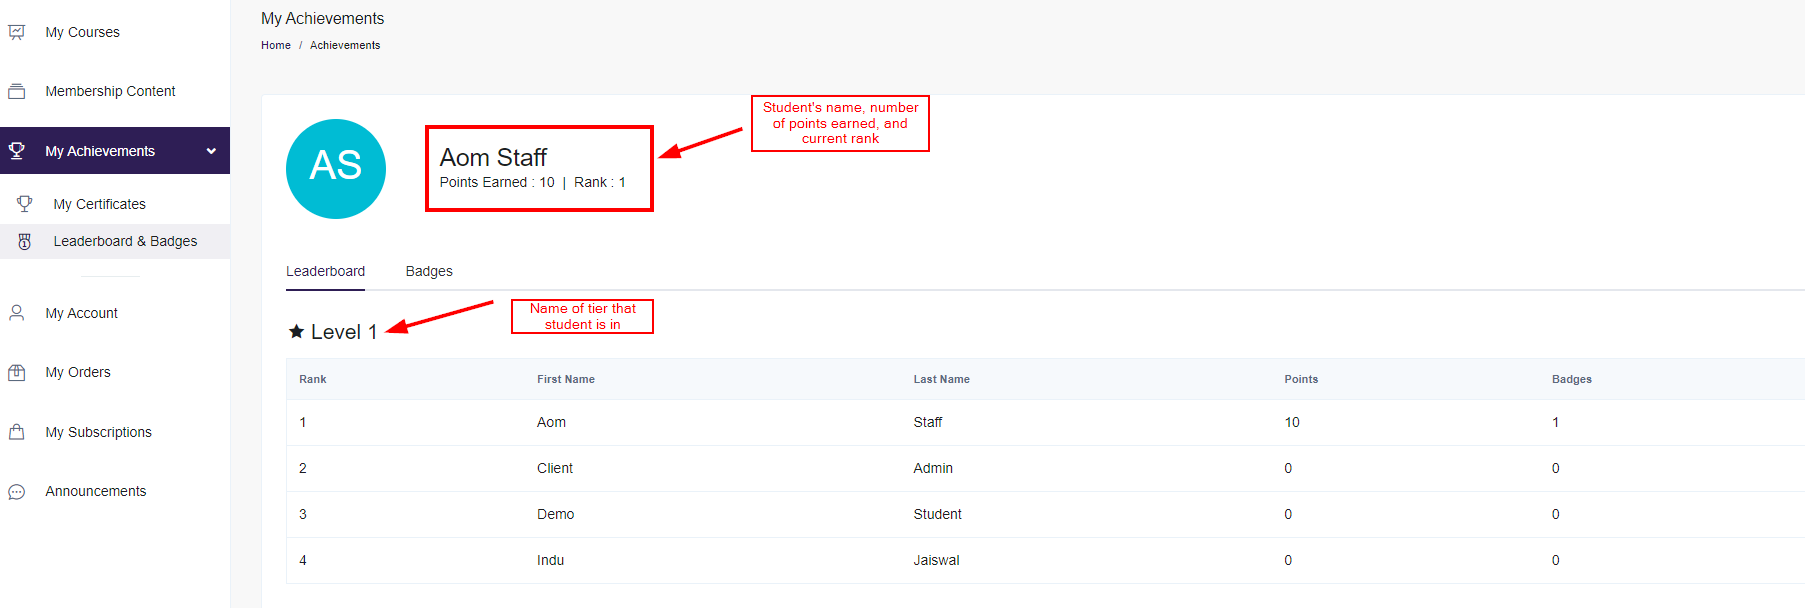
Learner will be able to keep track of their leaderboard status and badges within the My Achievements area of their learner portal.
- From the Learner Dashboard, select My Achievements
- Choose Leaderboard & Badges
- The learner will view their leaderboard status and rank on the Leaderboard tab. Learners will have a tier assigned based on their ranking on the leaderboard, and their ranking will depend on the number of points that they have. A tier contains a set number of ranks (for example, you may have a tier called "Elite" which will contain the ranks 1-3 so only those three learners who are ranked 1-3 will be in that tier) and learners will be able to move up and down in tiers, depending on their ranking and points compared to other learners.
Note that if a learner is not within a tier ranking range, their leaderboard will show the top ten learners overall instead of a tier name.
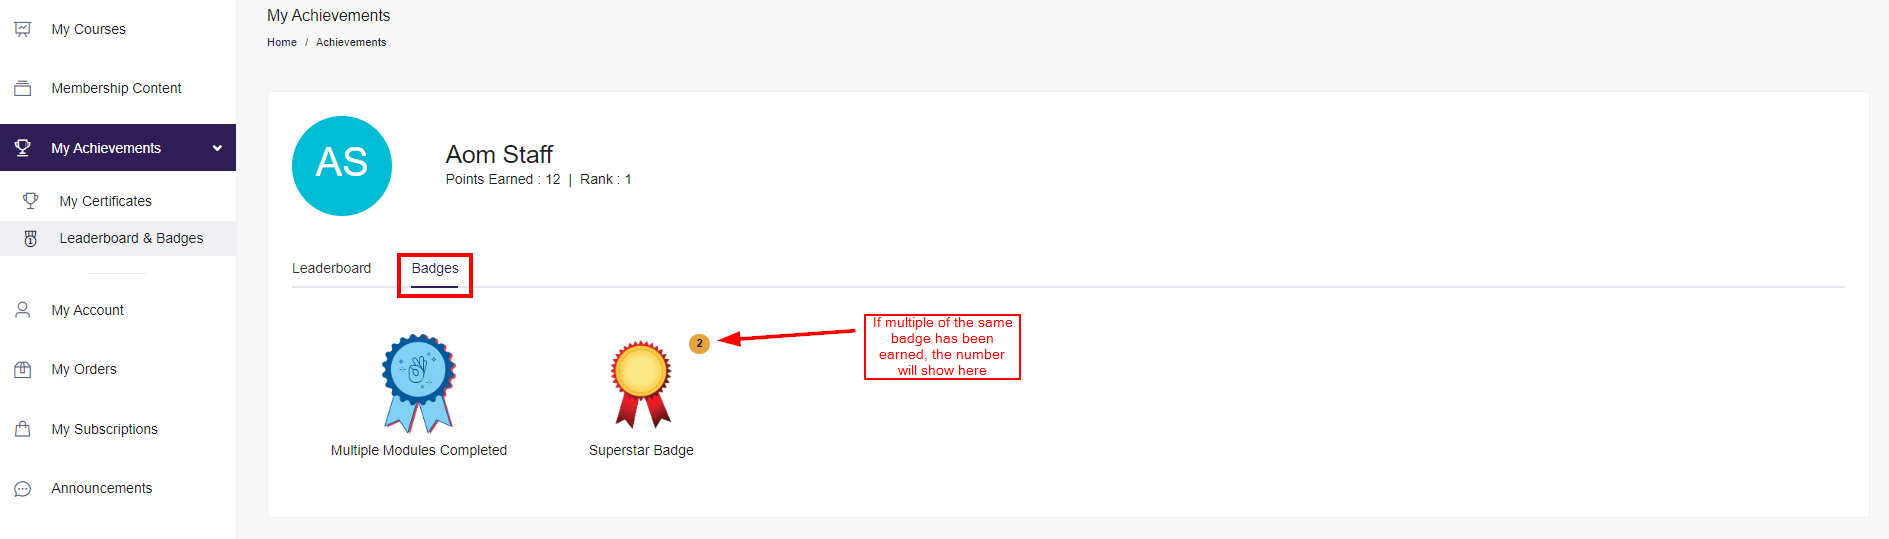
- Clicking the Badges tab will show the badges the learner has earned. If they have multiple of the same badges, the number of each badge will show on the badge listing
If you have enabled sharing certificates and badges with LinkedIn, learners will have the option to share their badges to their LinkedIn page. Please see this guide for more details.
As mentioned in the email section above, learners will be notified when their tier status has changed, as well as when they receive any badges.