Enrolling Students and Managing your Group (for Group Admins)
As a Group Admin for your organization, company or team account, you have some amazing functionality at your fingertips to manage your group of students and keep tabs on their progression. The main function of your Group Admin role is to enroll Students into available seats in a course, view and manage their progress, as well as manage the Courses available to your Group.
In this article, we'll be going over your Group Admin Dashboard, how you can enroll and manage students, manage your Courses, as well as the Reporting and Settings available. Note that permissions and access can vary, so if you run into a Permissions error or not seeing a particular function, get in touch with the Admin of the platform.
Also note that Instructor Led courses may not be available to legacy users. Please contact the Admin of your account so they can connect with support on the availability of this function.
If you are needing guidance on navigating the checkout processing when purchasing Course seats in bulk, please see this article.
Group Admin Dashboard
First, let's ensure you're feeling comfortable with navigating through the account. The Group Admin Dashboard is where you'll land when you log in, and is the hub of your account. From the side menu, you can access:
- Courses: where you'll be able to view and manage the Courses available
- Users: where you can view and manage students
- eCommerce: where you can view and manage orders
- Assets: this gives you access to the Media Library, where uploaded files are
- Reports: the reports available, including Course and Student Insight
- Settings: where you can adjust general settings for your account, as well as send out Announcements
Again, note that permissions can vary so you may not see everything depending on the settings the Admin has in place.
Adding & Enrolling Students into Self Paced Courses
There are a few ways to enroll Students into your Courses, and Students can also self-enroll as well, so long as the have the Registration URL and referral code for your Group. We'll go over all the ways below, and also have this short video that goes through how you can enroll Students:
Adding & Enrolling a New Student via Manage Course
You can add and enroll a single Student from the Manage Course page:
- From your Dashboard, choose Courses, then All Courses
- Click +Enroll Student in the upper right corner
- Enter in the Student's information, select the Courses you'd like to enroll them in from the dropdown menu
- Click Submit to enroll them and trigger the New Account email to be sent to the Student with their login details
Adding & Enrolling a New Student via All Users
You can also add and enroll a single Student from the All Users page:
- From your Dashboard, choose Users, then All Users
- Click +Assign Students in the upper right corner
- Enter in the Student's information, select the Courses you'd like to enroll them in from the dropdown menu
- Click Submit to enroll them and trigger the New Account email to be sent to the Student with their login details
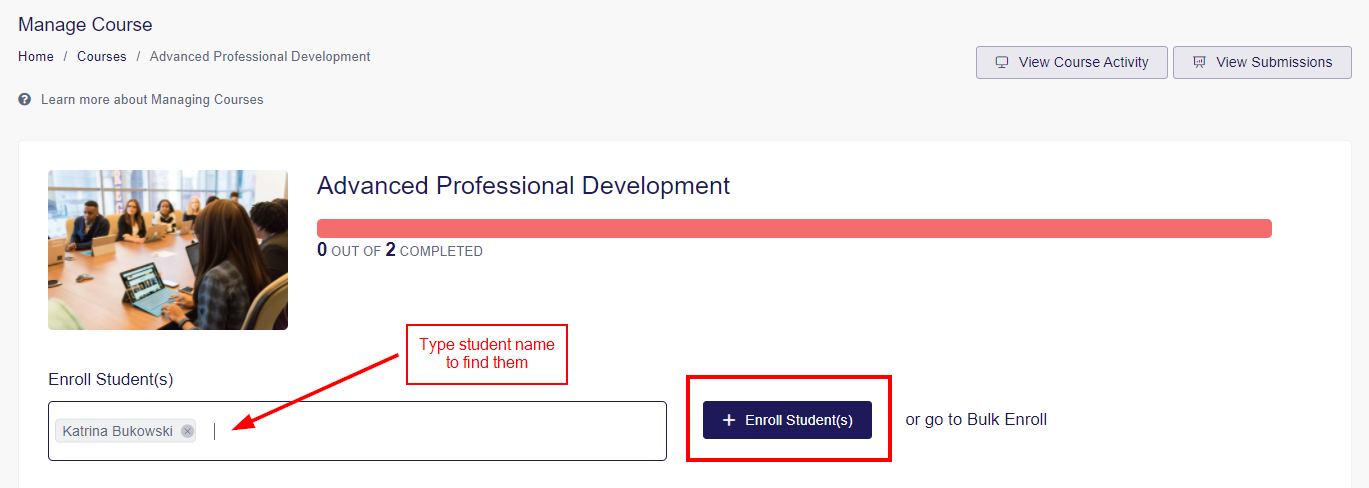
Enrolling Existing Student(s) via Manage Course
If the Student you'd like to enroll is already added to your account, you may enroll them on the Manage Course page. This is handy if there are several Students you'd like to enroll in a specific Course.
- From your Dashboard, choose Courses, then All Courses
- Click the three-dot Action Menu to the right of the Course you'd like to enroll the Student in, and choose Manage Course
- Type in the name of the Student or Students you want to enroll. Once they have been entered, click +Enroll Student(s)
Enrolling an Existing Student via All Users
If the Student you'd like to enroll is already added to your account, you may enroll them by following these steps from their profile as well:
- From your Dashboard, choose Users, then All Users
- Click the three-dot Action Menu to the right of the Student you'd like to enroll and choose Enroll in a Course
- Type in the name of the Course(s) you want to enroll them in. Once they have been entered, click Confirm
Enrolling Multiple Existing Student(s) via All Users
You can also enroll multiple existing Students at a time via the Bulk Actions function on the All Users Page:
- From your Dashboard, choose Users, then All Users
- Check the box to the left of the Students you'd like to enroll, then select the Bulk Actions menu
- Choose Quick Edit, and then type in the Course(s) you'd like to enroll them in.
- Click Confirm to enroll them
Enrolling Student(s) into Classes in an Instructor Led Course
- From the Admin Dashboard, select Courses, then All Courses
- Hover over the Course and select Manage
- Find the class you wish to enroll the student in and click the three-dot action menu--select Manage Roster
- Here, you can adjust a student's attendance from Registered to Attended, No Show or Cancelled. You can also use the Bulk Edit feature to select multiple students at once, and adjust their attendance status or assign a certificate en masse.
- To enroll a student or students, type in their name(s) and then click +Enroll Students. This will add them to the class, and they will have the status of Registered.
Bulk Enrolling New Students into Self Paced or Instructor Led Courses
If you still need to add students to your account and have them in an Excel file, you will be able to bulk upload them and enroll them in Courses all at once via the Bulk Upload.
- From your Dashboard, choose Users, then choose Bulk Upload
- Follow the instructions on the page to upload the Excel file
- You can select one or more Courses to enroll your Students into for Self Paced courses, or you can select a Learning Path as well. Selecting a Learning Path will enroll students into the Courses included in that Learning Path. If you are enrolling students into an Instructor Led course, you will select the course under the "Select Class" dropdown, and will then be required to select the location and the class that you want to enroll the students into.
- Click Upload Users to finalize
Having Students Self-Enroll using a Referral Code
It is also possible to - instead of you as the Group Administrator enrolling the students - have the students self-enroll into the Group. A student that is registering via the traditional Registration page will see a Referral Code field. If they input the same Referral Code that is specified for your Group, they will automatically become part of your Group and get enrolled into all of its courses (depending on whether enough seats are available).
You can find and edit the referral code, as well as copy the Registration URL of your Group by:
- From the Admin Dashboard, select Settings, then General
- Here you can copy the referral code, as well as the Registration URL
- Share these with the Students you wish to enroll
Managing Students
On the Student page, you will be able to see all the Students that are part of your Group. Access this from your dashboard by selecting Users>All Users. For each student their basic personal information is shown (such as name and email address) as well as when they last logged in and their progression through the courses they are enrolled in (see Completion column). Similarly as with the Student Progress column discussed earlier, the red portion represents how many of their courses they have Not Started, the orange section indicates how many courses they have In Progress, and the green section indicates how many courses they have Completed.

By clicking on the three-dot icon for a student, you'll find additional functionality for managing your students. You can:
- Switch To (allows you to see the platform and courses from that student's point of view)
- Delete them
- Go to their profile
- Enroll them in a course
- View their certificates
- Take a look at their activity across the courses in the platform.
- Manage their Courses: Selecting this, you will see all courses they are taking as well as their status, when they last accessed it, and some enrollment details.
You can also go to the View Progress page here for each course, similarly as from a specific Manage Course page as discussed earlier. You do so by opening the Actions dropdown via the triple-dot icon, and select View Progress. You'll be able to see - module-by-module - how the student has progressed through the course.
Managing Courses
You can get a birds-eye view of all the Courses you have from the Manage Course page, and you can also dive into specific Courses as well.
Viewing All Courses
From your Dashboard, select Courses, then All Courses to view the Course list.
From the Courses list, you will immediately be able to see some data such as:
- The number of seats that are used/available
- How many students have been active in the course the last 24 hours,
- The Student Progress bar, which gives you an easily digestible representation of the status of your students in the course. The red portion represents the students that have Not Startedthe course yet, the orange section the students that are In Progress, and the green portion represents students that have Completed the course.
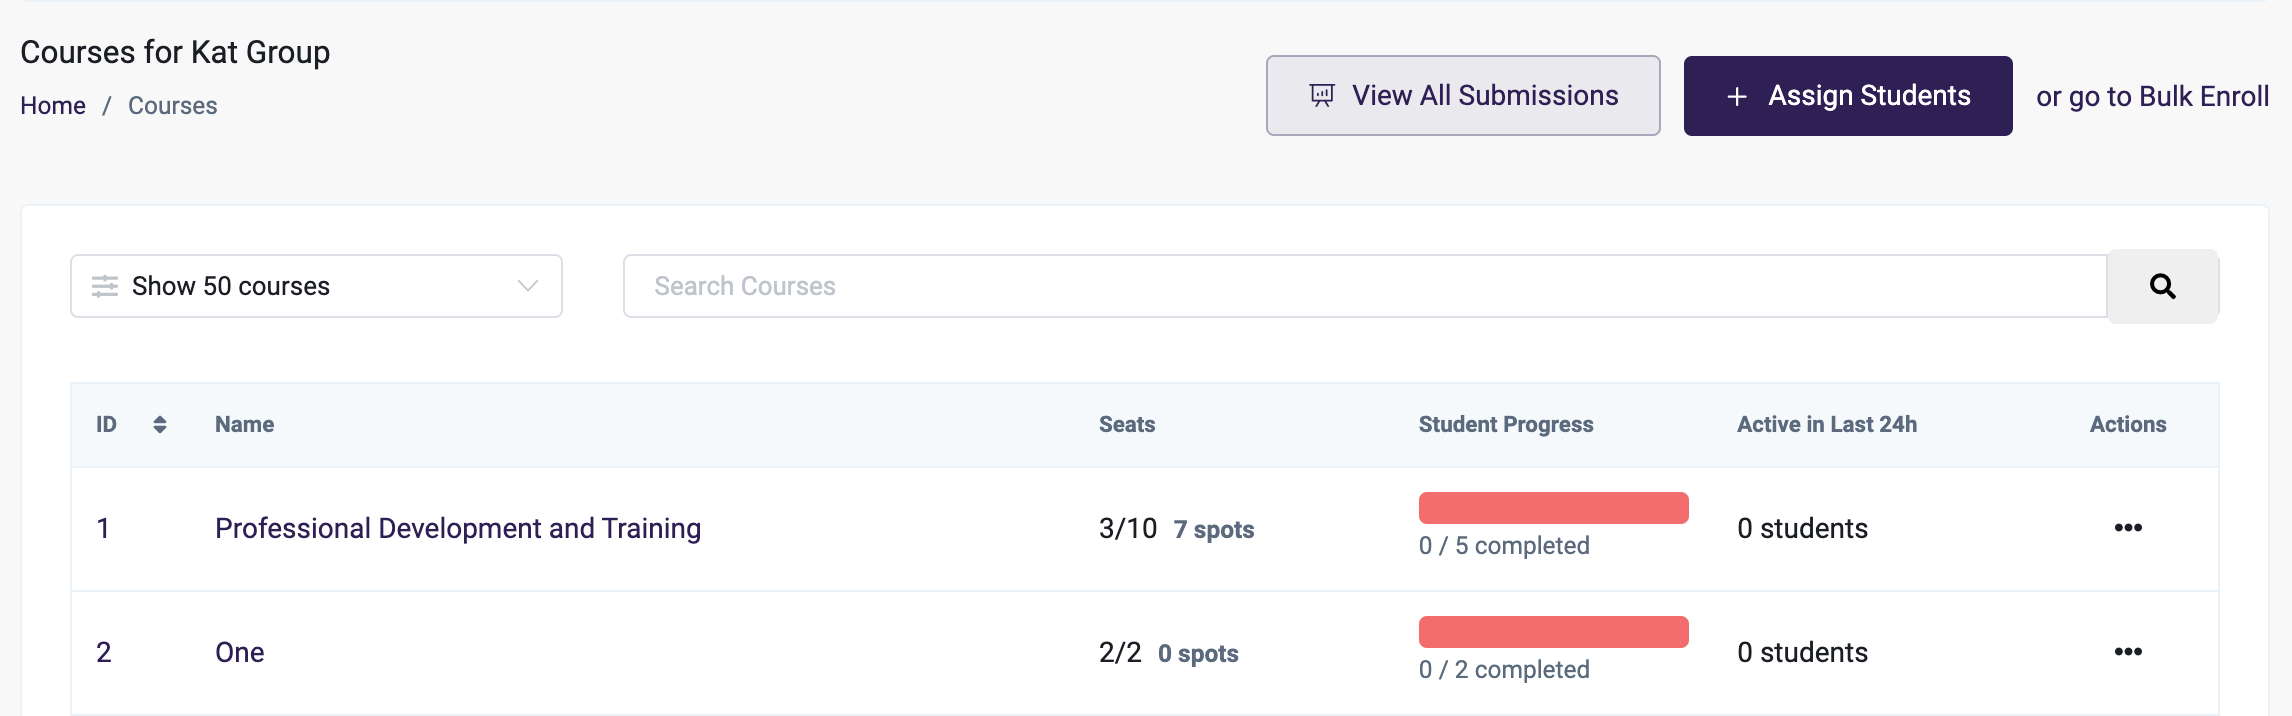
From this page, you can also Go to Bulk Enroll button in the right top to go to the Bulk Upload page and enroll new students into courses, or add a single new student with the Enroll Student button.
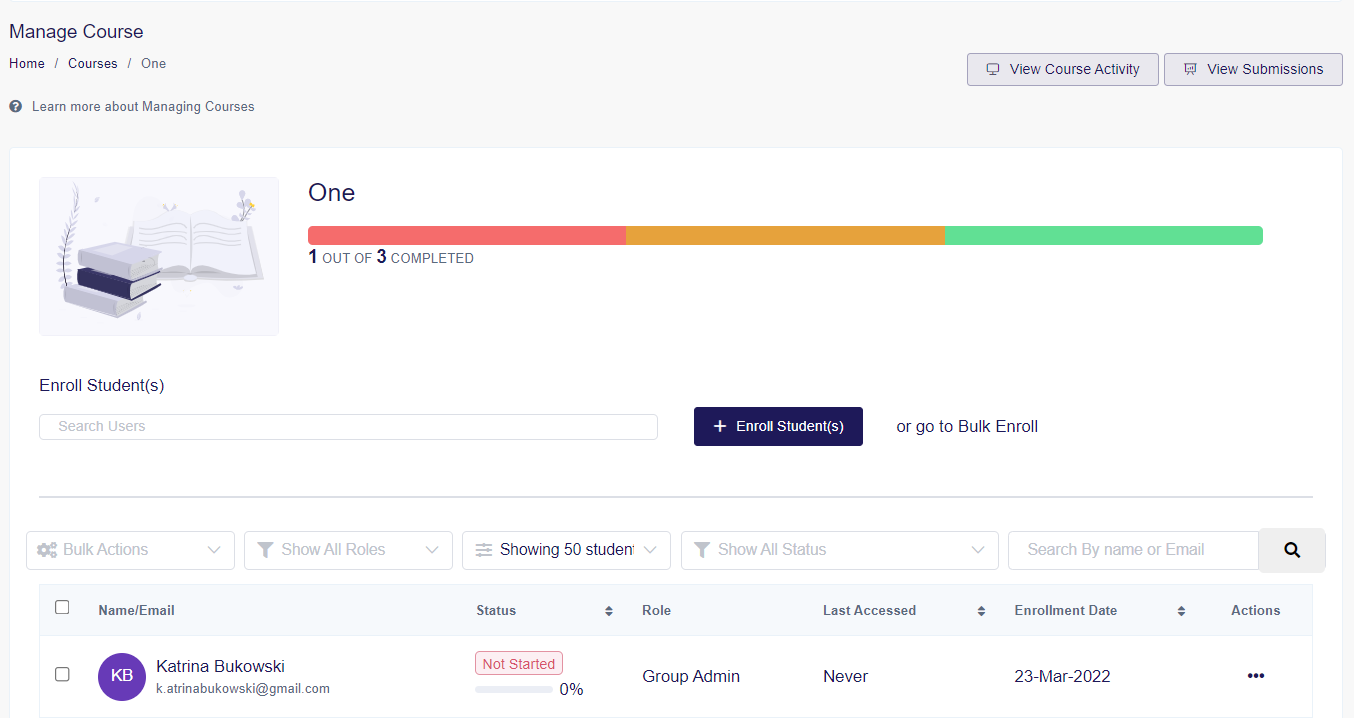
Managing a Couse
On the Manage Course page for a particular Course, you can view the course Activity and evaluate student Submissions directly. You'll also be able to see more detailed progress data for each student that is enrolled in the course.
-
From the Dashboard, click Courses, then All Courses
-
Click the three dot menu to the right of the Course you want to view, from the Course list.
- Here you can opt to Manage Course to view more details
- You can also opt to View Submissions, View Activity or View Survey Report
-
On the Manage Course page, you will see a list of Students enrolled in the Course. You can enroll existing students into the course that are already part of your Group or go to the Bulk Enroll page using the Enroll Students field above the Student table. Furthermore, you can click the View Course Activity and View Submissions buttons in the top right to see all actions taken by students inside the course or evaluate student submissions for the Assignments and Discussions of this course.
- When clicking the triple-dot icon for a student, you'll see a lot of different options to manage the student for this particular course, depending on the privileges that the LMS admin has assigned. As such, you can remove them, reset their progress, revoke access (but keeping them in the course), manually assign the course certificate, and you can even do a Switch To (which allows you to see the platform as that student). You can also get more detailed and view the course progress module-by-module for each specific student by clicking the View Progress button. You will be able to see status of each module, when they last accessed it, the time they spent in each module, and - when relevant - the details of the module (for example quiz responses).

Viewing Reports
You can access reports by clicking the Reports tab from your Dashboard. Here, you can select to view specific reports where you will find more visualized presentations of the course and student data we discussed in the foregoing tabs, and you will also be able to download this data in an Excel file so it can be used outside of the platform when desired.
Group Admins are able to pull reports from Course and Student activity, as well as the Overview Report. These are found in the Reports section of the dashboard. You can read more about reports here, and again, keep in mind that the permissions or access may be different.
Viewing Orders
Group Admins can view any orders and invoices relevant to the group. These are found in the Orders section of the dashboard.
Viewing Settings
General Group settings and the Announcements section can be found in the Settings section of the Dashboard.
General Settings
Group Admins have the ability to modify some of the settings for their group by going to Settings>General. This is a limited list of features from the Group Creation by Admin section. The Group Admin has permission to change the Group Name, Referral Code, Group Logo, and Update Group Admin Users (add additional Group Admins). If the Group Admin wants to purchase extra Course seats or other Courses, they may do so via the purchase in the Course Catalog.
Announcements
The announcement feature is a clear and simple way to communicate with your users directly, and you can use it any way that best suits your needs. This is found by going to Settings>Announcement. For more details on creating an announcement, please see this article: Platform Announcements.
Delete User From Group
Step 1 : Delete group admin
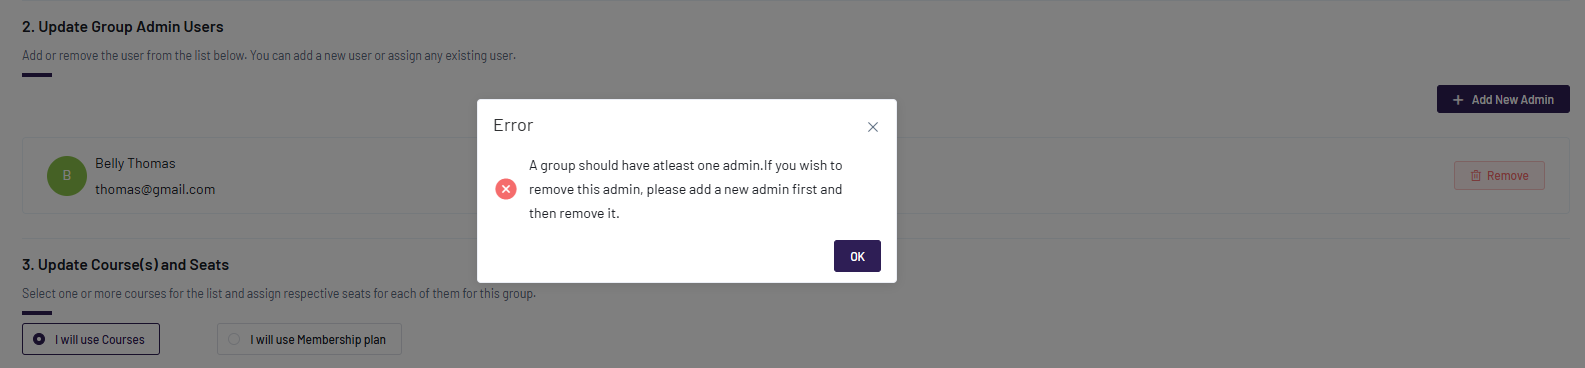
Go to Groups > All Groups, select the group that the group admin needs to delete, then select the group admin and click the Remove button in the right side.
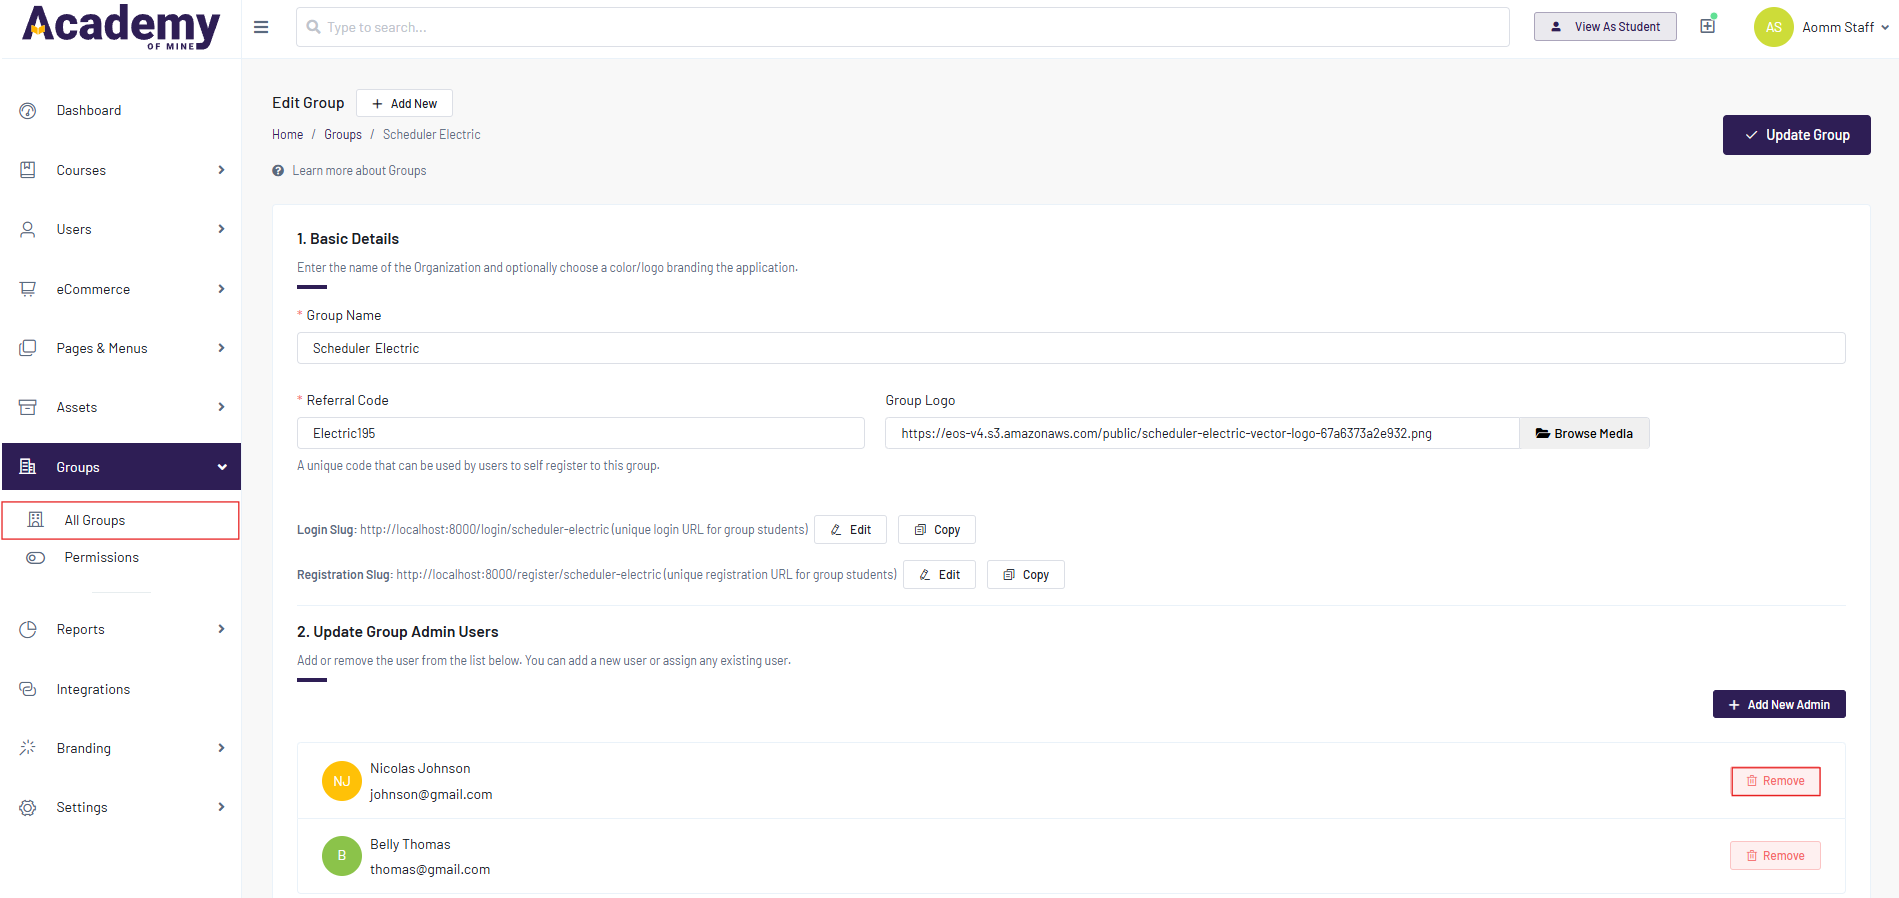
Once you delete a group admin, that user will be removed from the selected group.
If there is only one admin, they cannot be removed, as at least one admin must be present. If you try to delete the last admin, a popup message will appear, preventing the deletion
Step 2 : Delete Users Inside the Group Admin
Log in as a group admin and go to Users → All Users. Select the user that needs to be removed. Before deleting, make sure to remove the user from enrolled courses and classes. Then, click on the three dots and select Delete.
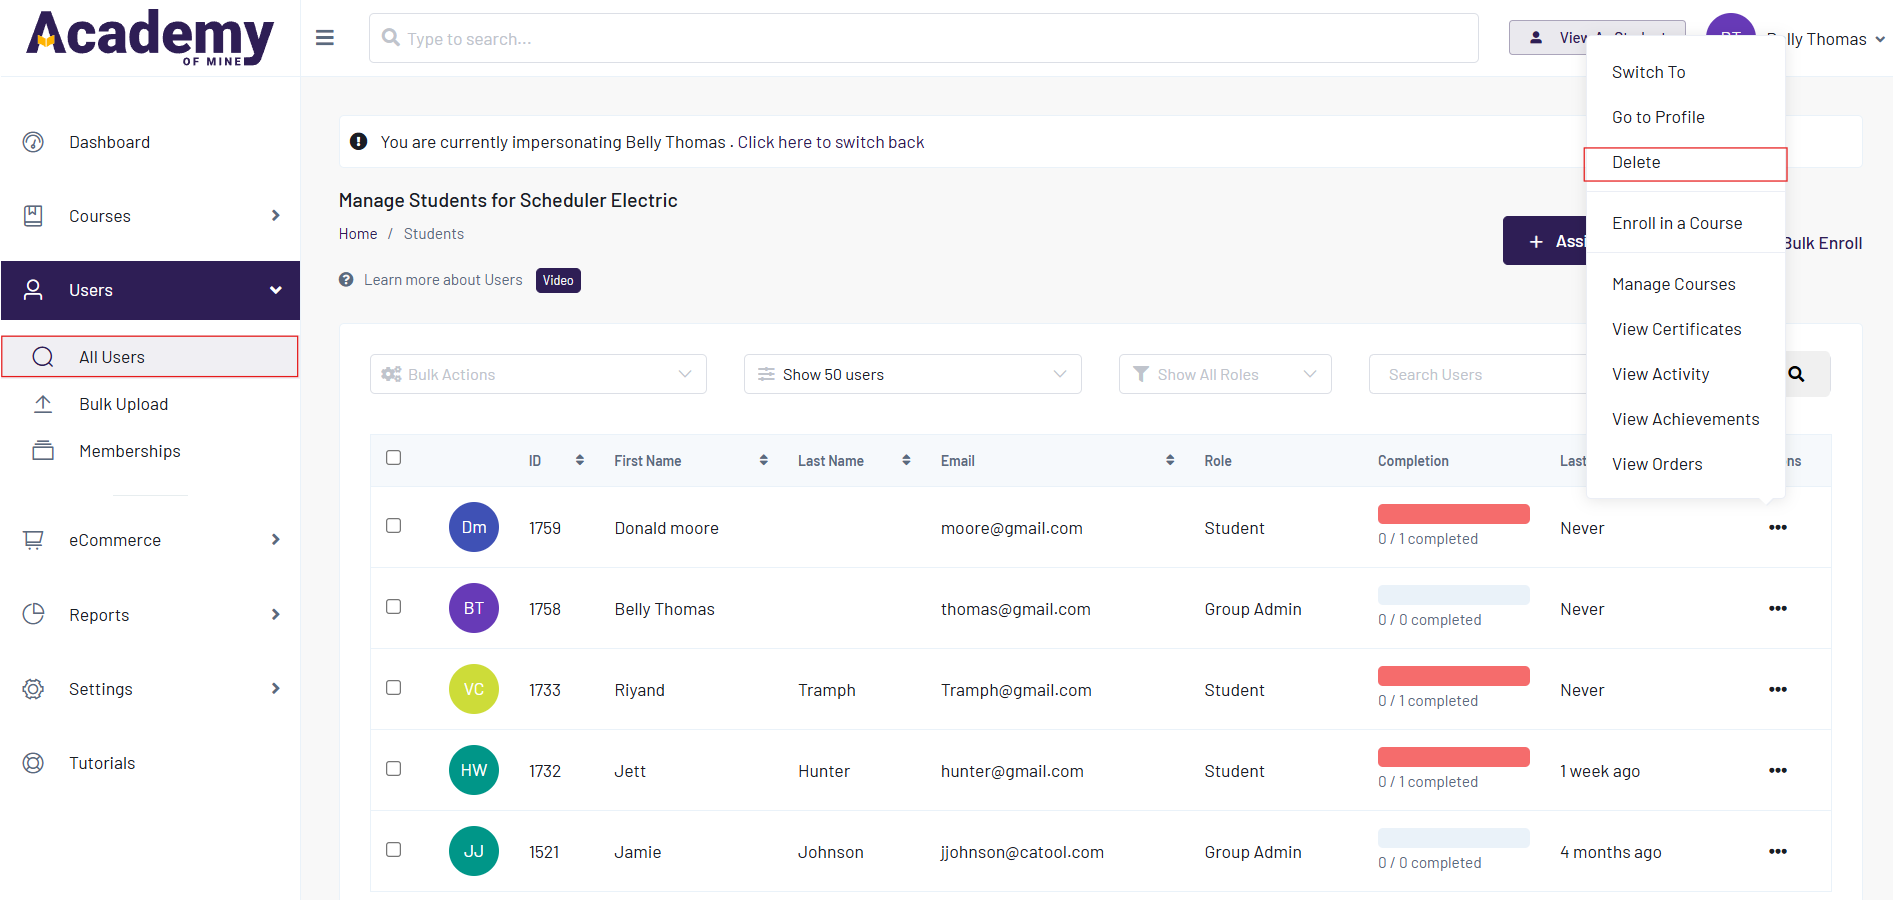
Deleting a user will permanently remove them from the system.