Create Portals & Sub-Portals
The Portal feature appears to be an ideal solution for teams and organizations seeking efficient management of course enrollment and learner access. Here's why:
- Portal Creation and Seat Limits : Administrators can create portals within the platform and designate specific group of users to each portal. They also have the capability to set seat limits for portal, ensuring effective resource allocation.
- Public User Portal Creation via eCommerce : Public users can create portals via the eCommerce feature by purchasing products in bulk. To learn more about creating a portal via eCommerce please click here. .
- Branding: Portals have the flexibility to define their own branding, enabling them to personalize their identity within the platform. This customization promotes a sense of ownership and community among portal members.
- Reports : Reports generated within the platform are scoped to the portal(s) that the associate or portal admin has access to. This ensures that Portal Admins have access to relevant data and analytics pertaining to their specific portals.
Overall, these features empower Portal Admins to efficiently manage their respective portals within the AOM platform. Staff with sufficient permissions to create new Portals within the platform, and Portal Admins to create Portals via eCommerce purchases, provides flexibility and convenience for managing organizational structures and access to courses. Portal Admin holds a significant role within the AOM platform for overseeing and managing a specific portal. Learner on an AOM platform is a user who is actively engaged in taking courses or participating in learning activities.
Creating Portal
Portals allow you to train your own B2B Customers in bulk where you can give your customers a fully white-labeled branded platform to train their employees/learners, etc.
Now, let's proceed with creating a Portal. To create a Portal, go to your Admin Dashboard, then click on 'Portals' in the sidebar menu .
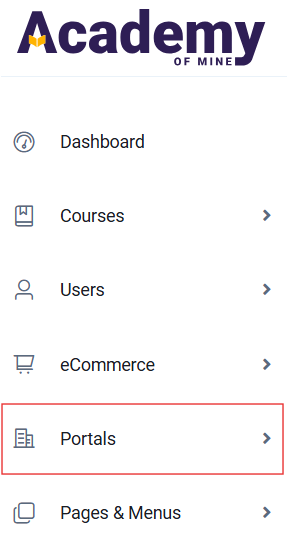
There are two methods to create Portals:
- Quick Way
- Detailed Method
Quick way to create a Portal
Creating a Portal is a breeze with just 3 simple steps.
- Click on Portals -> All Portals .
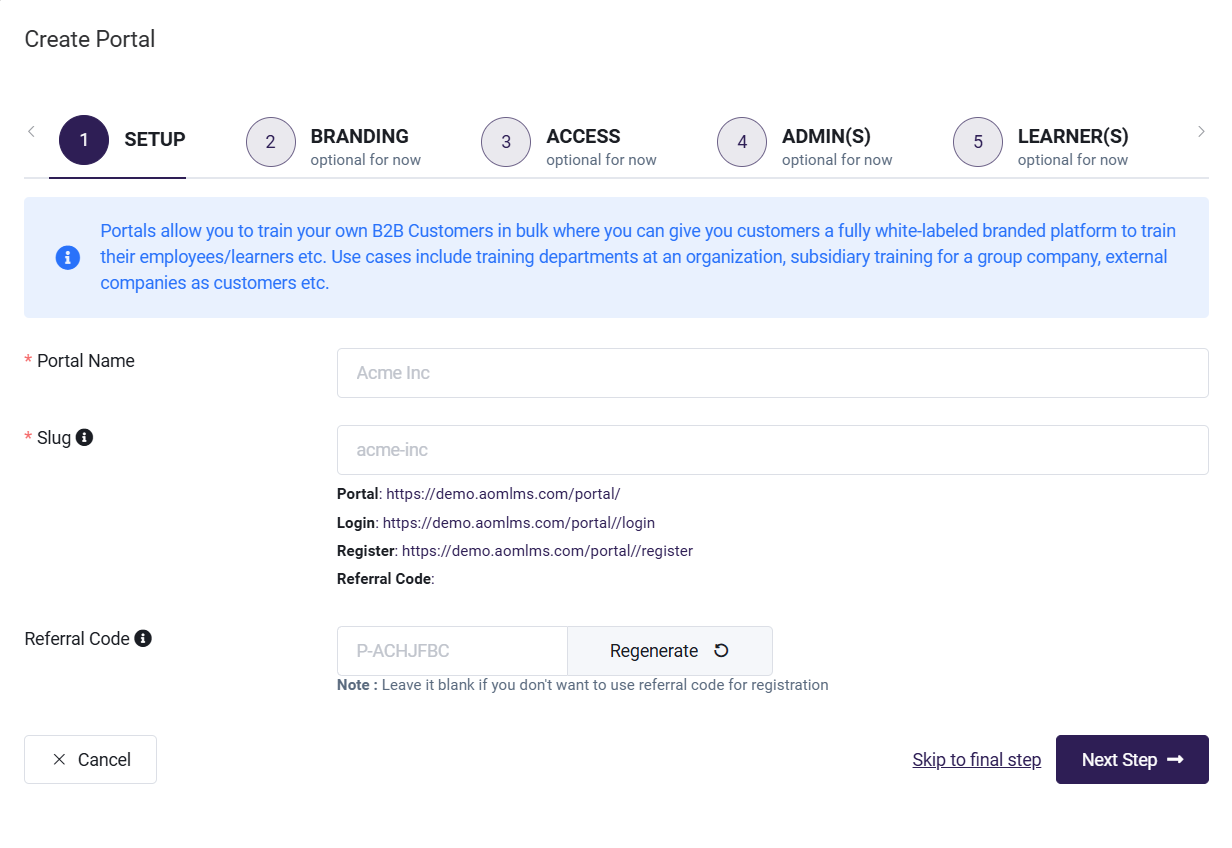
- Click on Create Portal button. A "Create Portal" pop-up form will appear. In the SETUP tab, fill in the following fields:
- Portal Name: Specify the Portal name.
- URL slug: A slug is generated based on the Portal name you provide, which can then be used to create a unique Portal URL for your customer organization. You can also customize the slug according to your preference.
- Referral Code: The referral code generates a unique registration link for learners from the customer organization to self-enroll. If a referral code is added, it becomes mandatory for users during registration. If the referral code is left blank, it will not be visible or required when users register.
- Click on Skip to Final Step and then hit the 'Create Portal' button .
Detailed Method to create Portal
Here's a step-by-step guide on how to add a portal with branding, learners, admins, along with access details and etc.,
- Click on Portals -> All Portals
- Click on 'Create Portal' button
- In the Create Portal pop-up form go to SETUP tab
1. SETUP
- Portal Name: Specify the Portal name.
- URL slug: A slug is generated based on the Portal name you provide, which can then be used to create a unique portal URL for your customer organization. You can also customize the slug according to your preference.
- Referral Code: The referral code generates a unique registration link for learners from the customer organization to self-enroll. If a referral code is added, it becomes mandatory for users during registration. If the referral code is left blank, it will not be visible or required when users register.
2. BRANDING
Each Portal can have its own brand colors, custom styles, logo, and more, making it unique within the platform. To learn more about branding, refer to How to add Branding & Logo in Portal.
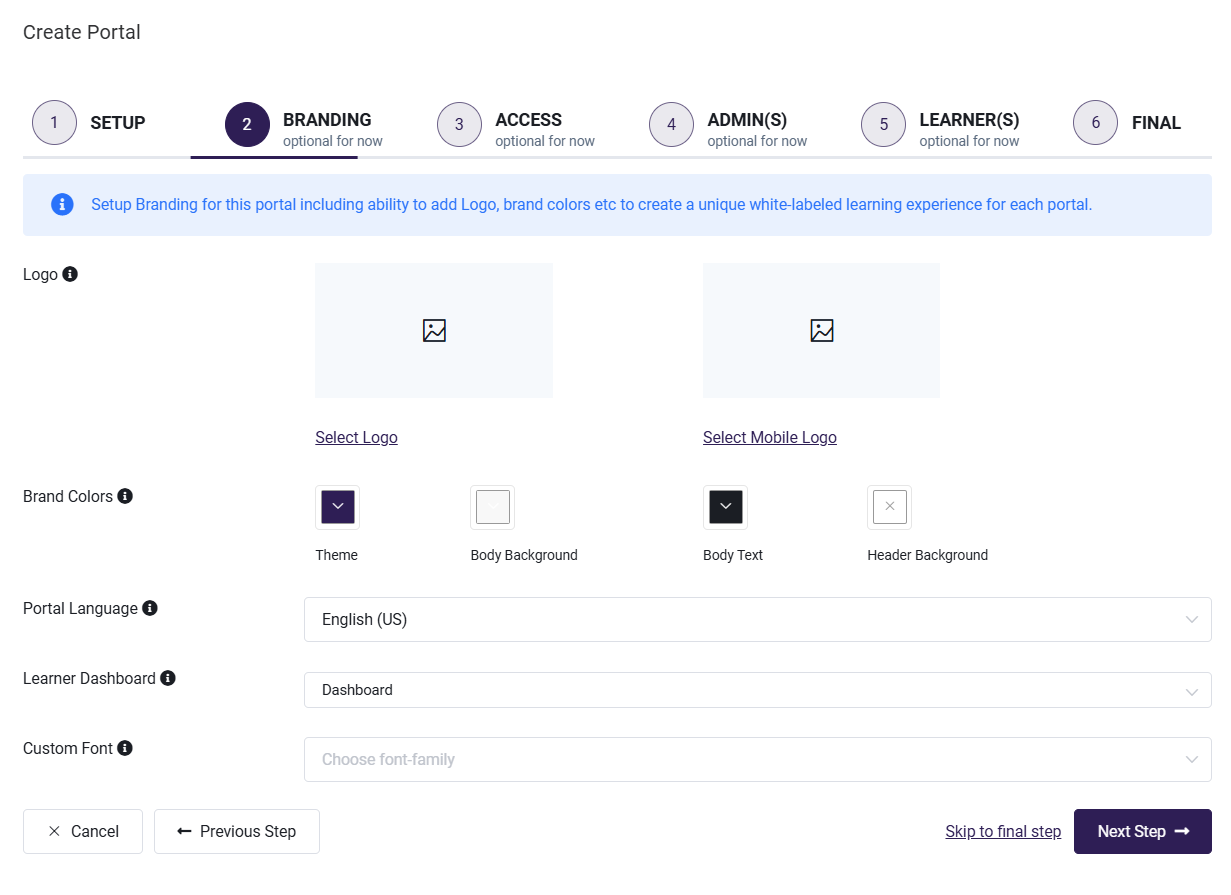
- Logo : A logo is a symbol consisting of text and images that represents your business on the Portal screen. Additionally, upload a mobile-optimized logo designed specifically for smaller devices to ensure a consistent and responsive user experience.
- Brand Colors : Set colors for Theme, Body Background, Body text, Header Background to give a unique look and feel to the Portal.
- Portal Language : Set the default language for the Portal. The choices available are English (US) , Spanish, French and German.
- Learner Dashboard : Set the default dashboard page that learners will see after logging in. Choose from options like Portal Courses, Portal Learning Paths, Portal Announcements, or Portal Membership to customize their experience and ensure they see the most relevant information first.
- Custom Font : Can select a Custom font for the Portal.
Click on Next Step .
3. ACCESS
Assigning Access to a Portal within the AOM platform is indeed a critical step and also enabling Portal users to consume Seats, Courses, Learning Paths and other learning resources.
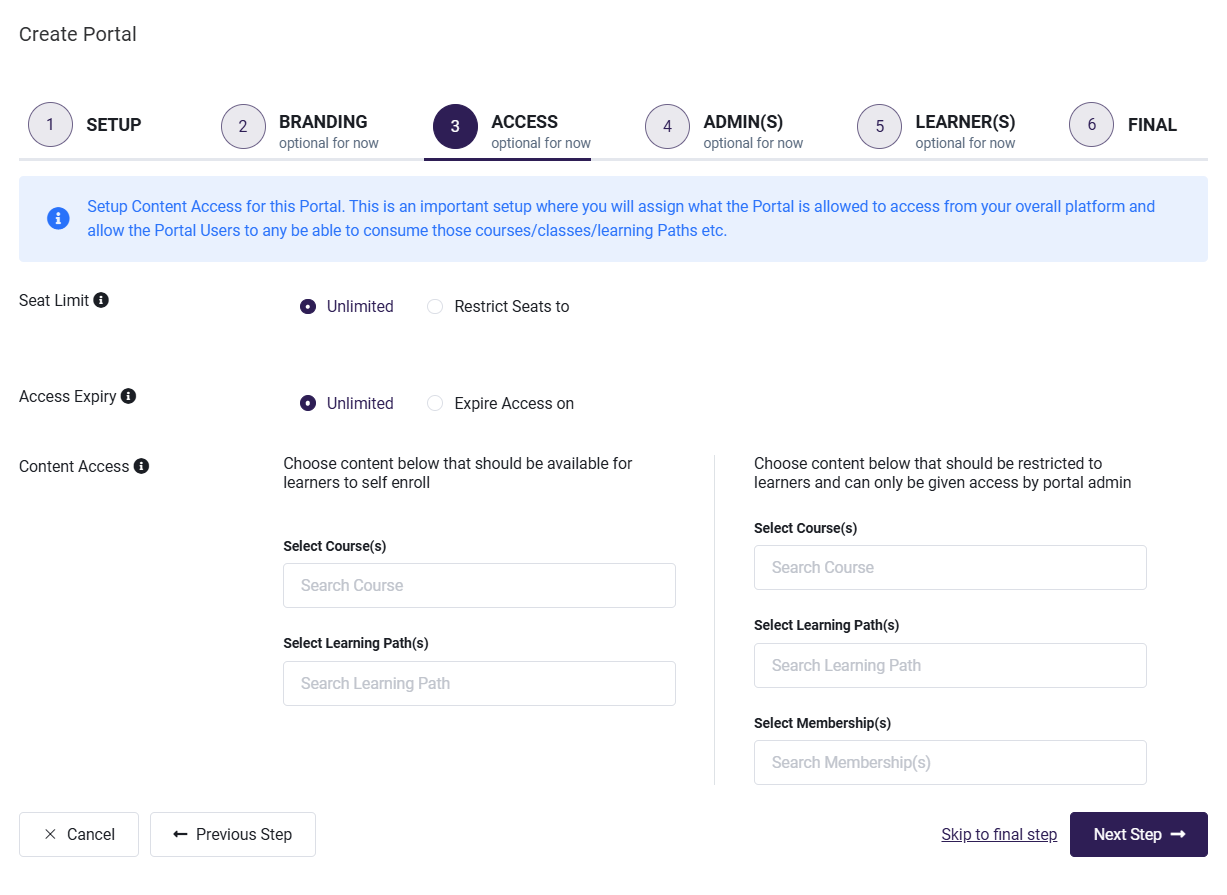
- Seat Limit : This allows you to specify whether seats are restricted to a certain limit or if any number of learners can be added to the Portal. On selecting 'Unlimited' an Admin/Portal Admin can enroll unlimited Learners whereas on selecting 'Restrict Seats to' we can provide a limit to the number of learners that can be enrolled in the Portal. Leave it blank for unlimited access. The seat count includes the total number of unique learners.
- Access Expiry : This setting allows you to determine whether the portal will expire on a certain date or remain open-ended. On selecting 'Unlimited' the portal will be always available. If you select 'Expire Access on' you will have to set an expiry date for the portal. Portal Admins and Learners will lose access to the Portal once the expiry date is reached. Along with the expiry date you will have to provide an Expiry Message which will be displayed when a user tries to access the Portal.

-
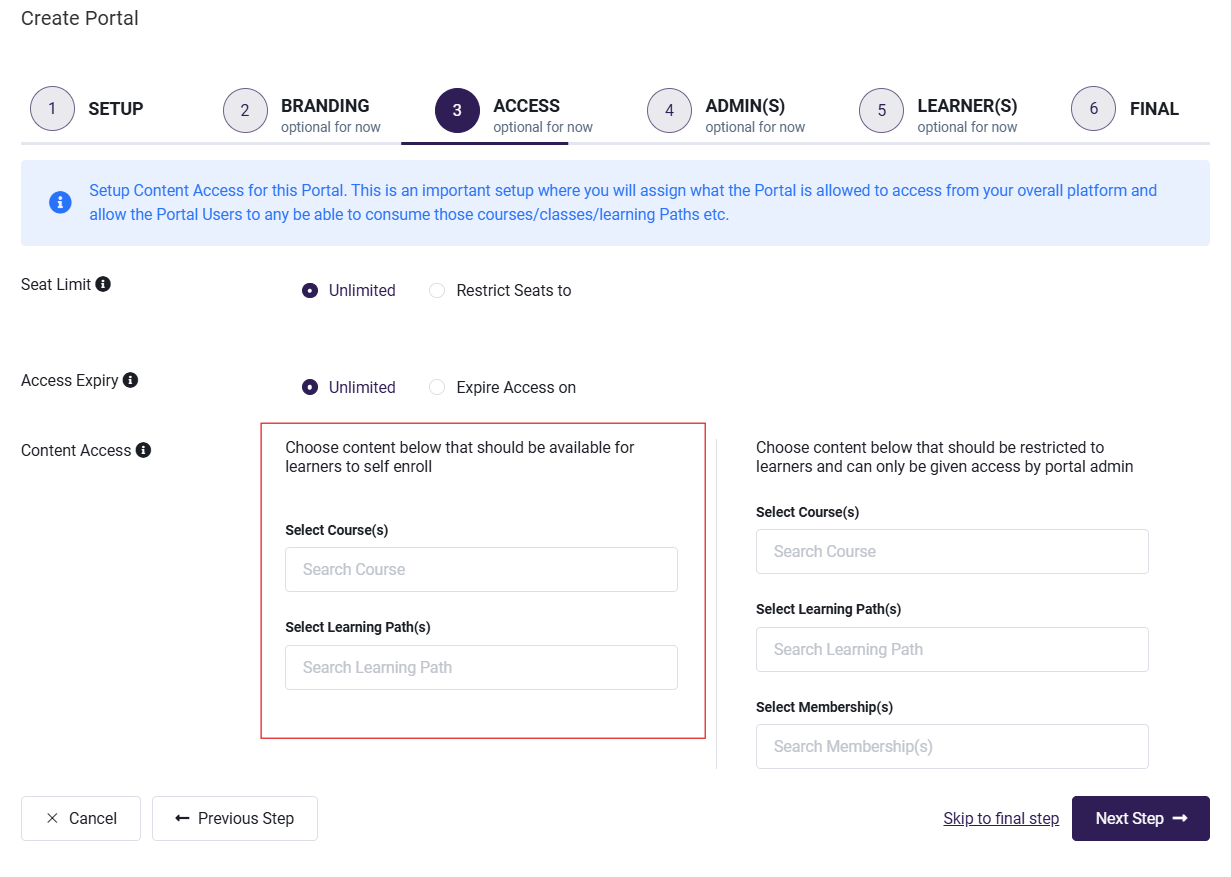
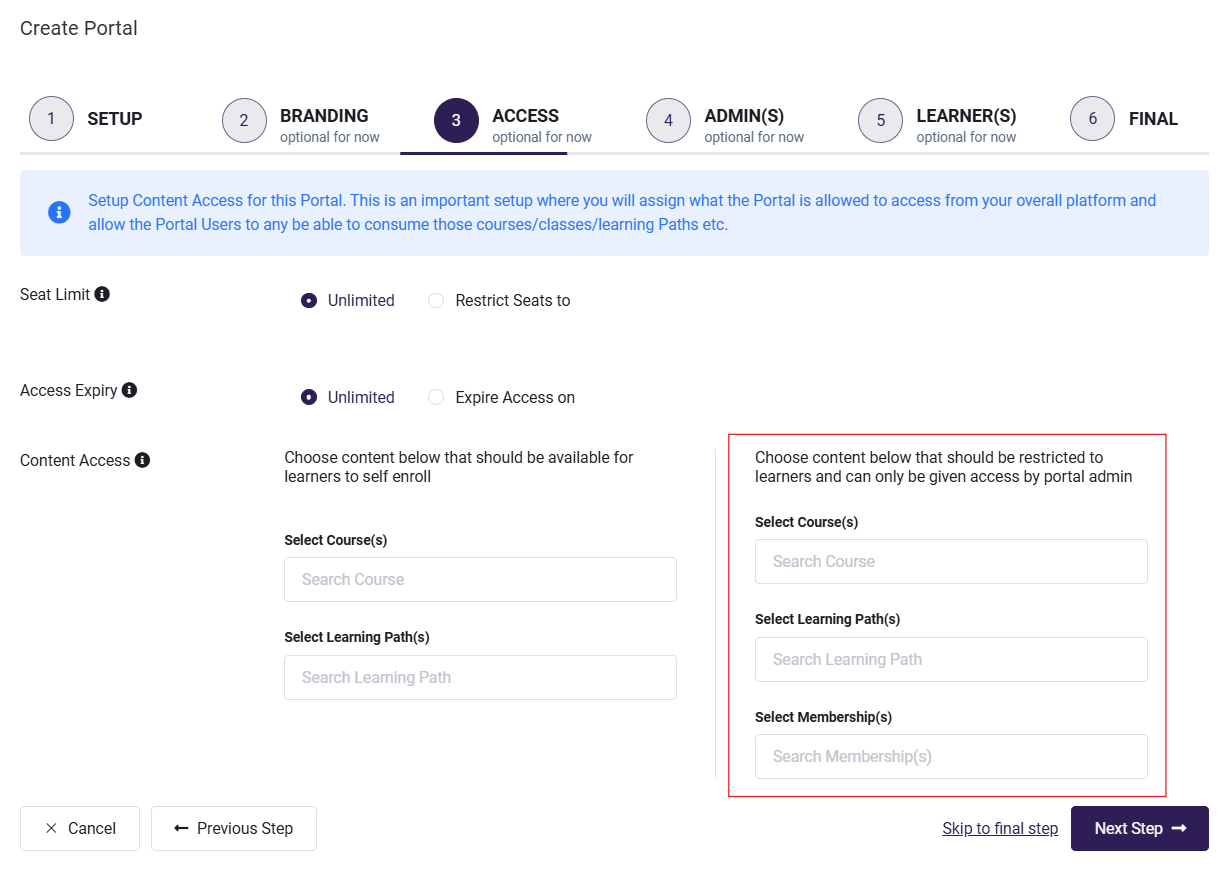
Content Access : This setting allows admins to control which materials, including Courses, and Learning Paths, are available for self-enrollment by learners. These materials can also be restricted and accessed only through admin approval.
Self-Enrollment - Learner access to materials such as Courses and Learning Paths can be made available for self-enrollment, allowing learners to access them independently.
- Restricted - Learner access to materials such as Courses, Learning Paths and Memberships are always restricted and can only be granted through admin approval.
- Click on Next Step
4. ADMIN(S)
You can create, manage, and view admins for each Portal. These admins, known as Portal Admins, are selected from the organization or team associated with a specific Portal. Portal Admins have the authority to oversee and operate within their assigned Portal, performing tasks limited to the permissions granted to them within that Portal.
If a user with the same email address is already registered on the platform, any input provided for first name, last name, and password will be ignored. Instead, the user will be added as an admin to the Portal while keeping their existing information intact.
There are two options for managing Portal Admins:
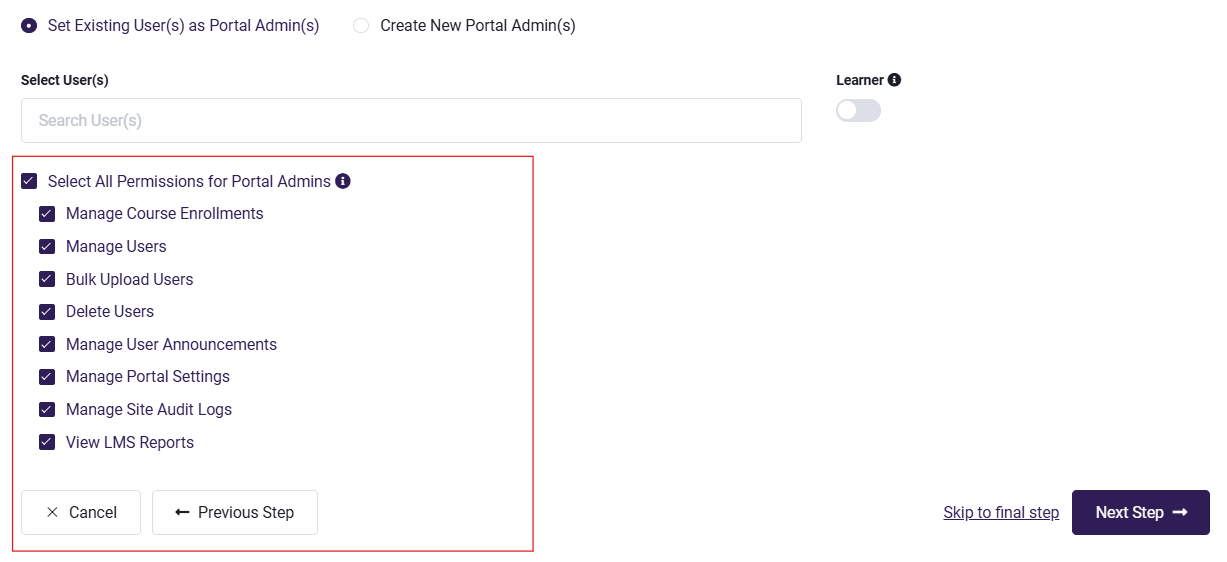
1. Set Existing User(s) as Portal Admin(s): This option allows you to designate an existing user as a Portal Admin. If the user is already registered on the platform, any input for first name, last name, and password will be ignored. The user will be added as an admin to the portal while keeping their existing information intact.

2. Create New Portal Admin(s): This option allows you to add new users as Portal Admins. You will need to provide their first name, last name, email, and optionally a password. If no password is provided, it is autogenerated.
- First Name : First name of the user who needs to be added as Admin.
- Last Name : Last name of the user who needs to be added as Admin.
- Email : Email ID of the user who needs to be added as Admin.
- Password : Leave blank as it will get auto generated or add your desired password.
- Learner? : By toggling this option, Portal Admins will also be allowed to enroll as learners in the Portal courses, which will utilize a seat count if set.
- Click 'Add More' to add admins. A Portal can accommodate multiple administrators.
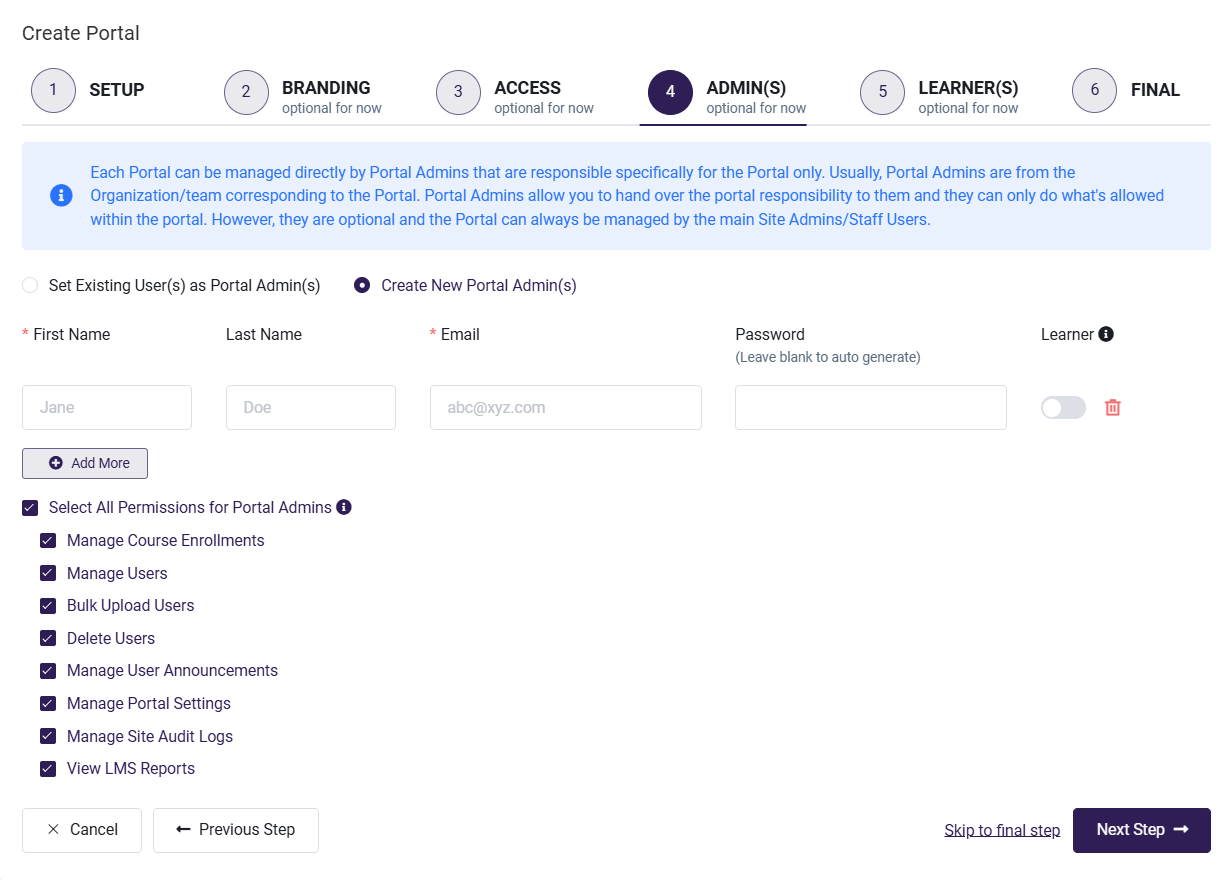
To configure all permissions for the Portal Admins, click on 'Select All permission for Portal Admins' . To allow only certain permissions to the Portal Admins, you can select the permissions according to your preference.
Click on Next Step.
This permission set applies exclusively to a specific portal. Portal Admins are restricted from accessing any other part of the platform.
5. LEARNER(S)
Learners can be added to the Portal individually by adding existing or new users, or in bulk via spreadsheet import. After importing, you can perform necessary post-import actions to assign learners to specific courses, learning paths, memberships, and categories.
If a user with the same email address is already registered on the platform, any input provided for first name, last name, and password will be ignored. Instead, the user will be added as an learner to the Portal while keeping their existing information intact.
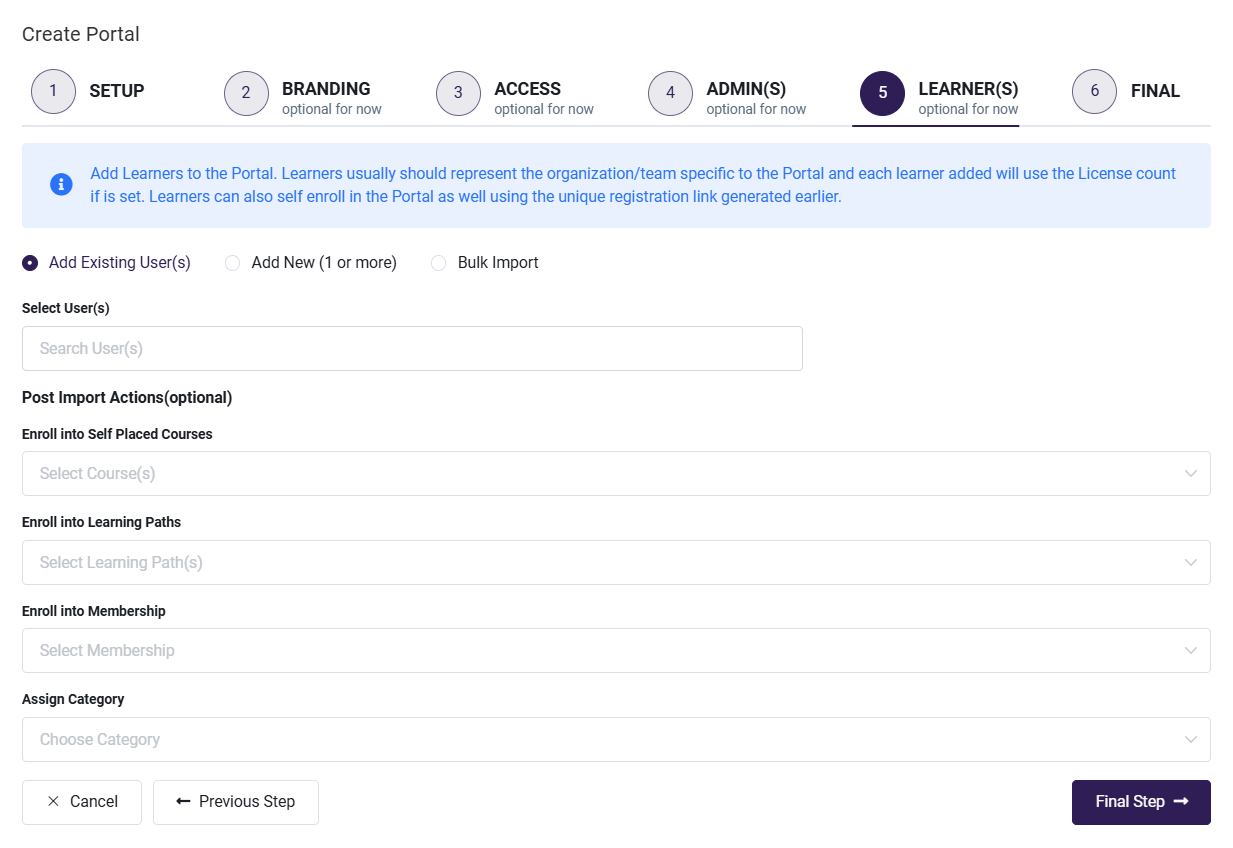
1. Add Existing User(s)
Assign existing users to the Portal. If a user with the same email address is already registered, any input for first name, last name, and password will be ignored. Instead, the user will be added as a learner to the Portal while keeping their existing information intact.
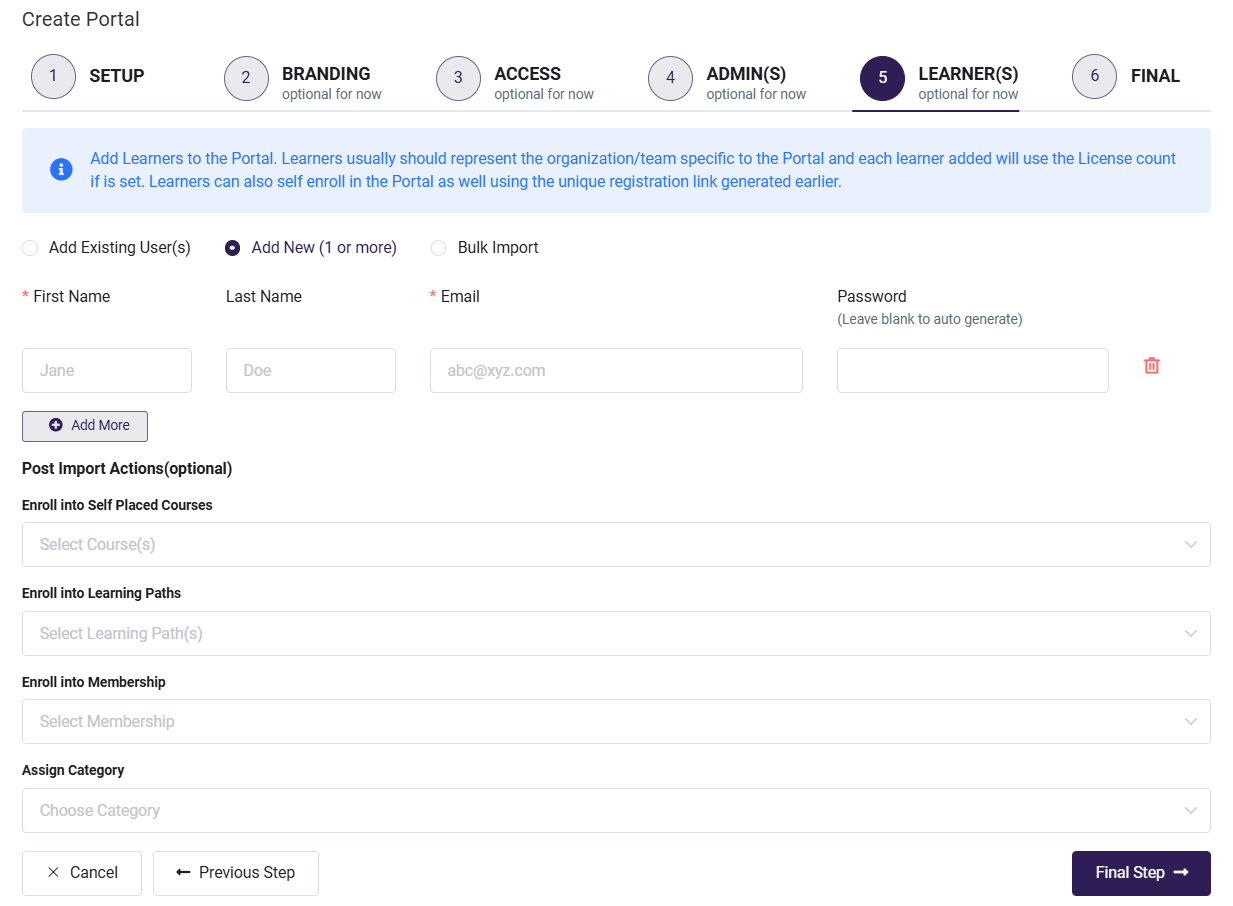
2. Add New (1 or more)
Add new users individually by providing their first name, last name, email, and optionally a password. Leave the password field blank to let the system auto-generate it. You can click 'Add More' to add more learners at once.
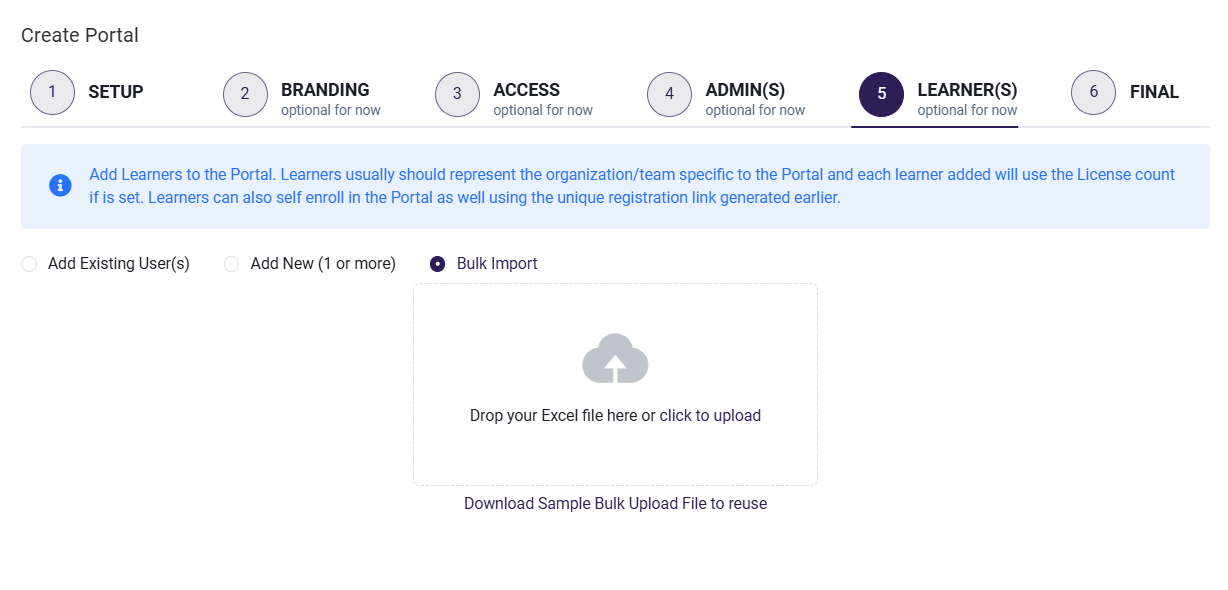
3. Bulk Import
Bulk import learners using a spreadsheet.
- Click on 'Bulk Import' under the Learner(s) tab.
- Download the 'Sample Bulk Upload File' to reuse.
- Fill in all required details in the downloaded Excel sheet.
- Upload the file by dragging it into the upload area or selecting it from your computer.
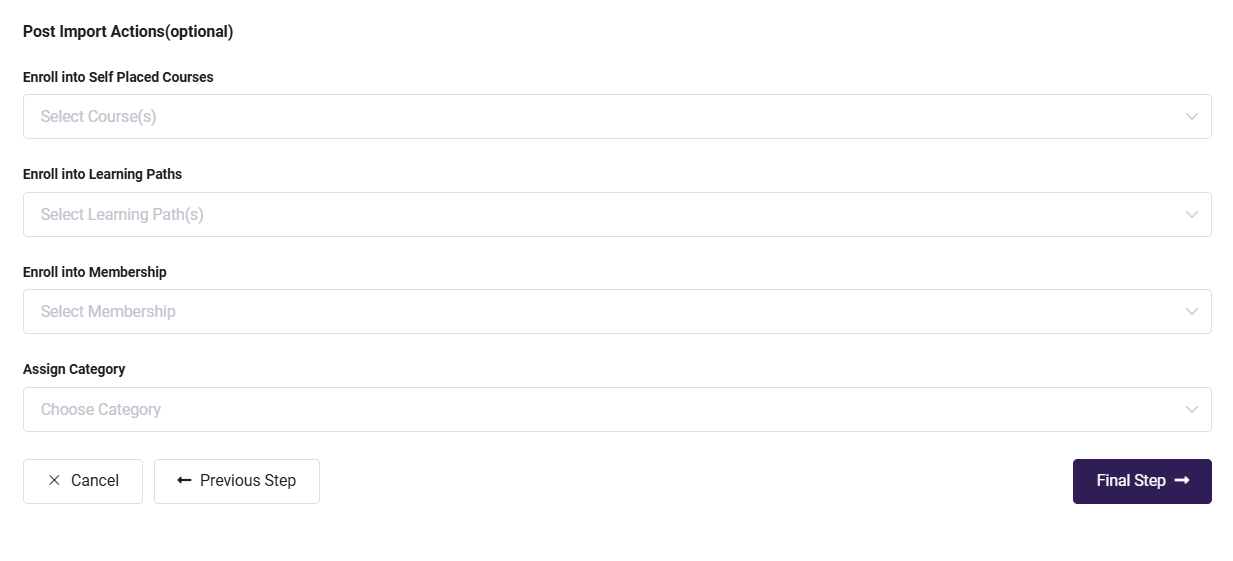
Post-Import Actions
After importing, you can perform several actions:
- Enroll in Courses/Learning Paths/Memberships: Assign learners to the selected learning paths, courses or memberships.
- Assign User Category: Select user categories under 'Assign Category'. Learners in the selected category will be enrolled in the Portal along with the assigned content.
Click on Final Step
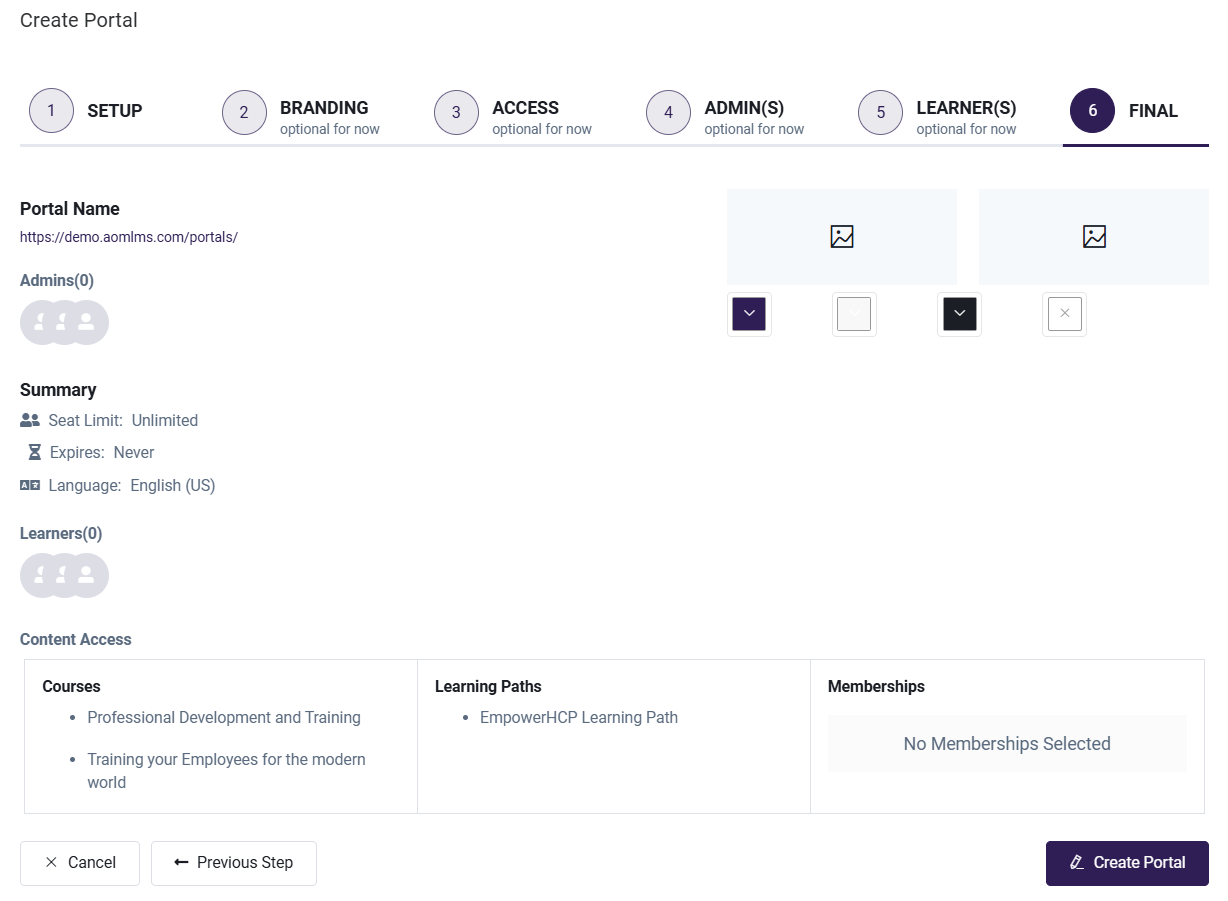
6. FINAL
This page displays a summary of all Portal parameters set across all the tabs.
- Review the details carefully.
- Once verified, click on Create Portal
Create Sub-Portal
A sub-portal is similar to a Portal which will inherit the attributes from its parent Portal by default such as Branding, Access, Admins, and Email. It can be created only after a portal is Created. To learn more about creating a sub-portal please click here.