Automated Account-Related Emails
Automated account emails are directly tied to actions related to a user's account, such as account creation or password reset requests and confirmations. These emails play a crucial role in welcoming users to the platform and ensuring they can log in smoothly to start their journey. This article will provide a detailed overview of the different types of account emails, how to enable and customize their templates, and what users will see when they receive these emails.
For more information on automated emails, please review our guide: Introduction to Automated Emails
Account Email Types
There are three types of Account emails, each triggered by a different action performed on the platform:
- New Account: A New Account email will be sent out to a user immediately after a user profile has been created for them. This can be done either by an Admin creating a new user, or a user creating their own account as part of the checkout process.
- Password Reset Request: Users can receive a Password Reset Request email after they have used the Forgot Password option on the login page. Once they fill out the Reset Password form, a Password Reset Email will be sent to their inbox, allowing them to complete the password reset process.
- Password Reset Success: When a user has completed the password reset process, they will be sent this email to let them know their password was changed successfully. This email is also sent for security purposes. If someone else has changed this user's password, they will be alerted by email and can contact Support to report suspicious activity.
Enabling & Editing Account Emails
Now let's go through how to set up and edit these emails. Each type of automated email must be enabled before it will be sent automatically.
-
From the Admin Dashboard, select Settings, then Email
-
Choose the Accounts tab across the top
-
Then you'll see each of the three Accounts email types on the left: New Account, Password Reset Request and Password Email Success. Select which one you'd like to enable or edit
-
The enabled button must be toggled on for both Primary Recipient or Other Users to be Notified, if you plan on using either. Note that there is not an option for "Other users to be notified" for password related emails.
-
Now, let's look at recipients. There are three different types of recipients who can be named to an automated Account email: the Primary Recipient, Other Users to be Notified, and CC'd Recipients.

-
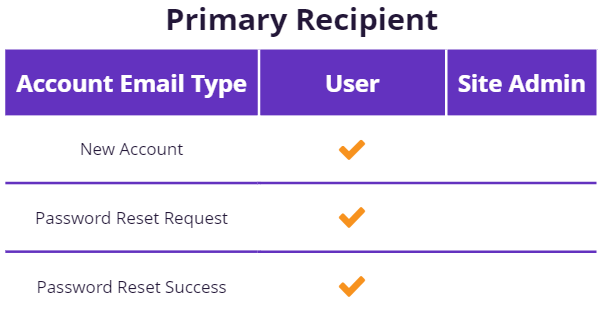
For Primary Recipients:
- Each automated email is sent to a Primary Recipient. Depending on the email type, the default Primary Recipient is either the user the issue is about, or the Site Admin listed in the Site General Settings found in the dashboard at Settings > General.
- Again, note that password reset emails can only be sent to the user. There is no way to add a CC'd recipient or an other user to be notified.
- This chart shows who is set as the default Primary Recipient by Account email type:
-
CC'd Recipients: You can also CC other email addresses to receive these messages if you wish. The addresses can be added to the CC field, separated by commas.
-
Other Users to be Notified: The New Account email type also has an option to send a message to Other Users to be Notified. These other users must be added to the CC field.

- The Other Users to be Notified message uses a separate email template from the Primary Recipient message. It's possible to customize this message in any way you wish. It's generally recommended for the Other Users message to be set up for internal use, and sent to an accounting team for recordkeeping, for example.
-
Subject: You can edit the subject line to be what you'd like
-
Heading: You can also adjust the email heading
-
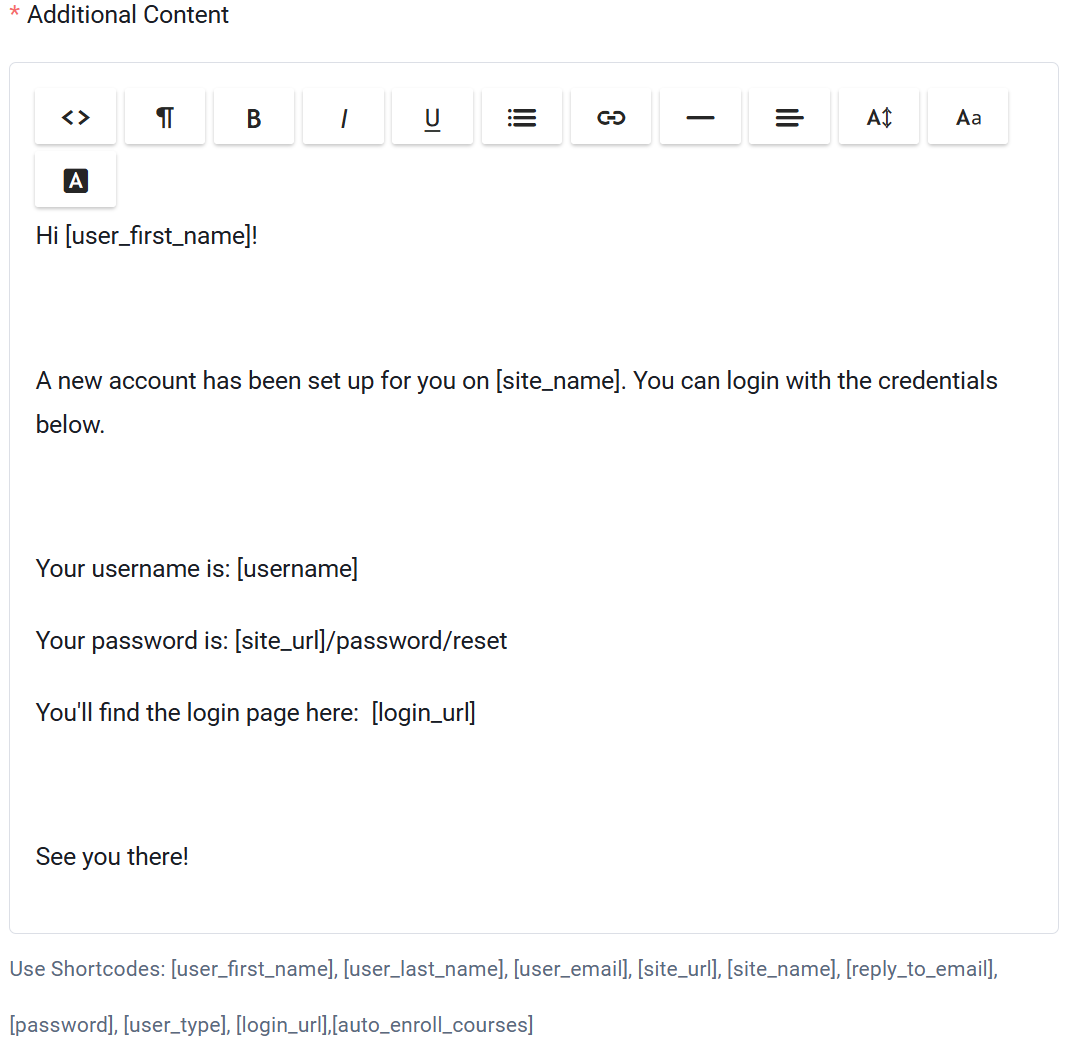
Additional Content: This is the main body of the email and you can change this template as well. As mentioned above, you will see shortcodes at the bottom, which are dynamic fields that will fill with the appropriate information. Simply copy them into your email body if you'd like to use them.
-
Once you have made all necessary changes, click Save Template, or send yourself a test email
User Experience of Emails
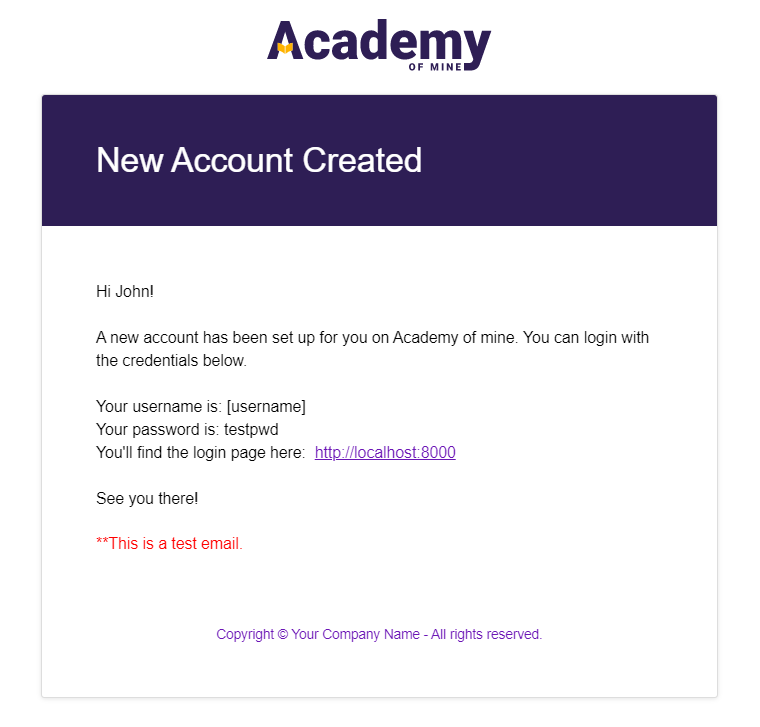
When editing the template of any of the emails above, you will of course see the template that you are typing into. You can send a test email to see what the email will look like to the end user receiving it, though here is an example of what the template looks like, and what the end email looks like, using the New Account Created email as the example. As you can see the template words are transferred over, and the shortcode (dynamic fields) are filled in with the correct information for that user.
The template:
Then this is what a user will see in their inbox:
Next Step
In the next article in this series, learn how Course notification messages are sent with LMS automated emails. They allow Students to submit work for a Course and Instructors to evaluate it: