Using Quizzes and Exams in a Course
Adding a quiz to your course is an excellent way to assess a learner's understanding of the material. If your course offers a certificate based on a grade, quizzes are a vital component in calculating the final grade.
To include a quiz or exam in your course, you’ll need to create a Quiz Module, add questions, and integrate the module into your course. You can design quizzes with various question types, such as short answers, multiple-choice, and multiple-correct options. Quizzes are automatically graded, and you have the flexibility to configure settings such as allowing retakes, specifying a minimum passing percentage, and setting a timer for the quiz.
In this guide, we'll be covering an overview of quiz and question types, how to truly create the quiz module itself as well as the learner experience of a quiz module. While we will be touching on quiz questions, please see Creating Questions for Quizzes for a more comprehensive guide.
Overview of Quiz & Question Types
In a Quiz Module, there are two types of quizzes to choose from. We also have several question types that we'll touch on.
Quiz Types

- Static: A Static Quiz will consist of the set number of questions you have added to your quiz. You can also choose to display those questions in a specific order or shuffle them each time a Learner takes the quiz.
- Dynamic: A Dynamic Quiz will draw its questions from a Question Category, and the quiz experience will be different each time. For example, let's say you have created a Question Category and added 50 questions to it. You can then create a Dynamic Quiz and set the number of questions to be used at 10 questions. The Dynamic Quiz will then randomly choose 10 questions from that list of 50 questions to display for a Learner. This will make the quiz experience different for each learner, and different each time a learner retakes this quiz.
Question Types
- Multiple Choice: these questions can have one correct answer. You can add as many possible answers as you'd like.
- Multiple Correct: Multiple Correct questions are similar to Multiple Choice but can have more than one correct answer. You can add as many possible answers as you'd like.
- Short Answers: With these, the learner is required to type the answer themselves. You can add as many possible answers as you'd like, and keep in mind there may be a variety of ways that learners may type in an answer when you're creating the answers. For example abbreviations, typos, etc.
- Match Answers: Learners will drag and drop answers to order them to match accordingly with the item
There are three ways to add questions to your Quiz:
- Creating questions directly inside the Quiz Module
- Creating questions on the Questions page
- Bulk importing questions via Excel
Learn more about these options and creating Quiz Categories in our Creating Questions for Your Quiz guide.
Creating a Quiz Module
Now that we understand the types of quizzes and questions, let's create the quiz module itself. There are two ways you can add a Quiz to a Course Curriculum.
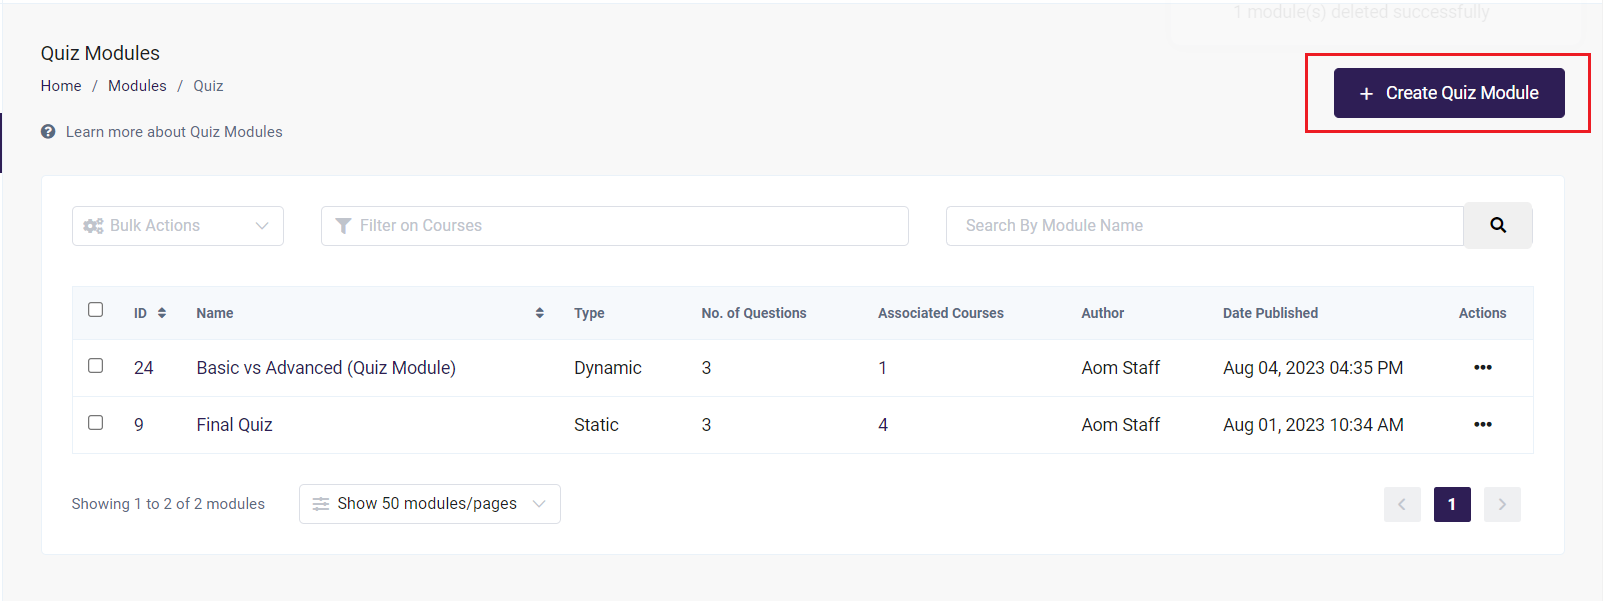
Option 1: From the Quiz Modules page
- From the Admin Dashboard, select Courses, then Quizzes under the Modules header
- Click Create Quiz Module
Option 2: In the Course Builder
- From the Admin Dashboard, select Courses, then All Courses.
- If you are Creating a New Course, select Create Course
- If you are editing a Course, select it from your Courses List
- In your selected Course, go to the Curriculum tab
- Click Add Module and select Quiz from the dropdown menu
- Name your Quiz Module and press Enter
You have now created a new Quiz Module!

Editing your Quiz Module
-
Click the Edit icon. This will open a new tab or window where you can edit and begin editing your Quiz Module.
-
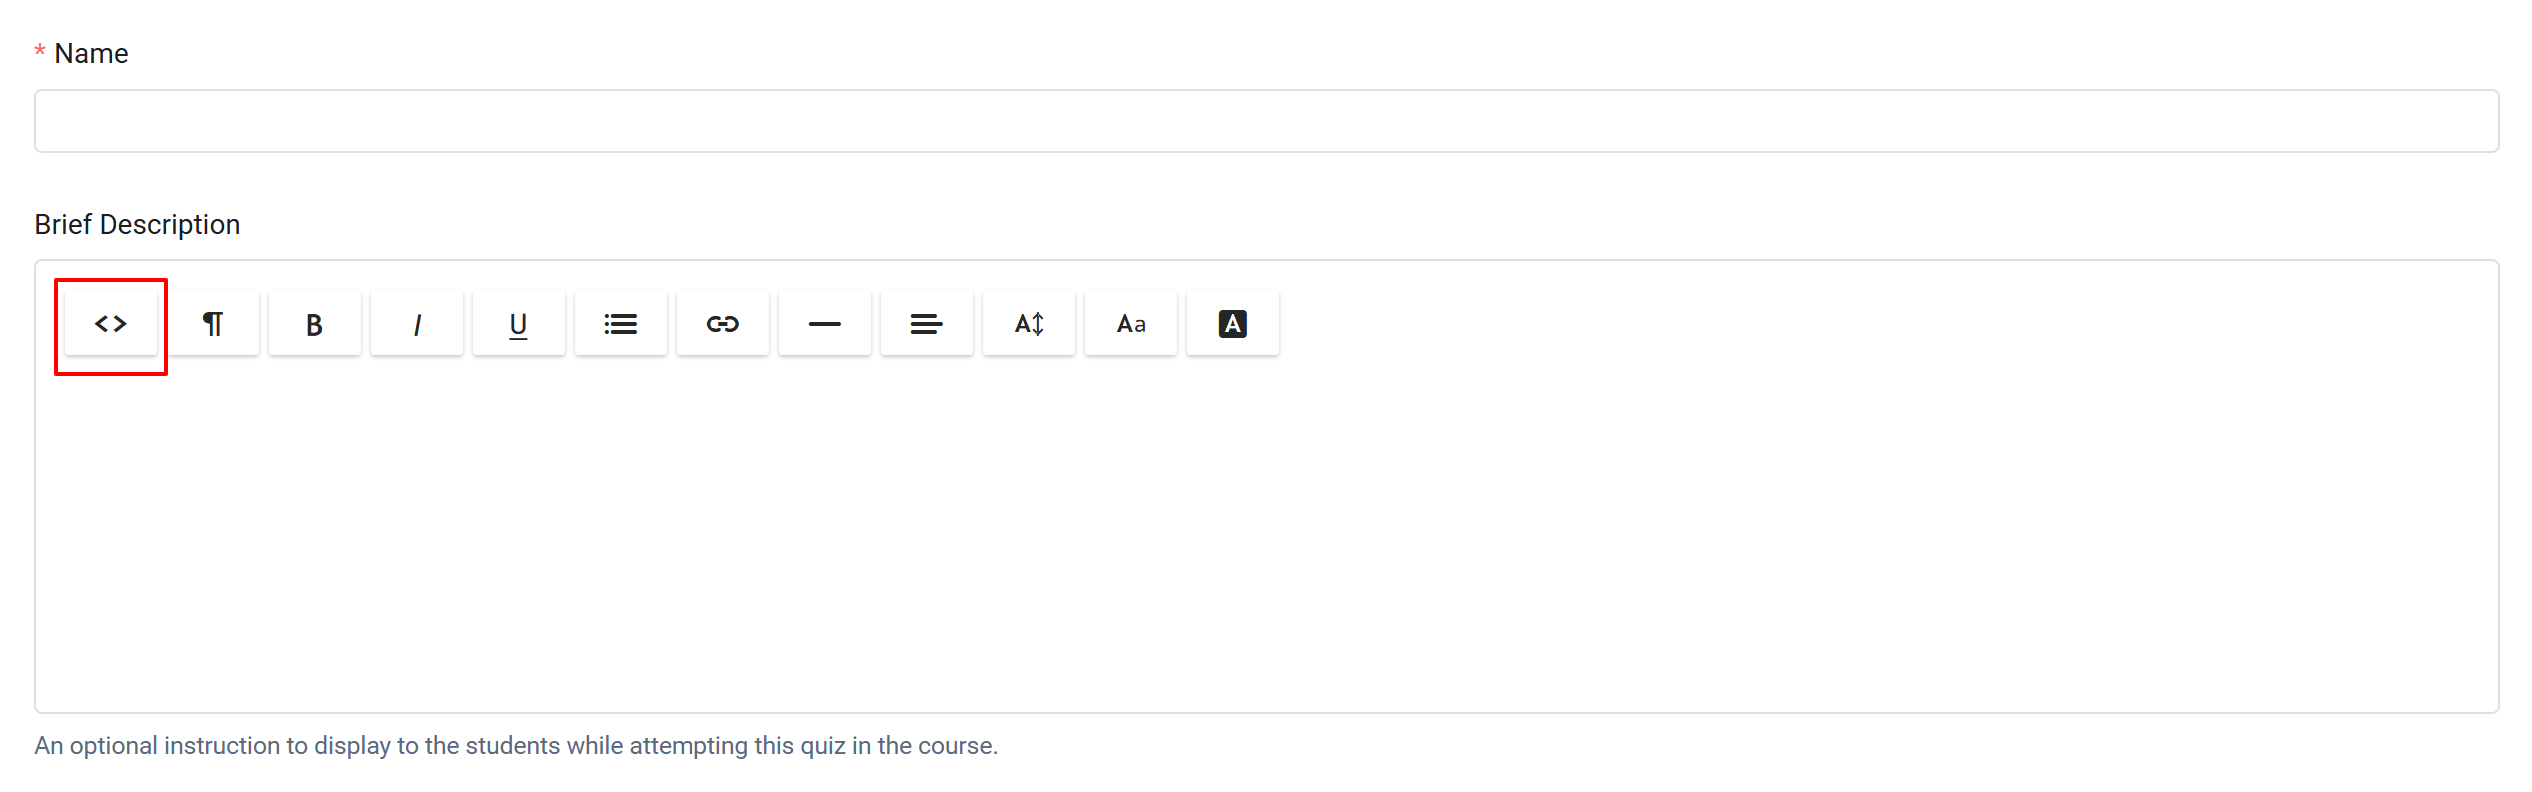
Enter a Name and Brief Description for the module
-
The Brief Description area is where you can provide instructions or additional information for your Quiz Module to guide learners before they begin. This text will appear in a pop-up box when a learner clicks the Show Instructions button. By default, this area supports text only. However, by clicking the HTML Code Editor button, you can insert images, videos, or other custom content using your own HTML code.
-
-
Choose the Quiz type: Static or Dynamic
- See Quiz Types
-
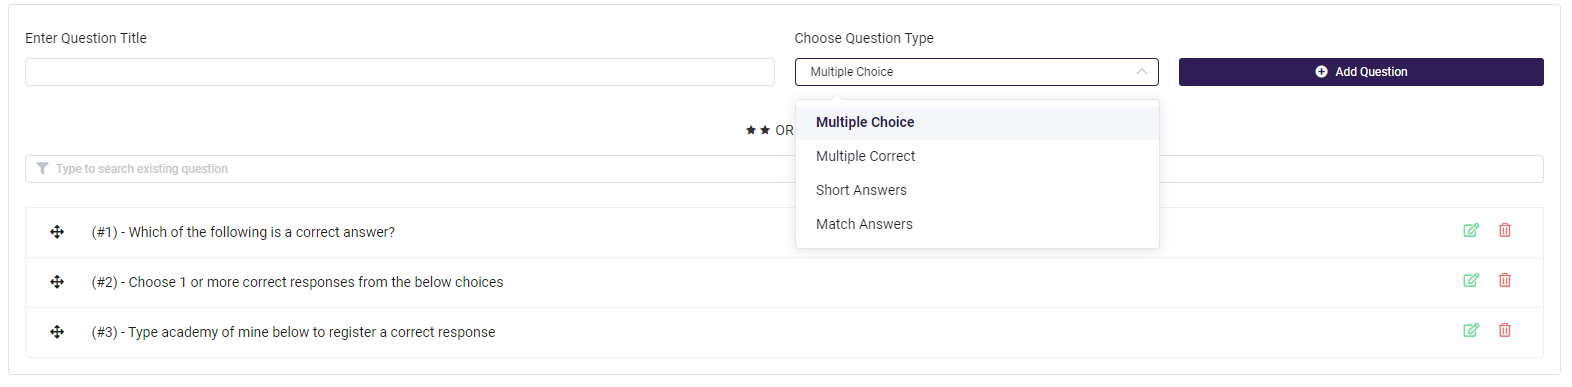
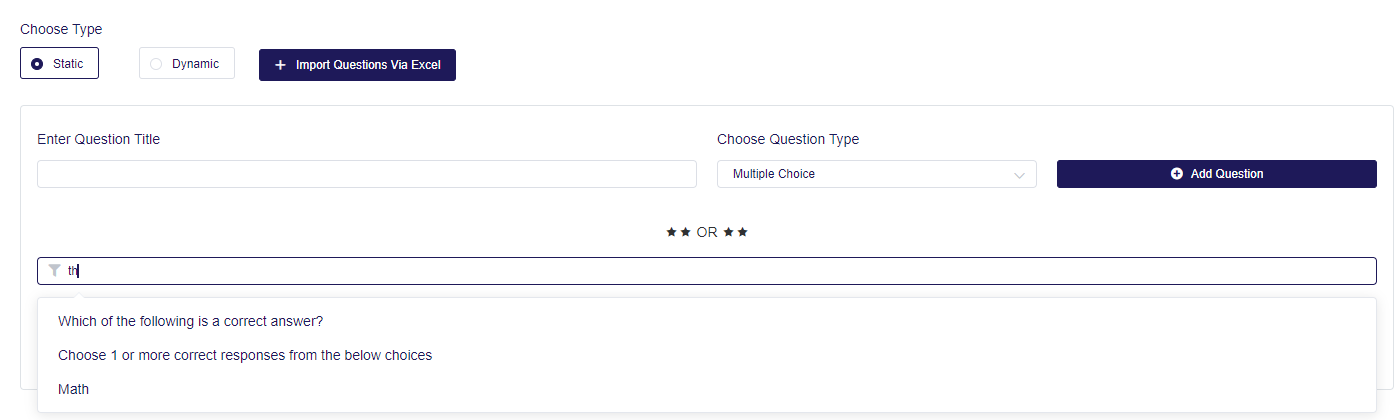
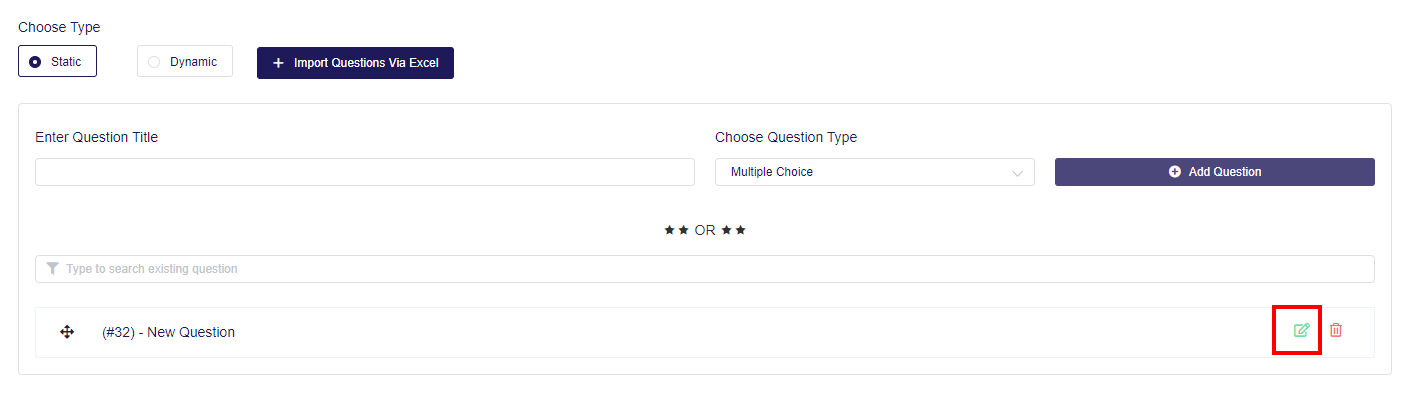
If you choose Static, you have three ways to add questions to your Quiz
- Add Existing Questions to Your Quiz: Already created questions are stored on the Questions page and can be added individually to any Static Quiz. Select your questions from the Search Existing Question field to add them to your Module. See Creating a Question on the Questions Page for more details
Import Questions from Excel: Click Import Questions Via Excel and upload the question file. See here for more information on formatting: File Format for Bulk Import
- Add a New Question: Enter the Question Title and Choose Question Type. Click Add Question. Then click the edit button to add the information for your Question. See Creating a Question Inside a Quiz Module for more details
Quiz Edit button
-
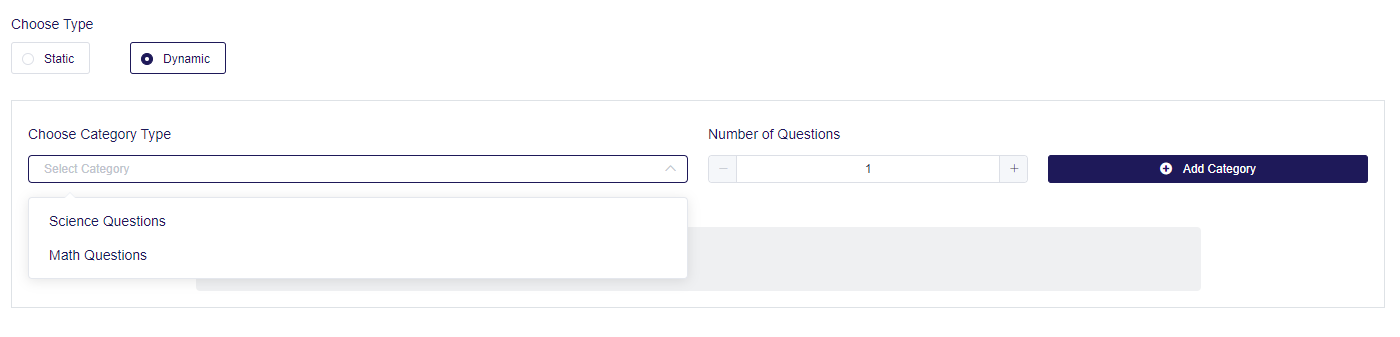
If you choose Dynamic, you'll need to select a Question Category. Questions are added to Dynamic Quizzes only after they are first bundled together in Question Categories. Check out this article for more information: Question Categories.
Select the category you would like to include in your quiz, and then select the number of random questions you would like pulled from that category and used in your quiz:
Choose Category

Quiz Settings
- Shuffle Your Questions: If you enable this option, the questions you have selected for your Module will be displayed in a random order to your learner.
- Force Sequential Ordering: Enabling this option will block your learner from skipping a question and moving on to the next one. All questions must be answered in the order they are listed.
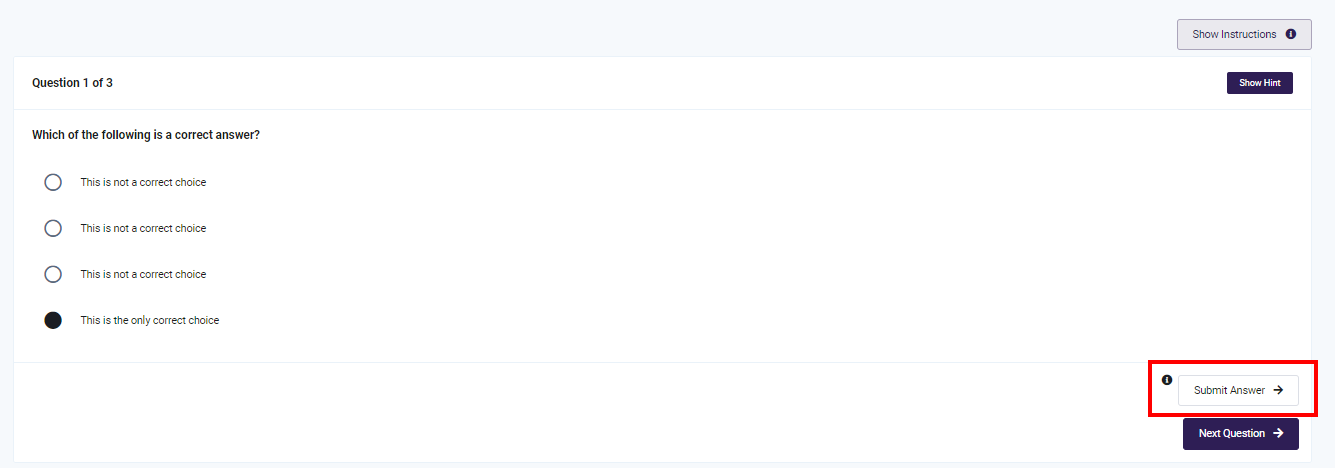
- Real-Time Grading: When enabled, learners will automatically see if they answered a quiz question correctly. A Submit Answer button will appear on each question, as seen below. Clicking this will lock the question, and then grade the question. Once a question is submitted, the answer cannot be changed. If the Submit Answer is not clicked, their answer will be saved and their selection can still be changed later on. However, if a learner clicks the Submit Quiz button when they reach the final question, all previously saved answers will be submitted.
Submit Answer button
Using Realtime Grading with Show Correct Answers in Scorecard

Show Correct Answers options
When Real Time Grading is enabled, the answers shown to the learners will follow the settings under the Show Correct Answers In Scorecard option.
- Always: A learner will see the answer and an explanation when they click Submit.
- Never: A learner will see if their answer is correct or incorrect, but the answer will not be visible.
- Not When Retake is Allowed: The answer and explanation will only be revealed if the learner has exhausted their retakes. If they still have retakes, their answer will only be shown as correct or incorrect.

More Quiz Settings
- No. Of Retakes Allowed: If a learner does not reach the minimum passing percentage of a quiz, you can offer them a set number of chances to attempt the quiz again. Leave blank if no retakes are allowed.
- Set a Minimum Passing Percentage: You can set a minimum passing percentage for your quiz. This is used for grading purposes, and if you are using certificates that are based on grading requirements.
Warning: If a learner has exhausted all their retakes without passing, a Quiz will still be marked*** Completed.* This allows a learner to complete the rest of the Course. However, when setting the Grading & Certificates** for a Course, you can make it so a learner will not receive the certificate for this course if they have failed the Quiz.
Show Correct Answers
-
Show Correct Answers in Scorecard: When a learner completes their quiz, they will be shown their Scorecard. You have three options for how correct answers are displayed:
- Always: Shows the correct answers at the end of the Quiz, no matter if the learner has passed or failed.
- Never: Correct answers are not shown at the end of the Quiz.
- Not When Retake Allowed: If a learner passes the Quiz, the correct answers will be displayed. If the learner fails, the correct answers will be displayed only after they have exhausted all of their retakes.
- When using Real-Time Grading, see here: Real-Time Grading and Show Correct Answers in Scorecard
Check this out for more information on the Scorecard.

Timer Settings
- Maximum Timer: Sets the maximum amount of time a learner can spend within a Quiz Module. Once the timer runs out, all saved answers will be submitted and the Module will be locked.

Associated Courses
- Associated Courses: If this is a brand new Quiz Module, this section won't be visible. Once the Module has been saved or added to a Course, this area will list all the other Courses that also include this Module.
Now you are done creating your Quiz Module! Once the module has been saved, you can add it to a Course using the steps below.
For more information on viewing, editing, or deleting existing Modules, see this article.
Adding a Quiz Module to a Course
Let's add your brand new Module to a Course!
- From the Admin Dashboard, choose Courses, then All Courses.
- Select the Course you wanted to add this module to, click the three-dot action menu, and select Edit
- Click the Step 2: Curriculum tab and scroll to the bottom of the page.
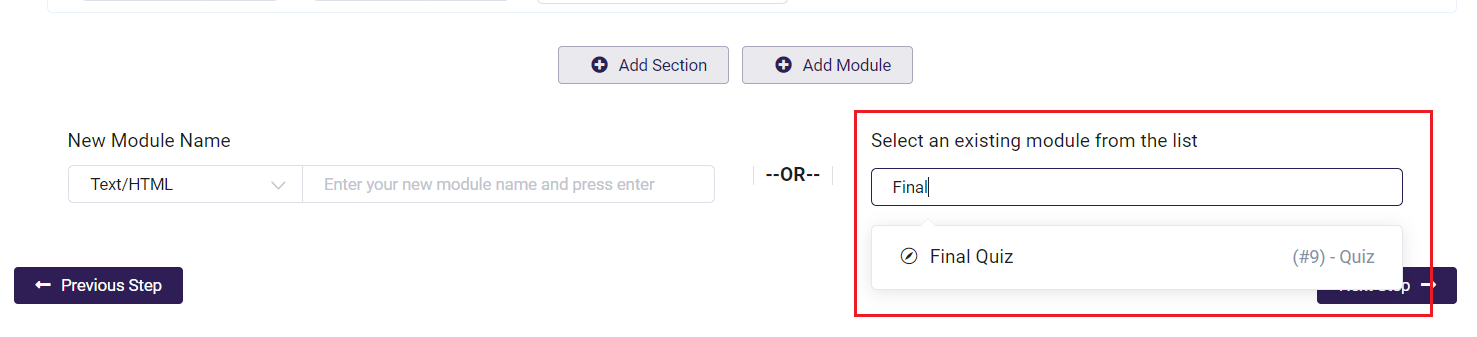
- Click Add Module and search for the module's name
Add and Search for Module Name
- Search the drop-down menu for your Module name, and select it.
- Once the Module is added to the bottom of your course list, you can go back into the **Edit screen** to make changes.
- Click and drag the modules to rearrange them in the order you want them to appear in the course.
***Warning*** - Any changes made to a Module will reflect across **all other Courses** that the Module is associated with.
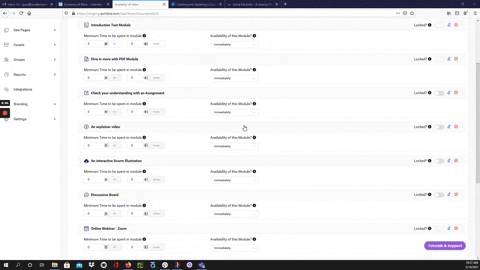
You have the option to:
- Lock the Module: This forces a learner to complete a Module before being able to move on in the course

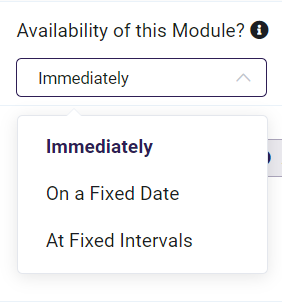
- Set Availability: This dropdown menu allows you to make the Module available Immediately, on a Fixed Date in the future, or at Fixed Intervals. This gives an Admin or Instructor the ability to make modules available to learners over time or to restrict learners from completing a course too early.
- Minimum Time Spent: If set, this option sets a required minimum time a learner must spend within a certain module before being able to progress in the course.

Minimum Time Spent
- Assign Badge or Points: The option to assign a Badge or Points will only be available if Gamification is enabled from the Gamification section under Settings. See Using Badges, Points and Tiers with Gamification to learn more.

Gamification Settings
- Save your Course changes by clicking Update Course in the upper right corner. If you navigate to another section of the platform before clicking this button, your changes will not be saved.
Please see this guide for the full details of Creating and Updating a Course.
Using Quizzes in Course Grading
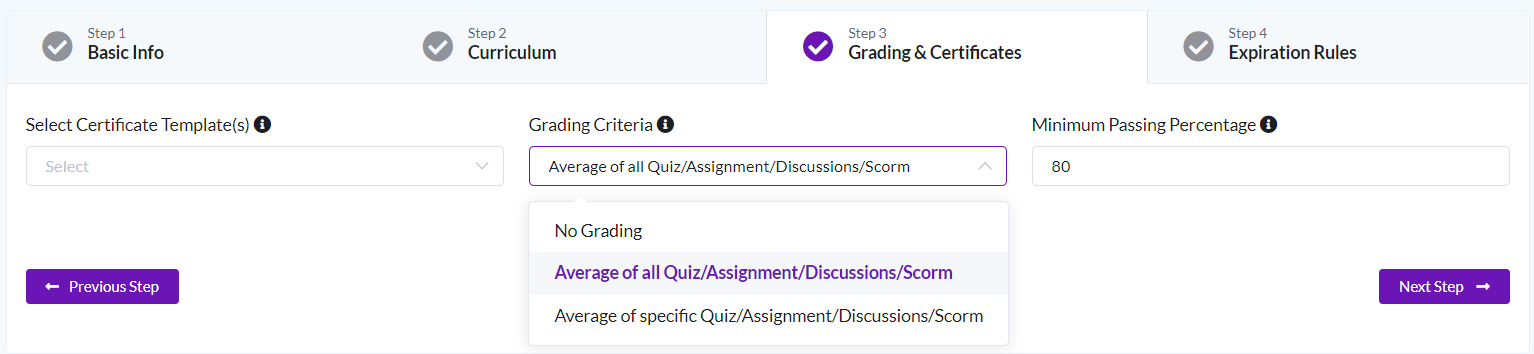
If using Grading Criteria in your Course, Quizzes can be included to calculate the final grade a learner receives. While editing or creating your Course, in the Grading & Certificates section, you can choose to get an average of all graded Modules or specific Modules that you choose.
If setting a Minimum Passing Percentage, a learner's average will need to meet or exceed this percentage in order to complete the course.
For more details, check out Creating and Updating a Course.
Learner Experience of a Quiz Module
Let's go over what a learner will see during the quiz, and what their scorecard will look like.
During the Quiz
A learner's view while taking a quiz will look like this:
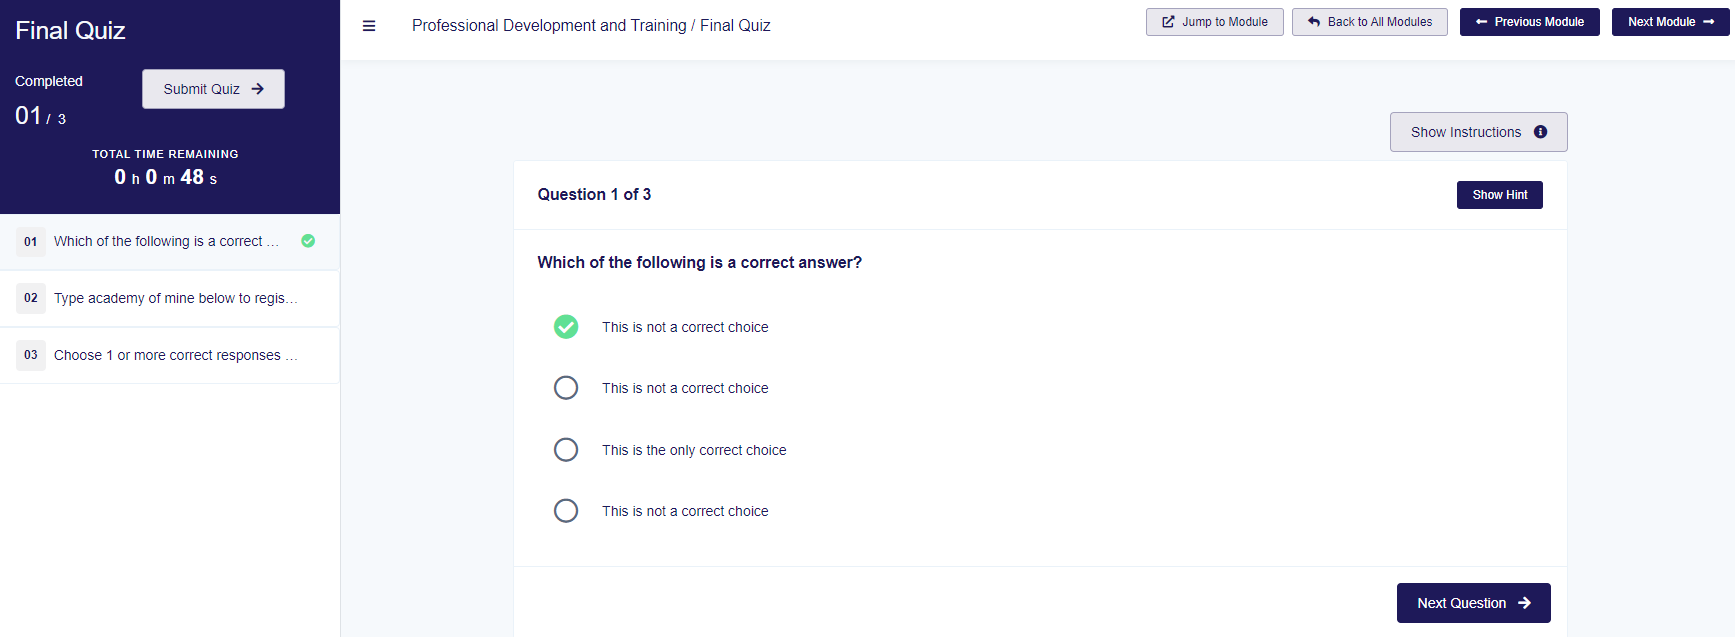
- On the right side is the Show Instructions button to display the quiz instructions the instructor has provided.
- There is also an optional Show Hint button if the instructor has provided a hint for the question currently being viewed.
Scorecard
When a learner answers all the questions, or the timer runs out, they can select Submit Quiz. The quiz will be graded instantaneously and the learner will be able to see their Scorecard. A scorecard will include their Total Score, the correct answers to each question, and an explanation (if one was included while creating a Question) See Creating Questions on the Questions Page for more information on including explanations.
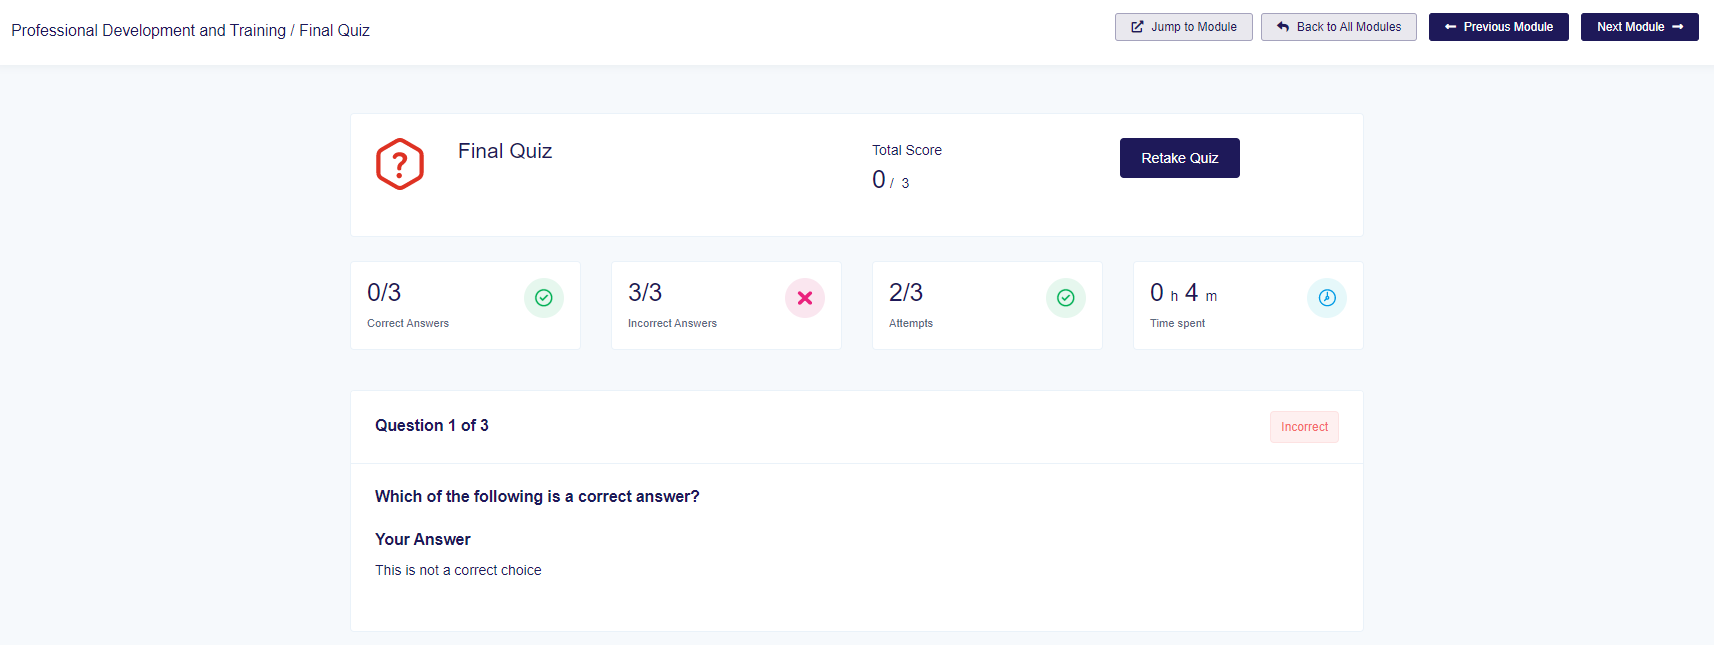
Regarding Retakes:
- A passing quiz will say No Retake Allowed since the learner doesn't need to retake it.
- A failed quiz will include a Retake button if the instructor has allowed for retakes. As long as the learner hasn't exhausted their Retakes, this button will be visible.
You can also configure an email that is sent when the learner submits the quiz. This email is sent to the instructor/author of the course. See this guide to learn more about this email - Automated LMS Emails